
Rooftop Kale Growing Tips: Imagine stepping onto your rooftop and harvesting fresh, vibrant kale, ready to be transformed into a delicious and healthy meal. Sounds idyllic, right? Well, it’s more achievable than you might think! For centuries, urban dwellers have sought ways to bring nature closer, and rooftop gardening, particularly with resilient greens like kale, has become increasingly popular. From the hanging gardens of Babylon to modern-day urban farms, the desire to cultivate our own food in limited spaces is deeply ingrained in human history.
But why kale, and why on your roof? Well, kale is a nutritional powerhouse, packed with vitamins and antioxidants. And let’s be honest, buying organic kale at the grocery store can be expensive! That’s where these rooftop kale growing tips come in. I’m going to share some simple, effective DIY tricks and hacks that will help you transform your rooftop into a thriving kale garden, even if you’re a complete beginner.
This DIY guide is essential because it addresses the unique challenges of rooftop gardening – things like limited space, sun exposure, and container gardening techniques. We’ll cover everything from choosing the right containers and soil to protecting your kale from pests and diseases. So, get ready to roll up your sleeves and discover the joy of growing your own delicious, healthy kale, right on your rooftop!
Your Own Rooftop Garden: Kale Growing Made Easy!
Hello dear garden friends! Do you also feel that your balcony or garden simply doesn’t offer enough space for all your vegetable dreams? Then I have the perfect solution for you: a rooftop garden! And what could be better to grow there than kale? Kale is super healthy, incredibly versatile, and surprisingly easy to grow, even on a roof. I’ll show you how to create your own little kale heaven on your roof!
What you need for your rooftop garden:
Before we get started, here is a list of everything you need for your kale rooftop garden:
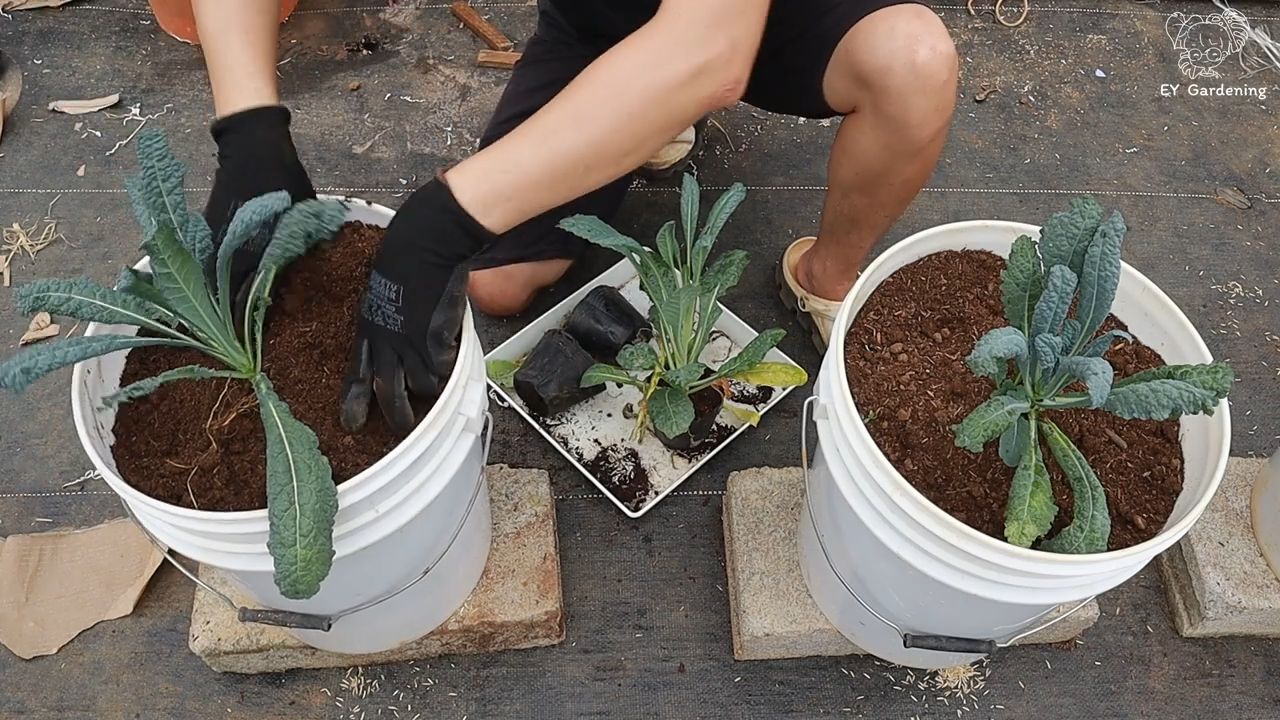
- Suitable containers: Large pots, planter boxes, or even recycled containers (with drainage holes!) are perfect. Remember that kale needs space to grow, so choose containers with sufficient volume.
- High-quality soil: Use well-draining, nutrient-rich potting soil. I recommend using special vegetable soil, as it is already enriched with important nutrients.
- Kale seeds or young plants: You can either grow kale from seed or buy young plants at a garden center. Both work well, but you’ll save some time with young plants.
- Fertilizer: An organic fertilizer, such as compost or horn shavings, is ideal for providing your kale plants with enough nutrients.
- Watering can or garden hose: To water your plants regularly.
- Gardening tools: A small shovel, a rake, and possibly garden shears.
- Pest protection: Depending on the region, pests like cabbage white butterflies or snails can be a problem. Be prepared to protect your plants.
- Sun protection (optional): On very hot days, a sun sail or shade net can be helpful to protect your kale plants from sunburn.
- Wind protection (optional): It can be windy on a roof. A windbreak, like a hedge or a fence, can protect your plants.
Preparation: The Key to Success
Before we start planting, good preparation is crucial. Here are the most important steps:
- Rooftop check: Before you even begin, you should make sure your roof is suitable for a garden. If in doubt, ask a structural engineer if your roof can bear the additional load. Also, make sure your roof is waterproof and has no damage.
- Cleaning: Thoroughly clean your roof of dirt, leaves, and other debris. This ensures a clean workspace and prevents pests from settling in.
- Prepare containers: Make sure your containers have drainage holes so that excess water can run off. You may want to place a layer of gravel or clay shards at the bottom of the containers to improve drainage.
- Fill with soil: Fill the containers with the prepared soil. Leave about 2-3 cm (about 1 inch) of space to the rim so you don’t overflow everything when you water.
- Choosing a location: Kale needs a lot of sun, at least 6 hours a day. Choose a sunny spot on your roof for your containers. Also, make sure the location is protected from strong winds.
Planting Kale: How to Do It Right
Now comes the exciting part: planting! Here are the steps you should follow:
- Sowing seeds (optional): If you want to grow kale from seed, sow the seeds about 1 cm (0.4 inches) deep in the soil. Keep the soil moist, but not wet. Germination usually takes 5-10 days. When the seedlings are large enough, you can transplant them into larger containers.
- Planting young plants: If you have bought young plants, dig small holes in the soil large enough to accommodate the root balls. Carefully insert the plants and press the soil down lightly. Make sure the plants are not set too deep.
- Watering: Water the plants thoroughly after planting. This helps them to get established.
- Keep your distance: Make sure the plants have enough space between them. Kale needs room to grow. A distance of 30-40 cm (12-16 inches) between plants is ideal.
Caring for Your Kale Rooftop Garden: So It Greens and Thrives
Care is crucial for your kale rooftop garden to flourish. Here are my best tips:
- Regular watering: Kale needs regular watering, especially during dry periods. It is best to water the plants early in the morning or late in the evening to avoid evaporation. Make sure the soil is moist, but not wet. Avoid waterlogging, as this can lead to root rot.
- Fertilizing: Fertilize your kale plants regularly to provide them with sufficient nutrients. Use an organic fertilizer, such as compost or horn shavings. Fertilize every 2-3 weeks during the growing season.
- Pest control: Check your plants regularly for pests such as cabbage white butterflies, aphids, or snails. In case of infestation, you can use natural pesticides, such as neem oil or a soap solution. It is best to collect snails by hand.
- Remove weeds: Regularly remove weeds from your containers. Weeds compete with your kale plants for nutrients and water.
- Remove wilted leaves: Regularly remove wilted or yellow leaves. This promotes the growth of new leaves and prevents the spread of diseases.
- Wind protection: If your roof is very windy, you should install a windbreak for your plants. A windbreak can consist of a hedge, a fence, or a shade net.
- Sun protection: On very hot days, a sun sail or shade net can be helpful to protect your kale plants from sunburn.
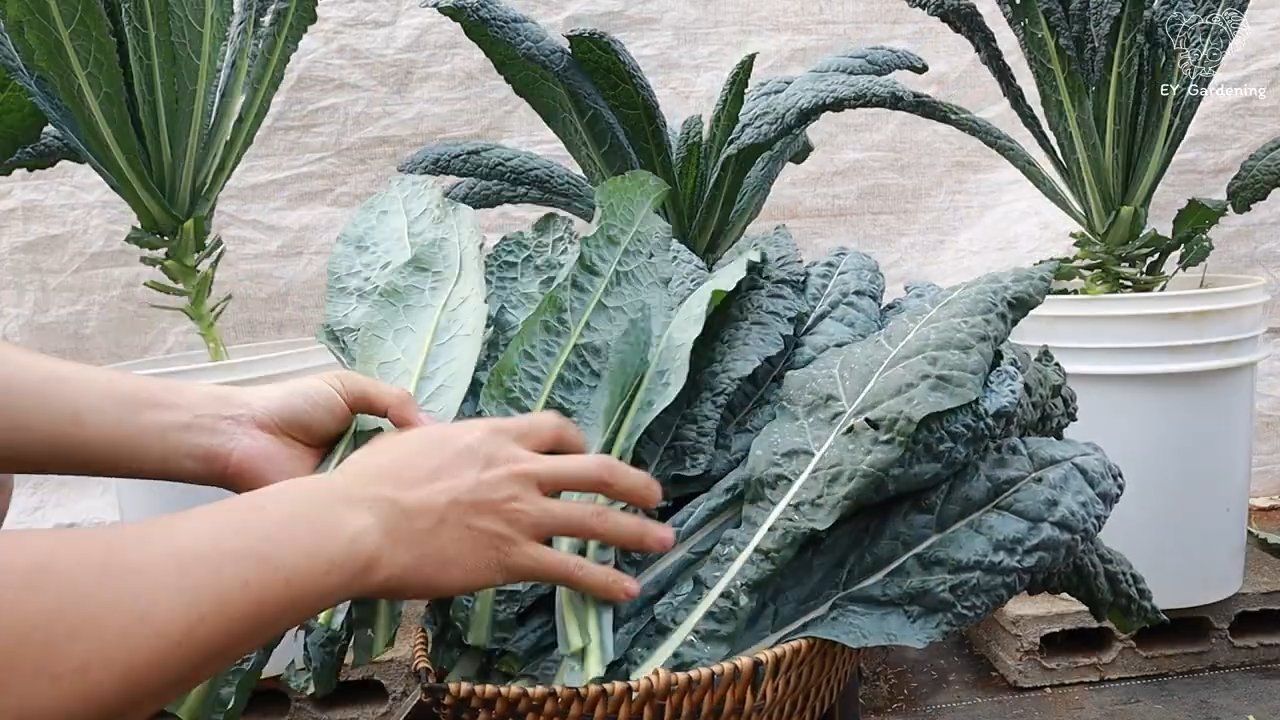
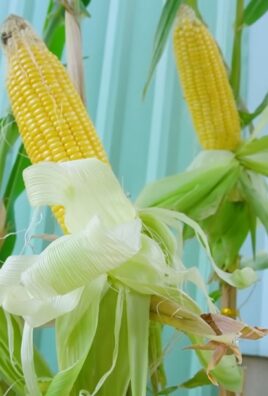
- Harvesting: Kale can be harvested as soon as the leaves are large enough. Harvest the outer leaves while the inner leaves continue to grow. This allows for a continuous harvest over a longer period.
Harvest Time: Enjoying the Fruits of Your Labor
The harvest is the reward for your effort! Kale can be harvested as soon as the leaves are large enough, usually about 20-30 cm (8-12 inches) long.
- Harvesting technique: Harvest the outer leaves by cutting them with a knife or scissors. Leave the inner leaves to continue growing.
- Harvesting time: Kale can be harvested throughout the winter. The leaves even taste better after they have been exposed to frost once.
- Storage: Kale can be stored in the refrigerator for a few days. Wrap the leaves in a damp cloth to keep them fresh. You can also freeze kale to make it last longer.
Kale in the Kitchen: Versatile Recipe Ideas
Kale is incredibly versatile and can be used in many different dishes. Here are some of my favorite recipes:
Kale soup: Kale leaves in a vegetable broth
Kale chips: A healthy and crispy snack. Mix the kale leaves with olive oil and spices and bake in the oven.
Kale salad: Finely chop kale leaves and mix with a dressing of your choice. Add nuts, seeds, or fruits to make the salad even more interesting.
Kale smoothie: Mix kale leaves with fruits, yogurt, and water or juice. A healthy and refreshing start to the day.
Conclusion
So, there you have it! Transforming your rooftop into a thriving kale garden is not only achievable, but it’s also incredibly rewarding. We’ve explored the essential steps, from selecting the right containers and soil to mastering watering techniques and pest control. But why is this DIY rooftop kale growing adventure a must-try?
Firstly, imagine stepping onto your rooftop and harvesting fresh, vibrant kale leaves just moments before adding them to your salad, smoothie, or stir-fry. The taste and nutritional value of homegrown produce are simply unmatched. You’ll be enjoying kale at its peak freshness, packed with vitamins, minerals, and antioxidants that store-bought kale simply can’t compete with.
Secondly, growing your own kale is an incredibly sustainable practice. You’re reducing your carbon footprint by minimizing transportation needs and packaging waste. Plus, you’re in complete control of the growing process, ensuring that your kale is free from harmful pesticides and herbicides. It’s a win-win for your health and the environment.
Thirdly, rooftop gardening is a fantastic way to connect with nature, even in the heart of the city. Tending to your kale plants can be a therapeutic and stress-relieving activity. Watching them grow and flourish under your care is an incredibly satisfying experience.
But the benefits don’t stop there. Rooftop gardens can also help to insulate your building, reducing energy costs and improving air quality. They can even provide a habitat for beneficial insects and pollinators, contributing to the biodiversity of your urban environment.
Now, let’s talk about variations. While we’ve focused on kale, you can easily adapt these techniques to grow other leafy greens, herbs, and even some vegetables on your rooftop. Consider adding companion plants like marigolds or basil to deter pests and attract pollinators. Experiment with different varieties of kale, such as curly kale, lacinato kale, or Russian kale, to find your favorites. You can also try succession planting, sowing new seeds every few weeks to ensure a continuous harvest throughout the growing season.
For those with limited rooftop space, consider vertical gardening techniques. Trellises, hanging baskets, and stacked planters can help you maximize your growing area and create a visually stunning display. You can even repurpose old pallets or containers to create unique and eco-friendly vertical gardens.
Don’t be afraid to experiment and adapt these techniques to suit your specific rooftop conditions and preferences. The key is to start small, learn from your mistakes, and enjoy the process.
We strongly encourage you to embark on your own rooftop kale growing journey. It’s a rewarding and sustainable way to enjoy fresh, healthy produce, connect with nature, and enhance your urban living space.
Once you’ve harvested your first batch of homegrown kale, we’d love to hear about your experience! Share your tips, challenges, and successes in the comments below. Let’s create a community of rooftop gardeners who are passionate about growing their own food and making a positive impact on the environment. Your insights could inspire others to take the plunge and transform their rooftops into thriving green spaces. So, grab your seeds, soil, and containers, and get ready to experience the joy of rooftop kale growing!
Frequently Asked Questions (FAQ)
What kind of kale is best for rooftop growing?
The best kale varieties for rooftop growing are those that are relatively compact and resilient. Curly kale, also known as Scots kale, is a popular choice due to its cold hardiness and relatively small size. Lacinato kale, also called dinosaur kale or Tuscan kale, is another excellent option. It has a slightly milder flavor than curly kale and is also quite adaptable to container growing. Red Russian kale is a visually appealing variety with reddish-purple stems and frilly leaves. It’s also relatively heat-tolerant, making it a good choice for warmer climates. Ultimately, the best kale variety for you will depend on your personal preferences and local climate conditions. Experiment with different varieties to see which ones thrive best on your rooftop.
How much sunlight does rooftop kale need?
Kale thrives in full sun, which means at least 6 hours of direct sunlight per day. However, it can also tolerate partial shade, especially in hotter climates. If your rooftop receives less than 6 hours of sunlight, try to position your kale plants in the sunniest spot possible. You can also supplement with grow lights if necessary. Insufficient sunlight can result in leggy plants with weak growth and reduced yields. Monitor your kale plants closely and adjust their position as needed to ensure they are receiving adequate sunlight.
What type of soil is best for growing kale in containers?
The best soil for growing kale in containers is a well-draining potting mix that is rich in organic matter. Avoid using garden soil, as it can be too heavy and compact for container growing. A good potting mix will provide adequate drainage, aeration, and nutrients for your kale plants. You can also amend your potting mix with compost, aged manure, or other organic materials to improve its fertility and water-holding capacity. Aim for a soil pH of between 6.0 and 7.5, which is slightly acidic to neutral. You can test your soil pH using a soil testing kit and adjust it as needed with lime or sulfur.
How often should I water my rooftop kale plants?
Water your rooftop kale plants regularly, especially during hot and dry weather. The frequency of watering will depend on the size of your containers, the type of soil you are using, and the weather conditions. As a general rule, water your kale plants when the top inch of soil feels dry to the touch. Avoid overwatering, as this can lead to root rot. When watering, water deeply and thoroughly, ensuring that the entire root ball is moistened. Consider using a watering can or a soaker hose to avoid splashing water on the leaves, which can promote fungal diseases.
How do I protect my rooftop kale from pests and diseases?
Protecting your rooftop kale from pests and diseases is essential for a successful harvest. Common kale pests include aphids, cabbage worms, flea beetles, and slugs. You can control these pests with a variety of methods, including handpicking, insecticidal soap, neem oil, and row covers. Regularly inspect your kale plants for signs of pests and diseases and take action promptly. Good air circulation can also help to prevent fungal diseases. Avoid overcrowding your plants and prune away any yellowing or diseased leaves. Consider using companion planting to deter pests and attract beneficial insects. Marigolds, for example, are known to repel aphids and other pests.
Can I grow kale on my rooftop during the winter?
Yes, you can grow kale on your rooftop during the winter, especially in milder climates. Kale is a cold-hardy vegetable that can tolerate temperatures as low as 20°F (-7°C). In colder climates, you may need to provide some protection for your kale plants, such as covering them with a cold frame or row cover. You can also mulch around the base of the plants to help insulate the roots. Winter-grown kale tends to be sweeter and more flavorful than summer-grown kale.
How do I harvest kale from my rooftop garden?
Harvest kale leaves as needed, starting with the outer leaves. Avoid harvesting more than one-third of the plant at a time, as this can stress the plant and reduce its yield. To harvest, simply snap or cut off the leaves near the base of the plant. You can harvest kale leaves at any size, but they are generally most tender when they are young and small. After harvesting, wash the kale leaves thoroughly and store them in the refrigerator for up to a week.
Can I grow other vegetables alongside kale on my rooftop?
Yes, you can grow other vegetables alongside kale on your rooftop. Companion planting can be beneficial for both kale and other vegetables. Good companion plants for kale include onions, garlic, rosemary, thyme, and chamomile. These plants can help to deter pests and attract beneficial insects. Avoid planting kale near members of the brassica family, such as broccoli, cabbage, and cauliflower, as they can compete for nutrients and attract similar pests.
How do I fertilize my rooftop kale plants?
Fertilize your rooftop kale plants regularly to ensure healthy growth and abundant yields. You can use a variety of fertilizers, including organic fertilizers such as compost tea, fish emulsion, and seaweed extract. Apply fertilizer every 2-3 weeks during the growing season. Avoid over-fertilizing, as this can lead to excessive leaf growth and reduced flavor. Follow the instructions on the fertilizer label carefully.
What if my rooftop doesn’t get enough sunlight for kale?
If your rooftop doesn’t get enough sunlight for kale, you can still try growing it, but you may need to supplement with artificial lighting. Grow lights can provide the necessary light for kale to thrive, even in shady conditions. Choose grow lights that emit a full spectrum of light, including both blue and red wavelengths. Position the grow lights close to the kale plants and adjust the height as needed to ensure they are receiving adequate light. You may also need to rotate the plants regularly to ensure that all sides are exposed to the light.
Leave a Comment