
Effortless Cabbage Garden: Imagine harvesting crisp, juicy cabbages from your own backyard, without breaking a sweat! Sounds too good to be true? Well, get ready to ditch the backaches and embrace a simpler way to grow this versatile vegetable. For centuries, cabbage has been a staple in diets across the globe, from sauerkraut in Eastern Europe to kimchi in Korea, showcasing its incredible adaptability and nutritional value. But let’s be honest, traditional cabbage gardening can be a bit of a chore.
That’s where this DIY guide comes in! We’re diving deep into clever tricks and hacks that will transform your gardening experience. Forget complicated techniques and endless weeding. I’m going to show you how to create an effortless cabbage garden that practically takes care of itself. Whether you’re a seasoned gardener or a complete beginner, these tips will help you maximize your yield with minimal effort.
Why do you need these DIY tricks? Because life’s too short to spend hours toiling in the garden! These methods are designed to save you time, energy, and resources, allowing you to enjoy the fruits (or rather, vegetables!) of your labor without the usual hassle. Get ready to unlock the secrets to a thriving, low-maintenance cabbage patch. Let’s get growing!
Der mühelose Kohl-Garten: Dein DIY-Guide für eine reiche Ernte
Hallo Gartenfreunde! Ich zeige euch heute, wie ihr einen Kohl-Garten anlegen könnt, der fast von selbst wächst. Keine komplizierten Anleitungen, versprochen! Wir machen das Ganze so einfach und effizient wie möglich. Lasst uns loslegen!
Was du für deinen mühelosen Kohl-Garten brauchst
Bevor wir starten, hier eine Liste der Dinge, die du benötigst. Keine Sorge, das meiste hast du wahrscheinlich schon zu Hause oder kannst es leicht besorgen:
* Kohl-Setzlinge: Wähle deine Lieblingssorten! Rotkohl, Weißkohl, Grünkohl, Rosenkohl – die Auswahl ist riesig. Achte darauf, gesunde, kräftige Setzlinge zu kaufen.
* Gartenwerkzeug: Eine Schaufel, eine Harke, eine Gartenkralle oder ein Kultivator.
* Kompost oder gut verrotteter Mist: Das ist das A und O für einen gesunden Boden.
* Mulchmaterial: Stroh, Holzhackschnitzel, Grasschnitt oder Laub. Mulch hilft, Feuchtigkeit zu speichern und Unkraut zu unterdrücken.
* Gartenvlies oder Netz: Zum Schutz vor Schädlingen wie Kohlweißlingen.
* Pflanzstäbe oder Etiketten: Um deine Kohlarten zu kennzeichnen.
* Gießkanne oder Gartenschlauch: Für die Bewässerung.
* (Optional) Schneckenzäune oder Schneckenkorn: Wenn du in einer Gegend mit vielen Schnecken wohnst.
* (Optional) Bodenverbesserer: Je nach Bodenbeschaffenheit (z.B. Kalk bei saurem Boden).
Die Vorbereitung: Der Schlüssel zum Erfolg
Ein gut vorbereiteter Boden ist das A und O für einen erfolgreichen Kohl-Garten. Hier sind die Schritte, die du befolgen solltest:
1. Wähle den richtigen Standort: Kohl braucht viel Sonne! Mindestens 6 Stunden direkte Sonneneinstrahlung pro Tag sind ideal. Achte auch darauf, dass der Boden gut entwässert ist. Staunässe mögen Kohlpflanzen gar nicht.
2. Bereite den Boden vor: Entferne Unkraut, Steine und andere Hindernisse. Lockere den Boden mit einer Schaufel oder Gartenkralle auf.
3. Verbessere den Boden: Arbeite reichlich Kompost oder gut verrotteten Mist in den Boden ein. Das verbessert die Bodenstruktur, speichert Feuchtigkeit und liefert wichtige Nährstoffe. Ich persönlich schwöre auf eine ordentliche Portion Kompost!
4. Teste den pH-Wert (optional): Kohl bevorzugt einen leicht sauren bis neutralen pH-Wert (zwischen 6,0 und 7,0). Wenn dein Boden zu sauer ist, kannst du Kalk einarbeiten, um den pH-Wert zu erhöhen.
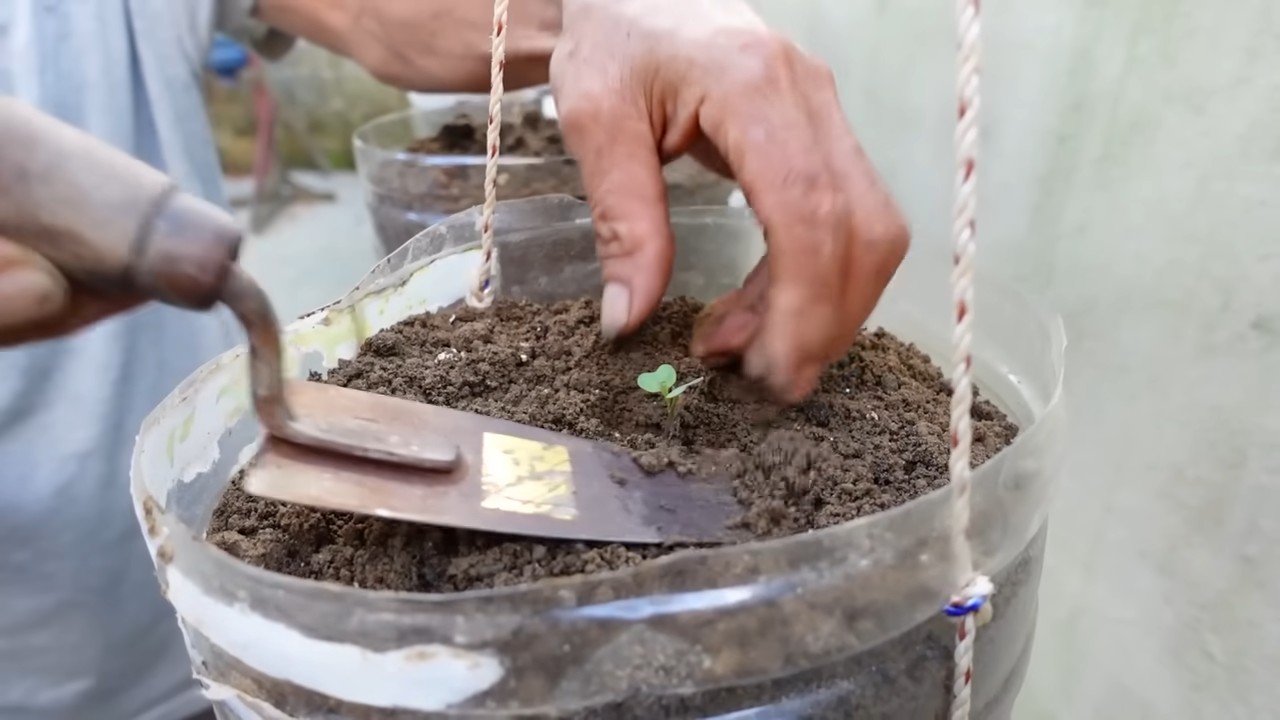
Pflanzen leicht gemacht: So setzt du deine Kohl-Setzlinge richtig
Jetzt kommt der spaßige Teil: das Pflanzen! Hier ist, wie du deine Kohl-Setzlinge richtig in die Erde bringst:
1. Grabe Pflanzlöcher: Die Löcher sollten etwas größer sein als die Wurzelballen der Setzlinge. Der Abstand zwischen den Pflanzen hängt von der Kohlart ab. Als Faustregel gilt:
* Weißkohl, Rotkohl: 50-60 cm Abstand
* Grünkohl: 40-50 cm Abstand
* Rosenkohl: 60-70 cm Abstand
2. Entferne die Setzlinge vorsichtig aus den Töpfen: Achte darauf, die Wurzeln nicht zu beschädigen. Wenn die Wurzeln stark verwurzelt sind, kannst du sie vorsichtig etwas auflockern.
3. Setze die Setzlinge in die Löcher: Die Oberseite des Wurzelballens sollte mit der Bodenoberfläche abschließen.
4. Fülle die Löcher mit Erde auf: Drücke die Erde leicht an, um die Setzlinge zu stabilisieren.
5. Gieße die Setzlinge gründlich: Das hilft ihnen, sich im neuen Boden zu etablieren.
6. Markiere die Kohlarten: Verwende Pflanzstäbe oder Etiketten, um den Überblick zu behalten.
Mulchen: Dein Helfer im Garten
Mulchen ist ein echter Gamechanger! Es spart dir Zeit und Mühe und sorgt für gesunde Pflanzen.
1. Bringe eine Mulchschicht auf: Verteile eine dicke Schicht Mulchmaterial (Stroh, Holzhackschnitzel, Grasschnitt oder Laub) um die Kohlpflanzen. Die Mulchschicht sollte etwa 5-10 cm dick sein.
2. Achte darauf, dass der Mulch die Stängel der Pflanzen nicht berührt: Das kann zu Fäulnis führen.
Die Vorteile des Mulchens:
* Feuchtigkeitsspeicherung: Mulch reduziert die Verdunstung und hält den Boden feucht.
* Unkrautunterdrückung: Mulch verhindert, dass Unkraut keimt und wächst.
* Bodentemperaturregulierung: Mulch schützt den Boden vor extremen Temperaturen.
* Bodenverbesserung: Organischer Mulch zersetzt sich langsam und verbessert die Bodenstruktur.
Schutz vor Schädlingen: So bleiben deine Kohlpflanzen gesund
Kohl ist leider bei einigen Schädlingen sehr beliebt. Aber keine Sorge, mit ein paar einfachen Maßnahmen kannst du deine Pflanzen schützen:
1. Verwende ein Gartenvlies oder Netz: Decke deine Kohlpflanzen mit einem Gartenvlies oder Netz ab, um sie vor Kohlweißlingen und anderen Schädlingen zu schützen. Achte darauf, dass das Vlies oder Netz gut befestigt ist, damit die Schädlinge nicht darunter gelangen können.
2. Kontrolliere deine Pflanzen regelmäßig: Suche nach Raupen, Blattläusen oder anderen Schädlingen.
3. Entferne Schädlinge manuell: Sammle Raupen ab oder spritze Blattläuse mit einem Wasserstrahl ab.
4. Verwende natürliche Schädlingsbekämpfungsmittel: Es gibt viele natürliche Schädlingsbekämpfungsmittel, die du verwenden kannst, z.B. Neemöl oder Brennnesseljauche.
5. Schneckenzäune oder Schneckenkorn (optional): Wenn du in einer Gegend mit vielen Schnecken wohnst, kannst du Schneckenzäune aufstellen oder Schneckenkorn verwenden.
Bewässerung und Düngung: Das richtige Maß finden
Kohl braucht ausreichend Wasser und Nährstoffe, um gut zu wachsen. Hier sind ein paar Tipps zur Bewässerung und Düngung:
1. Gieße regelmäßig: Kohl braucht regelmäßig Wasser, besonders während trockener Perioden. Gieße am besten früh morgens oder spät abends, um Verdunstung zu vermeiden.
2. Dünge regelmäßig: Kohl ist ein Starkzehrer und braucht regelmäßig Nährstoffe. Dünge deine Pflanzen alle paar Wochen mit einem organischen Dünger oder Komposttee.
3. Achte auf die Bedürfnisse der jeweiligen Kohlart: Manche Kohlarten brauchen mehr Nährstoffe als andere. Informiere dich über die spezifischen Bedürfnisse deiner Kohlarten.
Erntezeit: Die Früchte deiner Arbeit genießen
Endlich ist es so weit: Die Erntezeit! Hier sind ein paar Tipps, wie du deinen Kohl richtig erntest:
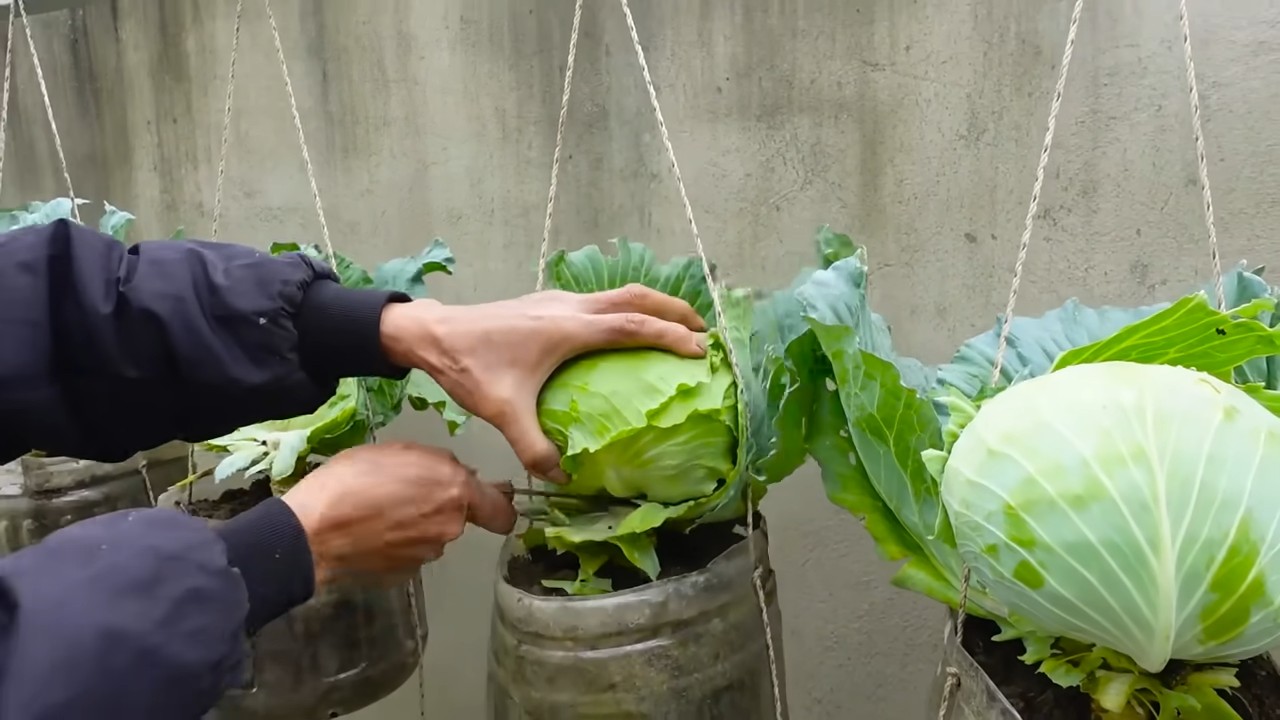
1. Ernte, wenn der Kohlkopf fest und reif ist: Die Reifezeit hängt von der Kohlart ab.
2. Schneide den Kohlkopf mit einem scharfen Messer ab: Lasse ein paar Blätter am Strunk stehen, damit der Kohlkopf nicht austrocknet.
3. Ernte Grünkohl nach Bedarf: Du kannst die Blätter nach und nach ernten, von unten nach oben.
4. Ernte Rosenkohl, wenn die Röschen fest und geschlossen sind: Die Röschen sollten etwa 2-3 cm groß sein.
5. Lagere den Kohl kühl und trocken: Kohl kann im Kühlschrank oder in einem kühlen Keller gelagert werden.
Zusätzliche Tipps für deinen mühelosen Kohl-Garten
* Fruchtfolge beachten: Baue Kohl nicht jedes Jahr am selben Standort an. Wechsle die Kulturen ab, um Krankheiten und Schädlingen vorzubeugen.
* Beipflanzung: Pflanze Kohl zusammen mit anderen Pflanzen, die ihn vor Schädlingen schützen oder sein Wachstum fördern. Gute Nachbarn sind z.B. Ringelblumen
Conclusion
So, there you have it! Transforming your garden into an Effortless Cabbage Garden is not just a dream; it’s an achievable reality with a few simple, strategic steps. We’ve explored how to minimize weeding, maximize space, and create an environment where your cabbages can thrive with minimal intervention. This isn’t just about growing cabbages; it’s about reclaiming your time and enjoying the process of gardening without the back-breaking labor.
Why is this DIY trick a must-try? Because it addresses the core challenges of cabbage cultivation: weed control, pest management, and efficient use of space. By implementing these techniques, you’re not just growing cabbages; you’re building a sustainable and manageable garden ecosystem. Imagine spending less time pulling weeds and more time enjoying the fruits (or rather, vegetables) of your labor. Think of the satisfaction of harvesting plump, healthy cabbages knowing you achieved it with minimal effort.
Consider these variations to tailor the Effortless Cabbage Garden to your specific needs and preferences:
* Companion Planting Power-Up: Experiment with different companion plants. Marigolds are known to deter nematodes, while dill can attract beneficial insects that prey on cabbage pests. Research which plants thrive alongside cabbages in your region and incorporate them into your design.
* Mulch Mania: While we’ve discussed using straw or wood chips, explore other mulch options like shredded leaves or compost. Each type of mulch offers different benefits, such as improved soil fertility or enhanced water retention.
* Vertical Cabbage: If space is truly limited, consider growing cabbages in containers on a vertical structure. This not only saves space but also elevates the plants, making them less susceptible to ground-dwelling pests.
* Succession Planting: Plant cabbage varieties with different maturity dates to extend your harvest season. This ensures a continuous supply of fresh cabbages throughout the growing season.
We wholeheartedly encourage you to try this Effortless Cabbage Garden approach. It’s a game-changer for both novice and experienced gardeners alike. Don’t be afraid to experiment, adapt, and personalize the techniques to suit your unique garden environment.
Most importantly, we want to hear about your experiences! Share your successes, challenges, and any modifications you make along the way. Your insights can help other gardeners create their own thriving Effortless Cabbage Gardens. Let’s build a community of effortless gardeners, sharing knowledge and inspiring each other to grow delicious, healthy cabbages with ease. So, grab your seeds, prepare your garden beds, and embark on this exciting journey towards a more relaxed and rewarding gardening experience. Happy gardening!
FAQ
What exactly makes this cabbage garden “effortless”?
The “effortless” aspect comes from minimizing the most labor-intensive tasks associated with cabbage gardening, primarily weeding and pest control. We achieve this through strategic mulching, companion planting, and optimized spacing. Mulch smothers weeds, reducing the need for constant weeding. Companion plants deter pests naturally, minimizing the need for chemical interventions. And proper spacing ensures adequate airflow, preventing disease and promoting healthy growth. It’s about working *with* nature, not against it.
What type of mulch is best for an Effortless Cabbage Garden?
The best type of mulch depends on your specific needs and resources. Straw is a popular choice because it’s readily available, affordable, and decomposes slowly, providing long-lasting weed suppression. Wood chips are another excellent option, especially for pathways and larger areas. They also improve soil drainage and aeration. However, avoid using fresh wood chips directly around your plants, as they can temporarily deplete nitrogen from the soil. Compost is a fantastic mulch option if you have access to it. It not only suppresses weeds but also enriches the soil with valuable nutrients. Shredded leaves are a great free option in the fall. Experiment to see what works best for your garden.
What are the best companion plants for cabbages in an Effortless Cabbage Garden?
Several plants make excellent companions for cabbages. Marigolds are known to deter nematodes and other soil pests. Dill attracts beneficial insects like ladybugs and lacewings, which prey on cabbage pests. Rosemary and thyme also repel cabbage moths. Nasturtiums act as a trap crop, attracting cabbage white butterflies away from your cabbages. Interplanting clover can fix nitrogen in the soil, benefiting your cabbages. Research which companion plants thrive in your region and incorporate them into your garden design.
How much space do cabbages need in an Effortless Cabbage Garden?
Proper spacing is crucial for healthy cabbage growth and disease prevention. Generally, allow 18-24 inches between cabbage plants and 24-36 inches between rows. This spacing allows for adequate airflow, reducing the risk of fungal diseases. It also provides enough room for the cabbages to mature without overcrowding each other. If you’re growing smaller cabbage varieties, you can reduce the spacing slightly.
How often should I water my Effortless Cabbage Garden?
Cabbages need consistent moisture, especially during head formation. Water deeply and regularly, aiming for about 1-1.5 inches of water per week. Check the soil moisture regularly and water when the top inch feels dry. Avoid overwatering, as this can lead to root rot. Mulching helps retain moisture in the soil, reducing the frequency of watering.
What if I don’t have a lot of space for an Effortless Cabbage Garden?
Even if you have limited space, you can still create an Effortless Cabbage Garden. Consider growing cabbages in containers on a patio or balcony. Choose smaller cabbage varieties that are well-suited for container gardening. You can also utilize vertical gardening techniques, such as growing cabbages in stacked planters or on a trellis. Companion planting is even more important in small spaces, as it helps maximize the benefits of each plant.
How do I deal with pests in my Effortless Cabbage Garden without using chemicals?
The key to pest control in an Effortless Cabbage Garden is prevention. Companion planting is a crucial first step, as it attracts beneficial insects that prey on cabbage pests. Regularly inspect your plants for signs of pests and remove them by hand. Use row covers to protect your cabbages from cabbage moths and other flying insects. Introduce beneficial nematodes to the soil to control soil pests. You can also use organic pest control sprays, such as neem oil or insecticidal soap, as a last resort.
How long does it take for cabbages to mature in an Effortless Cabbage Garden?
The time it takes for cabbages to mature depends on the variety and growing conditions. Generally, cabbages take 60-100 days to mature from transplanting. Early-maturing varieties can be harvested in as little as 60 days, while late-maturing varieties may take up to 100 days or more. Check the seed packet or plant label for specific maturity dates.
Can I grow cabbages in the fall in an Effortless Cabbage Garden?
Yes, cabbages are a cool-season crop and can be grown in the fall in many regions. Start seeds indoors in mid-summer and transplant them into the garden in late summer or early fall. Fall-grown cabbages often have a sweeter flavor due to the cooler temperatures. Be sure to choose cabbage varieties that are suitable for fall planting in your area.
What if I encounter problems or have questions while creating my Effortless Cabbage Garden?
Don’t hesitate to reach out to your local gardening community for support and advice. Local nurseries, gardening clubs, and online forums are great resources for troubleshooting problems and getting answers to your questions. And of course, feel free to share your experiences and ask questions in the comments section of this article. We’re here to help you succeed in creating your own thriving Effortless Cabbage Garden!


Leave a Comment