
Growing Kale in Plastic Bottles: Unlock a world of fresh, homegrown goodness, even if you’re short on space! Have you ever dreamed of harvesting your own vibrant, nutrient-packed kale but thought you didn’t have the room? Well, dream no more! This DIY guide will show you how to transform ordinary plastic bottles into thriving vertical gardens, perfect for balconies, patios, or even sunny windowsills.
The concept of vertical gardening, while seemingly modern, has roots stretching back centuries. Think of the Hanging Gardens of Babylon, one of the Seven Wonders of the Ancient World! While we might not be building wonders on that scale, we’re tapping into the same ingenious spirit of maximizing space and bringing nature closer to home.
In today’s fast-paced world, access to fresh, healthy food is more important than ever. Store-bought produce can be expensive and often lacks the flavor and nutrients of homegrown vegetables. That’s where growing kale in plastic bottles comes in! This simple, cost-effective method allows you to cultivate your own organic kale, free from harmful pesticides and packed with vitamins. Plus, it’s a fantastic way to recycle those plastic bottles and reduce your environmental footprint. I’m excited to share this easy and rewarding project with you, so let’s get started and turn those empty bottles into a flourishing kale oasis!
Growing Kale in Plastic Bottles: A DIY Garden Project for Everyone
Hello garden friends! Do you want to grow your own fresh kale, even if you don’t have a huge garden? Then you’ve come to the right place! I’ll show you how you can conjure up a small but fine kale garden using simple plastic bottles. This is not only super sustainable because we’re reusing plastic, but also totally space-saving and perfect for balconies, terraces, or even windowsills. Let’s go!
What you need:
- Plastic bottles: Large PET bottles (1.5 liters or larger) are best. The larger the bottle, the more space the kale plants have to grow.
- Kale seeds or seedlings: You can either start with seeds or buy small kale plants directly. Seeds are cheaper, but seedlings save time.
- Soil: High-quality potting soil or vegetable soil is ideal. Make sure it is well-draining.
- Scissors or knife: For cutting the plastic bottles.
- Drill or nail and hammer: For the drainage holes.
- Watering can or spray bottle: For watering the plants.
- Optional: Pebbles or clay shards for drainage.
- Optional: Plant labels and a waterproof pen for labeling.
The Preparation of the Plastic Bottles
Before we can start planting, we need to prepare the plastic bottles. Don’t worry, it’s very easy!
- Cleaning: First, you should clean the plastic bottles thoroughly. Remove all labels and rinse them with warm water and a little dish soap. Make sure no soap residue is left behind.
- Cutting: Now comes the fun part! You have two options for cutting the bottles:
- Option 1: Horizontal cut: Cut the bottle horizontally in the middle. The top part is later turned upside down and inserted into the bottom part, creating a mini-greenhouse. This option is particularly good for growing from seed.
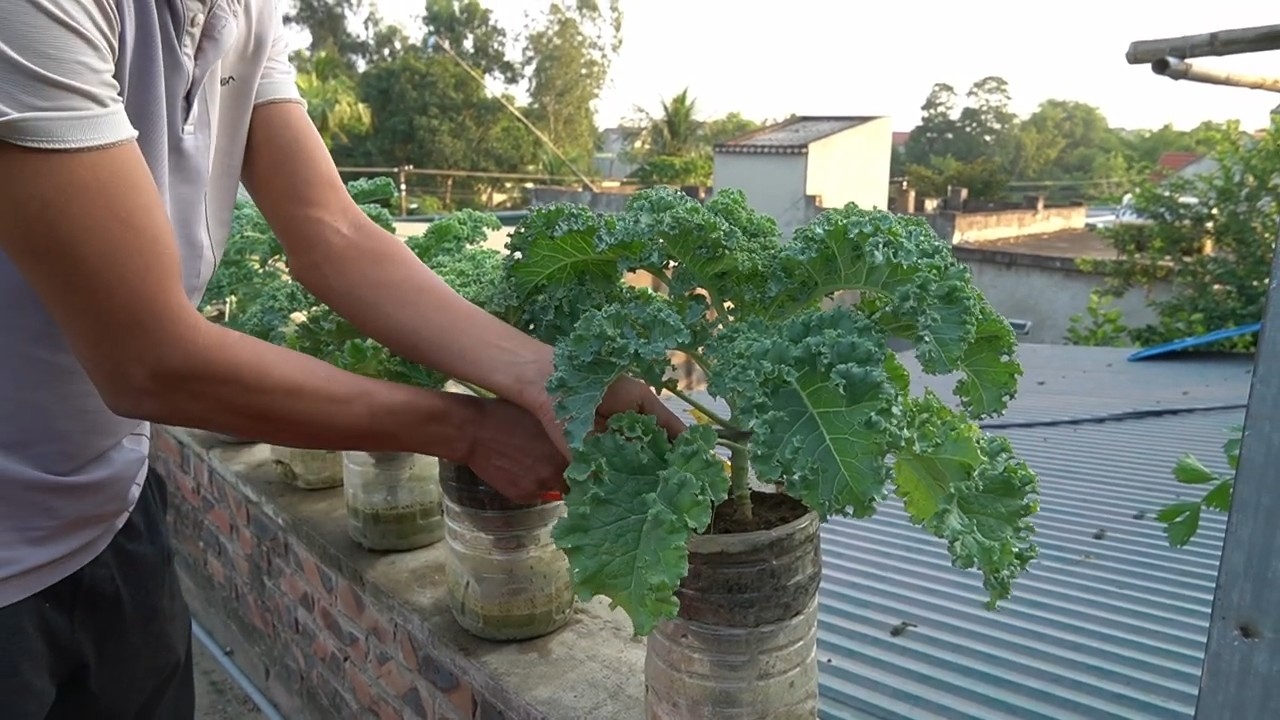
- Option 2: Vertical cut: Cut a large rectangle out of the side of the bottle. This creates a kind of “balcony box.” This option is ideal for larger plants or if you want to grow several plants in one bottle.
- Drainage holes: This is a very important step! To allow water to drain well and prevent the roots from rotting, you must drill or poke drainage holes in the bottom of the bottle. It’s best to make 3-5 holes, depending on the size of the bottle. If you have a drill, it’s of course the fastest way. Otherwise, you can also use a nail and a hammer. Be careful not to injure yourself!
- Optional: Drainage: To improve the drainage even further, you can place a layer of pebbles or clay shards at the bottom of the bottle before filling it with soil. This prevents waterlogging and ensures healthy roots.
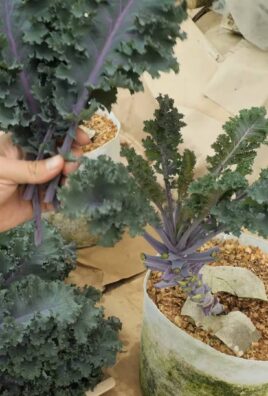
Planting the Kale
Now comes the exciting part: We are planting our prepared plastic bottles with kale!
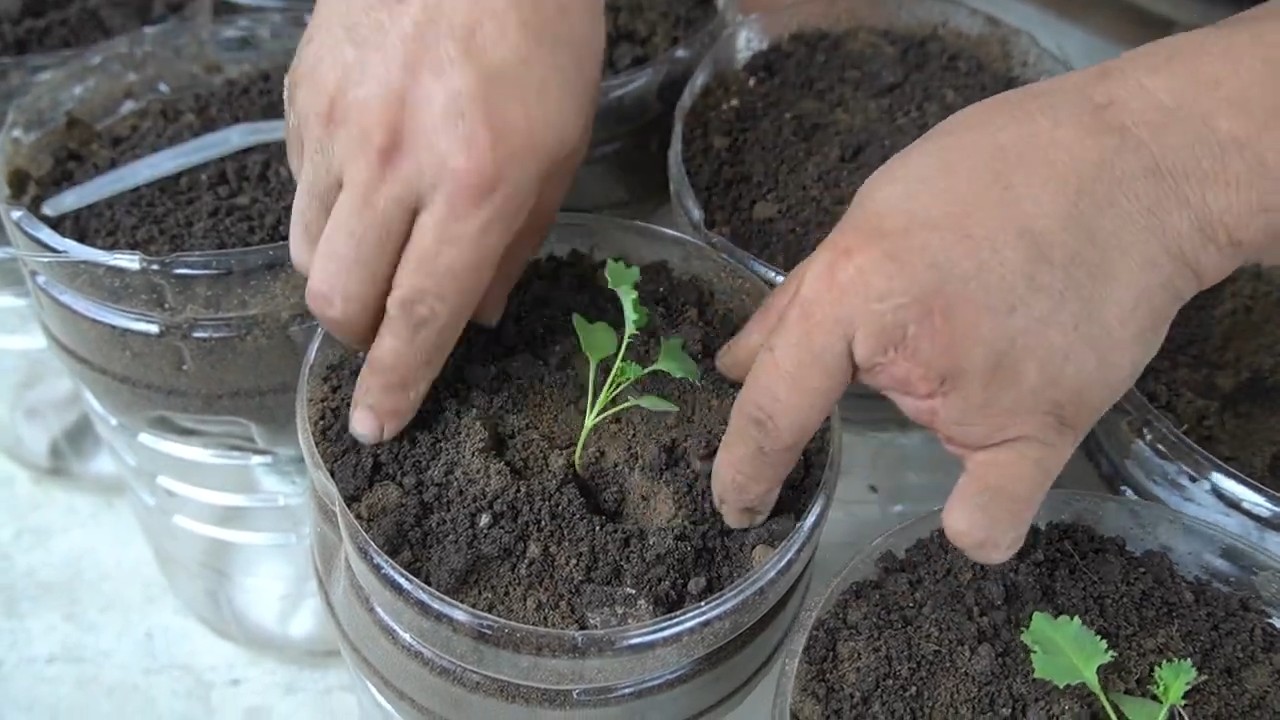
- Fill with soil: Fill the plastic bottle with soil. Leave about 2-3 cm of space at the top so the water doesn’t immediately overflow when watering. Press the soil down lightly.
- Sow seeds or plant seedlings:
- Seeds: If you are starting with seeds, make small depressions in the soil (about 1 cm deep). Place 2-3 seeds in each depression and cover them with soil. Water the soil gently.
- Seedlings: If you are using seedlings, make a hole in the soil large enough for the root ball. Carefully place the plant in it and fill the hole with soil. Press the soil down lightly and water the plant well.
- Labeling: Don’t forget to label your plastic bottles! This way you’ll always know what you’ve planted where. You can simply write on a small plant label and stick it in the soil.
- Watering: Water the plants regularly, but avoid waterlogging. The soil should always be slightly moist. It’s best to water in the morning so the leaves can dry during the day.
Caring for the Kale
For your kale to thrive, it naturally needs some care. But don’t worry, it’s not a lot of work!
- Location: Kale loves the sun! Place your plastic bottles in a sunny location, preferably with at least 6 hours of sun per day.
- Watering: As mentioned, water regularly, but avoid waterlogging. Be especially careful on hot days that the soil does not dry out.
- Fertilizing: Kale is a heavy feeder and needs regular nutrients. You can fertilize it every 2-3 weeks with an organic liquid fertilizer. I like to use nettle tea; it’s super natural and easy to make yourself.
- Pests: Watch out for pests like aphids or cabbage white caterpillars. In case of an infestation, you can either pick off the pests or treat them with a biological pesticide.
- Harvesting: You can harvest the kale as soon as the leaves are large enough. Simply pick the outer leaves. The inner leaves will then continue to grow. This way you can harvest over a longer period.
Additional Tips and Tricks
- Variety choice: There are many different kale varieties. Just try out which one you like best. Popular varieties are, for example, “Nero di Toscana” (Lacinato kale) or “Dwarf Green Curled.”
- Overwintering: Kale is hardy and can stay outside in winter. However, you should cover it with a fleece during heavy frost.
- Companion planting: You can combine kale well with other plants, e.g., with lettuce, radishes, or strawberries.
- Creative design: Why not paint your plastic bottles in bright colors? This will turn your small kale garden into a real eye-catcher.
Common Problems and Solutions
Plants are not growing: If the plants are not growing, it could be due to too little sun or nutrients. Move the plants to a sunnier location and fertilize them.
Yellow leaves: Yellow leaves can be a sign of a nutrient deficiency. Fertilize the plants with a liquid fertilizer.
Pests: Check the plants regularly for pests and treat them if necessary.
Waterlogging: Make sure that the water can drain well and avoid waterlogging.
Conclusion
So, there you have it! Transforming discarded plastic bottles into thriving kale gardens is not just a quirky DIY project; it’s a sustainable, space-saving, and incredibly rewarding way to enjoy fresh, homegrown greens. We’ve walked you through the simple steps, highlighting the benefits of this method, and hopefully, inspired you to give it a try.
Why is this DIY trick a must-try? Because it addresses several common gardening challenges simultaneously. Limited space? No problem! Plastic bottle gardening allows you to grow kale vertically, maximizing your yield even on a small balcony or patio. Concerned about soil quality? You have complete control over the growing medium, ensuring your kale receives the nutrients it needs. Want to reduce waste and contribute to a more sustainable lifestyle? This project repurposes plastic bottles, preventing them from ending up in landfills. Plus, let’s be honest, there’s a certain satisfaction that comes from nurturing something from seed to harvest, especially when you’ve created the growing container yourself.
But the beauty of this method lies in its adaptability. Feel free to experiment with different varieties of kale. Curly kale, Lacinato kale (also known as dinosaur kale), and Red Russian kale all thrive in container gardens. You can also adjust the size of the bottles to suit your needs. Smaller bottles are perfect for starting seedlings, while larger bottles can accommodate mature plants.
Consider adding companion plants to your plastic bottle garden. Herbs like basil, thyme, and oregano can deter pests and enhance the flavor of your kale. Marigolds are another excellent choice, as they attract beneficial insects and add a splash of color to your vertical garden.
Don’t be afraid to get creative with the design of your plastic bottle planters. Paint them with vibrant colors, add decorative labels, or create intricate hanging systems. The possibilities are endless! You can even build a tiered system for a visually appealing and highly productive kale garden.
Remember to monitor your kale plants regularly for signs of pests or diseases. Aphids, cabbage worms, and slugs are common kale pests, but they can be easily controlled with organic methods like insecticidal soap or handpicking. Ensure proper drainage to prevent root rot, and provide adequate sunlight for optimal growth.
Ultimately, growing kale in plastic bottles is a fun, educational, and environmentally friendly activity that anyone can enjoy. It’s a fantastic way to connect with nature, learn about sustainable gardening practices, and enjoy the delicious taste of fresh, homegrown kale.
We strongly encourage you to try this DIY trick and experience the joy of growing your own food. Once you’ve harvested your first batch of kale, we’d love to hear about your experience! Share your photos, tips, and challenges in the comments section below. Let’s build a community of plastic bottle gardeners and inspire others to embrace sustainable living. Your success with this DIY kale growing project could be the inspiration someone else needs to start their own journey towards a greener lifestyle.
Frequently Asked Questions (FAQ)
What type of plastic bottles are best for growing kale?
Ideally, you should use food-grade plastic bottles, such as those that previously contained water, juice, or soda. Avoid using bottles that held harsh chemicals or cleaning products, as these may contaminate the soil and harm your plants. PET (polyethylene terephthalate) bottles, commonly used for water and soda, are a good choice. Make sure to thoroughly clean the bottles with soap and water before using them. Consider the size of the bottle based on the kale variety you plan to grow. Larger varieties will need bigger bottles to accommodate their root systems.
How often should I water my kale plants in plastic bottles?
The watering frequency depends on several factors, including the weather, the size of the bottle, and the type of soil you’re using. Generally, you should water your kale plants when the top inch of soil feels dry to the touch. During hot, sunny weather, you may need to water them daily, while during cooler, cloudy weather, you may only need to water them every few days. Ensure that the bottles have adequate drainage holes to prevent waterlogging, which can lead to root rot. A good rule of thumb is to water deeply until you see water draining from the bottom of the bottle.
What type of soil is best for growing kale in plastic bottles?
A well-draining potting mix is essential for growing healthy kale in plastic bottles. Avoid using garden soil, as it can be too heavy and compact, hindering root growth. A good potting mix should contain a blend of peat moss, perlite, and vermiculite. You can also add compost or other organic matter to enrich the soil and provide essential nutrients. Consider using a potting mix specifically formulated for vegetables, as these often contain slow-release fertilizers.
How much sunlight does kale need when grown in plastic bottles?
Kale thrives in full sun, which means it needs at least six hours of direct sunlight per day. However, it can also tolerate partial shade, especially during the hottest part of the day. If you’re growing kale indoors, you may need to supplement with artificial lighting, such as grow lights. Position your plastic bottle garden in a location that receives ample sunlight, such as a south-facing window or balcony. If you notice that your kale plants are becoming leggy or pale, it may be a sign that they’re not getting enough sunlight.
How do I fertilize kale plants grown in plastic bottles?
Kale is a heavy feeder, so it’s important to fertilize it regularly to ensure healthy growth. You can use a balanced liquid fertilizer, such as a 10-10-10 or 20-20-20, diluted according to the package instructions. Apply the fertilizer every two to three weeks during the growing season. You can also use organic fertilizers, such as compost tea or fish emulsion. Avoid over-fertilizing, as this can lead to nutrient burn and damage your plants.
How do I protect my kale plants from pests and diseases?
Regularly inspect your kale plants for signs of pests or diseases. Common kale pests include aphids, cabbage worms, and slugs. You can control aphids with insecticidal soap or by spraying them off with a strong stream of water. Cabbage worms can be handpicked or treated with Bacillus thuringiensis (Bt), a natural insecticide. Slugs can be controlled with slug bait or by creating barriers around your plants. To prevent diseases, ensure proper drainage and avoid overcrowding. If you notice any signs of disease, such as yellowing leaves or fungal spots, remove the affected leaves immediately.
Can I grow kale in plastic bottles indoors during the winter?
Yes, you can grow kale in plastic bottles indoors during the winter, provided you have adequate lighting and temperature control. Place your plastic bottle garden near a sunny window or supplement with grow lights. Maintain a consistent temperature of around 60-70°F (15-21°C). Water regularly and fertilize as needed. Growing kale indoors during the winter can provide you with a continuous supply of fresh greens, even when the weather outside is cold and snowy.
How long does it take for kale to grow in plastic bottles?
The time it takes for kale to grow in plastic bottles depends on the variety of kale, the growing conditions, and the size of the bottle. Generally, you can expect to harvest your first leaves within 45-60 days of planting. Baby kale leaves can be harvested even earlier, within 30-40 days. Continue to harvest leaves as needed, taking care not to remove more than one-third of the plant at a time. With proper care, your kale plants can continue to produce leaves for several months.
Leave a Comment