
Growing Cabbage No Garden? Absolutely! Imagine harvesting crisp, flavorful cabbage right from your balcony or patio, even if you don’t have a traditional garden. It sounds like a dream, right? Well, get ready to turn that dream into a delicious reality with these incredible DIY tricks and hacks!
Cabbage, a staple in cuisines worldwide, boasts a rich history dating back to ancient times. From the humble peasant’s fare to a symbol of good luck in some cultures, this versatile vegetable has nourished and sustained communities for centuries. But what if you live in an apartment, or your backyard is all concrete? Does that mean you have to miss out on the joy of growing your own food?
Absolutely not! That’s where these ingenious DIY solutions come in. I’m going to show you how to successfully grow cabbage, even without a garden. We’ll explore container gardening techniques, vertical gardening ideas, and even repurpose everyday items into thriving cabbage patches. Think outside the box (or, in this case, inside a pot!) and discover the satisfaction of nurturing your own food source. These tricks are perfect for urban dwellers, apartment residents, or anyone looking to maximize their growing space. Plus, growing your own cabbage ensures you know exactly what’s going into your food – no pesticides, just pure, homegrown goodness. So, let’s dive in and unlock the secrets to growing cabbage no garden required!
Growing Cabbage Without a Garden: Your DIY Guide for Pot Cultivation
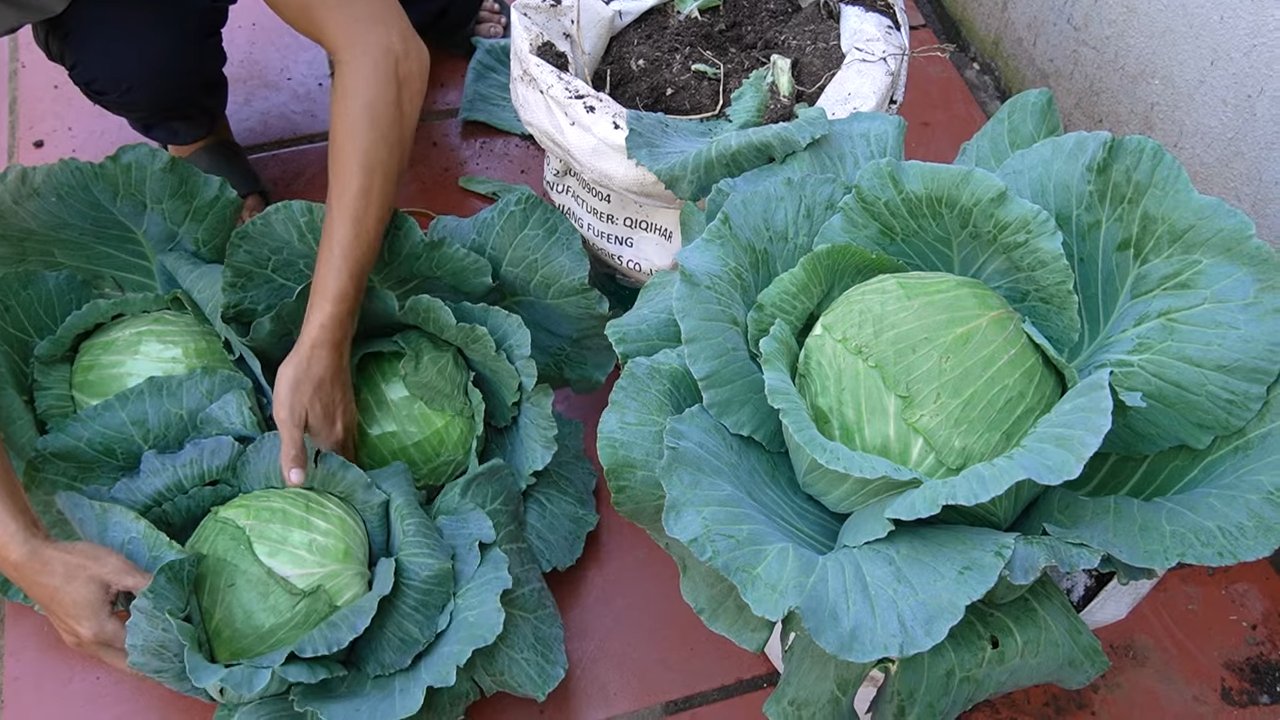
Hey garden friends! Who says you need a garden to harvest fresh cabbage? I’ll show you how you can grow magnificent cabbage in a pot even without a garden. It’s easier than you think and a lot of fun!
What You Need: The Preparation
Before we get started, we obviously need the right equipment. Don’t worry, you probably have most of these things at home already!
- Cabbage seeds or seedlings: You can either start with seeds or buy seedlings directly from a garden center. Personally, I find it exciting to be there from the beginning, so I prefer seeds. Make sure to choose the right cabbage variety for your needs. There’s white cabbage, red cabbage, savoy cabbage, Brussels sprouts – the selection is huge!
- Large pots: Cabbage needs space! Choose pots with a diameter of at least 30 cm and a depth of 30 cm. Bigger is always better, especially if you want to grow several plants in one pot.
- High-quality potting soil: Cheap soil can hinder cabbage growth. Invest in good, nutrient-rich potting soil or mix your own.
- Drainage material: Clay shards, gravel, or expanded clay at the bottom of the pot ensure good drainage and prevent waterlogging.
- Fertilizer: Cabbage is a heavy feeder and needs regular applications of fertilizer. Organic fertilizer like compost or horn shavings is ideal.
- Watering can or garden hose: For regular watering.
- Sunny location: Cabbage loves the sun! Choose a location that gets at least 6 hours of sun per day.
- Slug pellets (optional): Slugs can really do a number on cabbage plants. If you have problems with slugs, you should have slug pellets ready.
- Plant stakes (optional): For larger cabbage varieties, plant stakes can help support the plants.
Sowing or Planting: The Start
Now let’s get down to it! Whether you’re starting with seeds or seedlings, here are the steps you need to follow:
Sowing (if you’re starting with seeds):
- Prepare the pots: Fill the pots with drainage material and potting soil. Leave about 2-3 cm of space at the top.
- Sow the seeds: Distribute the cabbage seeds evenly on the soil. Press the seeds down lightly and cover them with a thin layer of soil.
- Water: Water the soil carefully so that it is moist but not wet.
- Location: Place the pots in a warm and bright place.
- Moisture: Keep the soil moist until the seeds germinate. This can take 1-2 weeks depending on the cabbage variety and temperature.
- Pricking out: As soon as the seedlings have a few leaves, you can prick them out. This means you transplant the strongest plants into separate pots so they have enough space to grow.
Planting (if you’re buying seedlings):
- Prepare the pots: Fill the pots with drainage material and potting soil. Leave about 2-3 cm of space at the top.
- Planting: Dig a hole in the soil large enough for the seedling’s root ball. Carefully place the plant in it and fill the hole with soil. Press the soil down lightly.
- Water: Water the plant thoroughly.
- Location: Place the pots in a sunny location.
Care: So Your Cabbage Grows Magnificently
Although cabbage is relatively easy to care for, there are a few things you should keep in mind for optimal growth:
- Watering: Water regularly, especially on hot days. The soil should always be moist, but not wet. Avoid waterlogging, as this can lead to root rot.
- Fertilizing: Fertilize the cabbage regularly, about every 2-3 weeks. Use organic fertilizer like compost or horn shavings. You can also use a liquid fertilizer for vegetables.
- Pests: Watch out for pests like cabbage white butterflies, aphids, or slugs. In case of an infestation, you can use natural pesticides or collect the pests by hand. Cabbage whites like to lay their eggs on the underside of the leaves. Check the plants regularly and remove the eggs.
- Weeds: Regularly remove weeds from the pots. Weeds compete with the cabbage for nutrients and water.
- Staking: For larger cabbage varieties, it may be necessary to support the plants with stakes to prevent them from tipping over.
- Remove wilted leaves: Regularly remove wilted or yellow leaves. This promotes ventilation and prevents diseases.
Harvest: The Reward for Your Effort
The harvest time depends on the cabbage variety. White and red cabbage are usually ready to harvest after 3-4 months, Brussels sprouts after 5-6 months.
- Recognizing ripeness: The cabbage head should be firm and closed. For Brussels sprouts, the sprouts should be firm and closed.
- Harvesting: Cut off the cabbage head with a sharp knife. For Brussels sprouts, you can harvest the sprouts individually as soon as they are ripe.
- Storage: Cabbage can be stored in the refrigerator for a few weeks. Brussels sprouts should be consumed as soon as possible.
Additional Tips for Successful Cabbage Cultivation in a Pot
- Variety selection: Choose cabbage varieties that are suitable for growing in pots. Smaller varieties like mini-cabbage or dwarf Brussels sprouts are ideal.
- Crop rotation: Do not grow cabbage in the same pot every year. Alternate the plants to prevent diseases and pests.
- Mulching: Cover the soil with a layer of mulch (e.g., straw or grass clippings). Mulch keeps the soil moist, suppresses weeds, and protects the plants from temperature fluctuations.
- Ventilation: Ensure good ventilation for the plants. Do not place the pots too close together and regularly remove wilted leaves.
- Observation: Observe your plants regularly for signs of diseases or pests. The sooner you detect problems, the better you can combat them.
- Experimentation: Try out different cabbage varieties and cultivation methods. Every garden is different, and what works for one person may not necessarily work for another.
- Patience: Growing cabbage takes time and patience. Don’t be discouraged if not everything works out right away. With a little practice, you will soon be able to harvest your own fresh cabbage.
Common Problems and Solutions
- Yellow leaves: Can be a sign of nutrient deficiency. Fertilize the cabbage with a suitable fertilizer.
- Aphids: Combat aphids with natural pesticides or rinse them off with a jet of water.
- Cabbage whites: Regularly check the plants for eggs and caterpillars. Remove the eggs and collect the caterpillars. You can also stretch a net over the plants to keep the cabbage whites away.
- Slugs: Use slug pellets or set up slug traps.
- Root rot: Avoid waterlogging and ensure good drainage.
Conclusion
Growing cabbage in a pot is a great way to harvest fresh vegetables even without a garden.

Conclusion
So, there you have it! Growing cabbage without a garden isn’t just a whimsical idea; it’s a genuinely achievable feat that opens up a world of fresh, homegrown goodness, even if you’re limited to a balcony, patio, or even a sunny windowsill. We’ve walked you through the process, from selecting the right container and soil to nurturing your cabbage plants and protecting them from pests. The beauty of this method lies in its accessibility and adaptability. You don’t need acres of land or specialized equipment to enjoy the satisfaction of harvesting your own crisp, flavorful cabbage.
This DIY trick is a must-try for several compelling reasons. First and foremost, it empowers you to control the quality of your food. You know exactly what goes into your cabbage, avoiding potentially harmful pesticides and herbicides often used in commercial farming. Secondly, it’s incredibly rewarding. There’s something deeply satisfying about watching a tiny seedling transform into a vibrant, leafy head of cabbage, all thanks to your care and attention. Thirdly, it’s a fantastic way to connect with nature, even in an urban environment. Gardening, in any form, is a therapeutic activity that can reduce stress and improve your overall well-being. Finally, it’s a cost-effective way to supplement your grocery bill. Imagine the savings you’ll accrue by growing your own cabbage instead of buying it from the store!
But the possibilities don’t stop there. Feel free to experiment with different varieties of cabbage. Red cabbage adds a splash of color to your salads and slaws, while savoy cabbage offers a more delicate flavor and texture. You can also try companion planting. Marigolds, for example, are known to deter cabbage moths, while dill attracts beneficial insects that prey on cabbage pests. Consider adding a layer of mulch to your container to help retain moisture and suppress weeds. For those in colder climates, you might even consider bringing your container indoors during the harshest winter months to extend your growing season.
Don’t be afraid to get your hands dirty and embrace the learning process. Gardening is all about experimentation and adaptation. What works for one person may not work for another, so don’t be discouraged if you encounter a few setbacks along the way. The key is to observe your plants carefully, adjust your approach as needed, and most importantly, have fun!
We are confident that you’ll find growing cabbage without a garden to be a surprisingly simple and incredibly rewarding experience. So, grab a container, some soil, and a few cabbage seedlings, and get started today! We can’t wait to hear about your success. Share your photos, tips, and experiences in the comments below. Let’s create a community of urban gardeners who are passionate about growing their own food, one cabbage at a time! Let us know what challenges you faced and what solutions you found. Your insights could help other aspiring gardeners overcome similar obstacles and enjoy the fruits (or rather, vegetables) of their labor. Happy gardening!
Frequently Asked Questions (FAQ)
1. What is the best type of cabbage to grow in a container?
The best types of cabbage for container gardening are smaller varieties that don’t require as much space. Some excellent choices include:
* Dwarf varieties: Look for varieties specifically labeled as “dwarf” or “compact.” These are bred to stay smaller and are well-suited for containers.
* Early varieties: Early-maturing cabbages tend to be smaller and faster-growing, making them ideal for container gardening. Examples include ‘Golden Acre’ and ‘Early Jersey Wakefield.’
* Red cabbage: Red cabbage varieties often stay relatively small and add a beautiful splash of color to your garden.
* Savoy cabbage: Savoy cabbage has a more delicate flavor and texture than other types of cabbage and tends to be smaller in size.
Ultimately, the best choice depends on your personal preferences and the specific growing conditions in your area. Research different varieties and choose one that suits your needs.
2. How big of a container do I need to grow cabbage?
A general rule of thumb is to use a container that is at least 12 inches in diameter and 12 inches deep for a single cabbage plant. However, larger is always better, as it provides more room for the roots to grow and allows for better water retention. A 5-gallon container is a good starting point. If you plan to grow multiple cabbage plants in the same container, choose a larger container accordingly. Make sure the container has drainage holes to prevent waterlogging.
3. What kind of soil should I use for growing cabbage in a container?
Cabbage needs well-draining, nutrient-rich soil. A good potting mix specifically formulated for vegetables is ideal. Avoid using garden soil, as it can be too heavy and compact in a container, hindering drainage and root growth. You can also amend your potting mix with compost or other organic matter to improve its fertility and drainage. A slightly acidic soil pH of around 6.0 to 6.8 is optimal for cabbage growth.
4. How often should I water my cabbage plants in a container?
Cabbage plants need consistent moisture, especially when grown in containers. Water deeply whenever the top inch of soil feels dry to the touch. Avoid overwatering, as this can lead to root rot. The frequency of watering will depend on the weather conditions, the size of your container, and the type of soil you’re using. During hot, dry weather, you may need to water daily. Check the soil moisture regularly and adjust your watering schedule accordingly.
5. How much sunlight do cabbage plants need?
Cabbage plants need at least 6 hours of direct sunlight per day to thrive. Choose a sunny location for your container garden. If you don’t have a spot that receives full sun, you can supplement with artificial light.
6. How do I fertilize my cabbage plants in a container?
Cabbage plants are heavy feeders and require regular fertilization. Use a balanced fertilizer specifically formulated for vegetables. Follow the instructions on the fertilizer package for application rates and frequency. You can also use organic fertilizers, such as compost tea or fish emulsion. Fertilize your cabbage plants every 2-3 weeks during the growing season.
7. How do I protect my cabbage plants from pests?
Cabbage plants are susceptible to various pests, including cabbage worms, cabbage loopers, and aphids. Here are some tips for protecting your plants:
* Inspect your plants regularly: Check for signs of pests, such as holes in the leaves or the presence of insects.
* Handpick pests: If you find any pests, remove them by hand and dispose of them.
* Use row covers: Row covers can prevent pests from reaching your plants.
* Apply organic pesticides: If necessary, use organic pesticides, such as Bacillus thuringiensis (Bt) for cabbage worms or insecticidal soap for aphids.
* Companion planting: Plant marigolds or other pest-repelling plants near your cabbage to deter pests.
8. How long does it take to grow cabbage in a container?
The time it takes to grow cabbage in a container depends on the variety you’re growing and the growing conditions. Generally, it takes about 60-100 days from transplanting seedlings to harvest. Early-maturing varieties will be ready sooner than late-maturing varieties.
9. How do I know when my cabbage is ready to harvest?
Cabbage is ready to harvest when the head is firm and solid. The size of the head will vary depending on the variety. To harvest, use a sharp knife to cut the head from the stem, leaving a few outer leaves intact.
10. Can I grow cabbage indoors?
Yes, you can grow cabbage indoors, but it requires a lot of light. You’ll need to provide at least 6 hours of direct sunlight per day or supplement with artificial light. Choose a sunny windowsill or use grow lights. Make sure to provide adequate ventilation and monitor for pests. While growing cabbage indoors is possible, it can be more challenging than growing it outdoors in a container.

Leave a Comment