
Growing Kale in Soil Bags: Unlock a bountiful harvest right at your doorstep! Have you ever dreamt of fresh, vibrant kale gracing your table, but felt limited by space or a lack of a traditional garden? Well, dream no more! This DIY guide is your key to unlocking the secrets of cultivating this nutritional powerhouse using a surprisingly simple and effective method: soil bags.
For centuries, kale has been a staple in diets across the globe, from the hearty stews of medieval Europe to the vibrant salads of modern health enthusiasts. Its resilience and adaptability have made it a beloved crop, and now, we’re taking that adaptability to a whole new level. Forget tilling, weeding, and extensive garden planning. With this ingenious trick, you can enjoy the benefits of growing kale in soil bags, regardless of your gardening experience or available space.
Why is this DIY trick a game-changer? Because it’s accessible, affordable, and incredibly rewarding! Many of us are drawn to the idea of fresh, homegrown produce, but the perceived challenges of traditional gardening can be daunting. Soil bags offer a contained, manageable environment, minimizing pests, maximizing drainage, and simplifying the entire process. Plus, it’s a fantastic way to recycle those extra soil bags! So, let’s dive in and discover how you can transform a simple bag of soil into a thriving kale garden. I’m excited to share all my tips and tricks with you!
Growing Kale in Grow Bags: A Simple DIY Guide
Hello garden friends! I love harvesting fresh vegetables directly from my garden, and kale is no exception. It’s super healthy, versatile, and surprisingly easy to grow, even if you don’t have a huge garden. In this article, I’ll show you how to grow kale in grow bags – a great solution for balconies, patios, or small gardens. Let’s go!
Why Grow Bags?
Grow bags are simply brilliant! They are lightweight, portable, and offer good drainage. Additionally, the soil in grow bags warms up faster than in a garden bed, which is particularly advantageous for early cultivation. And the best part: you can place them anywhere that gets sun.
What You Need: The Materials List
Before we get started, here is a list of everything you’ll need:
- Grow bags: Preferably made of sturdy material like polypropylene or jute. They should have at least a 30-liter capacity so the kale has enough space to grow.
- High-quality potting soil: Use a special vegetable soil or mix potting soil with compost. This ensures a good supply of nutrients.
- Kale seeds or seedlings: You can either start seeds indoors or buy seedlings directly. I personally find seedlings easier, especially if you’re in a hurry.
- Compost or organic fertilizer: For an additional nutrient supply during the growing phase.
- Watering can or garden hose: For regular watering.
- Pruning shears or knife: For harvesting the kale.
- Optional: Mulch material (e.g., straw or wood chips) for moisture retention and weed suppression.
- Optional: A sunny location with at least 6 hours of sun per day.
Step-by-Step Guide: Growing Kale in a Grow Bag
Here is the detailed guide to ensure nothing goes wrong:
1. Preparing the Grow Bags
- Prepare grow bags: Place the empty grow bags where you want to grow the kale. Remember that they will be heavier later when filled with soil.
- Improve drainage: If your grow bags don’t have holes at the bottom, you should cut a few small holes in them so that excess water can drain out. This prevents waterlogging, which kale does not like at all.
- Fill with soil: Fill the grow bags with potting soil, but leave about 5-10 cm of space at the top. This makes watering easier.
2. Sowing or Planting
You have two options here: either you sow the seeds directly into the grow bags, or you plant pre-grown seedlings. I’ll show you both methods:
Sowing (if you are using seeds):
- Sow seeds: Press small indentations (approx. 1 cm deep) into the soil with your finger. The distance between the indentations should be about 5-10 cm.
- Place seeds: Place 2-3 seeds in each indentation. This increases the probability that at least one seed will germinate.
- Cover with soil: Carefully cover the seeds with soil and press it down lightly.
- Water in: Water the soil gently so the seeds are not washed away. It’s best to use a watering can with a shower head attachment.
- Keep moist: Keep the soil moist, but not wet. It’s best to spray it regularly with water.
- Be patient: Germination takes about 5-10 days, depending on the variety and temperature.
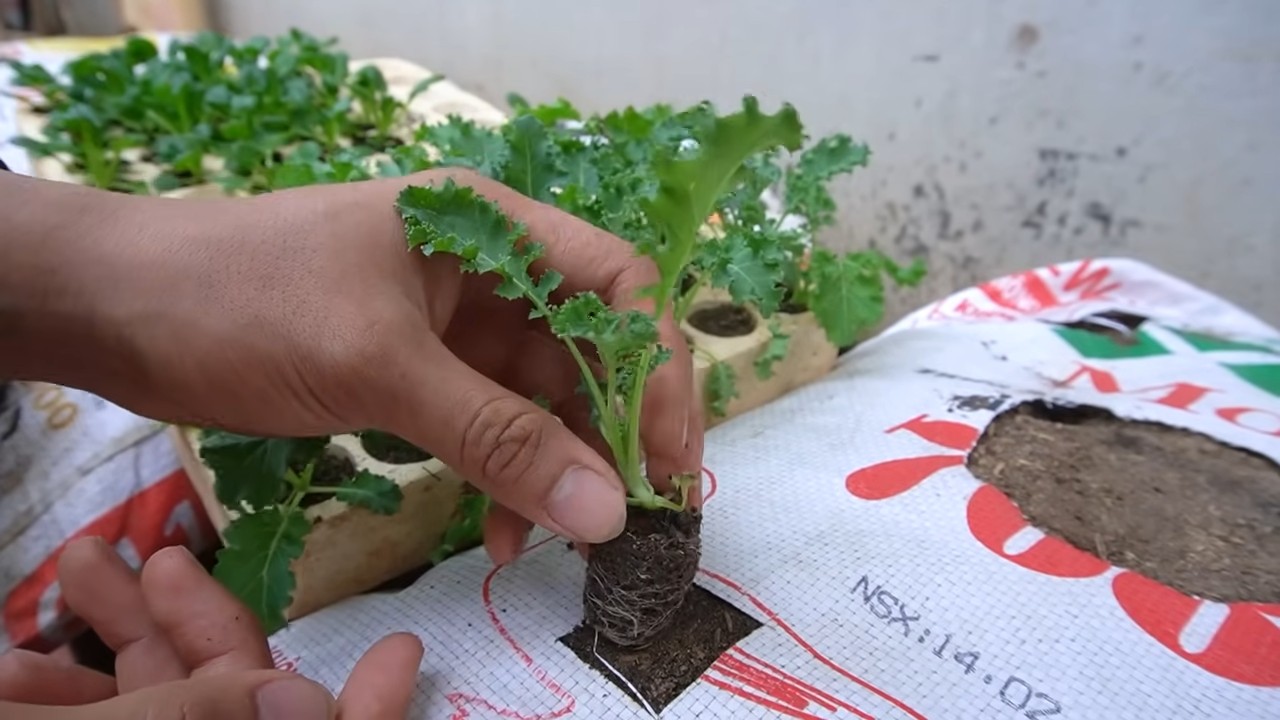
Planting (if you are using seedlings):
- Prepare planting holes: Dig planting holes in the soil with your fingers or a small trowel. The holes should be deep enough to fit the root balls of the seedlings. The distance between the holes should be about 30-40 cm so the plants have enough space to grow.
- Insert seedlings: Carefully remove the seedlings from their pots and loosen the root balls slightly. Place the plants in the planting holes and fill the holes with soil.
- Press down: Lightly press the soil around the plants.
- Water in: Water the plants thoroughly.
3. Caring for the Kale
Now for the most important part: proper care ensures that your kale thrives.
- Watering: Kale needs regular water, especially during dry periods. The soil should always be slightly moist, but not wet. It’s best to water in the morning or evening to avoid evaporation.
- Fertilizing: Kale is a heavy feeder and needs a lot of nutrients. Fertilize the plants every 2-3 weeks with compost, organic fertilizer, or a special vegetable fertilizer. Pay attention to the dosage instructions on the packaging.
- Weeding: Keep the grow bags free of weeds. Weeds compete with the kale for nutrients and water.
- Pest protection: Kale can be infested by various pests, e.g., cabbage whites, aphids, or slugs. Check the plants regularly and combat pests with natural remedies if necessary. For example, a net over the plants helps against cabbage whites. You can use slug pellets or slug fences against slugs.
- Mulching (optional): A layer of mulch made of straw or wood chips helps to retain moisture in the soil and suppress weeds. It also protects the soil from erosion.
- Staking (optional): If the kale grows very tall, it may be useful to support it with stakes to prevent it from tipping over.
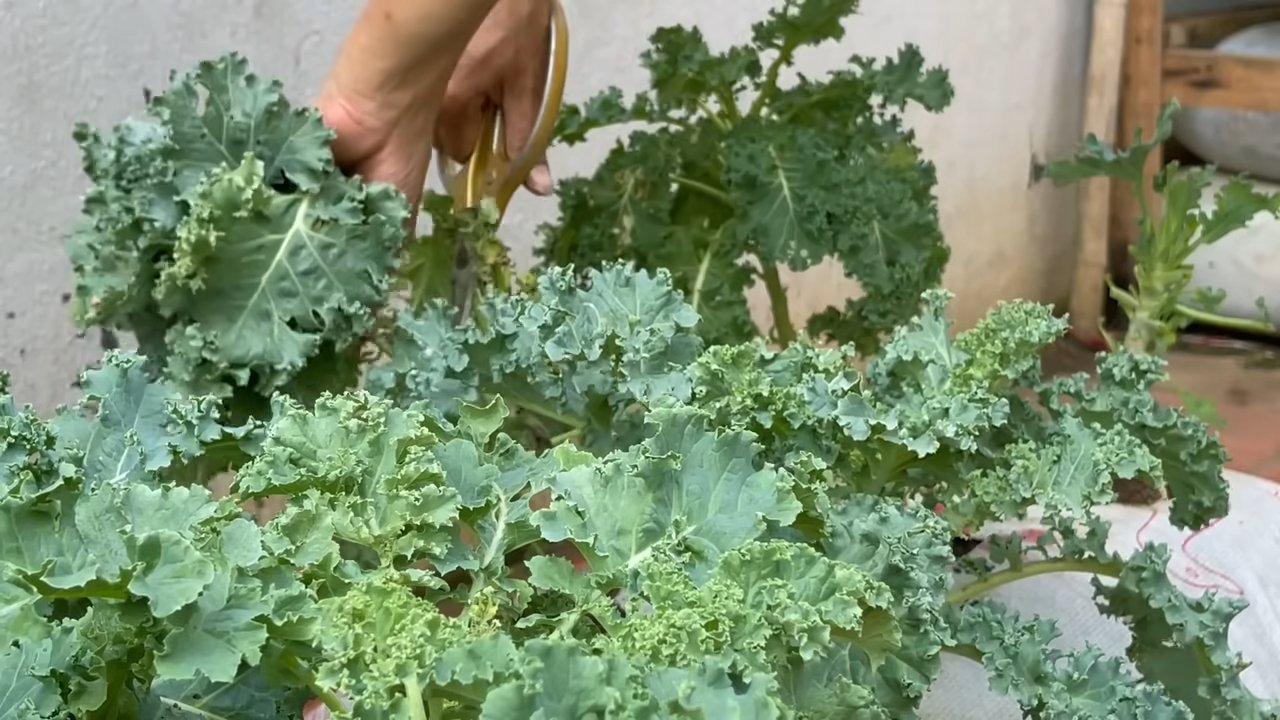
4. Harvest Time!
Finally! The moment you’ve been waiting for.
- Harvest time: Kale can be harvested as soon as the leaves are large enough (approx. 15-20 cm). The harvest season usually begins in the fall and lasts into the winter.
- Harvesting method: Cut the outer leaves with pruning shears or a knife. Leave the inner leaves so the plant can continue to grow. You can harvest the kale multiple times.
- Storage: Fresh kale keeps for about 3-5 days in the refrigerator. You can also freeze it to make it last longer. Before freezing, you should blanch it briefly.
Additional Tips for Successful Kale Cultivation
Regular checks: Check the plants regularly for pests and diseases.
Variety selection: There are many different kale varieties. Find out which varieties are best suited for your location and needs. Popular varieties include ‘Nero di Toscana’ (Lacinato kale), ‘Halbhoher Grüner Krauser’ (Dwarf Green Curled), or ‘Red Russian’.
Practice crop rotation: Do not grow kale in the same spot every year. Rotate the crops to prevent diseases and pests.
Improve the soil: If you want to grow kale in grow bags again next year, you should improve the soil with compost or organic fertilizer before winter.
Sunny location: Kale loves the sun. Place the grow bags in a sunny spot so the plants can grow optimally.
Conclusion
So, there you have it! Growing kale in soil bags is not just a gardening trend; it’s a game-changer for anyone looking to enjoy fresh, nutritious greens with minimal effort and maximum yield. We’ve explored the simplicity, the space-saving benefits, and the sheer joy of harvesting your own vibrant kale leaves right from your doorstep, balcony, or patio.
Why is this DIY trick a must-try? Because it democratizes gardening. You don’t need acres of land, specialized equipment, or a green thumb passed down through generations. All you need is a soil bag, some kale seeds or seedlings, a sunny spot, and a little bit of love. The beauty of this method lies in its adaptability. It’s perfect for urban dwellers, apartment residents, or anyone with limited space who still craves the satisfaction of growing their own food. Plus, the reduced weeding and improved drainage compared to traditional gardening methods make it a truly low-maintenance option.
But the benefits extend beyond convenience. Growing your own kale allows you to control the entire process, ensuring that your greens are free from harmful pesticides and herbicides. You know exactly what’s going into your food, from the quality of the soil to the amount of sunlight it receives. This translates to healthier, more flavorful kale that you can feel good about feeding yourself and your family.
Looking for variations? Absolutely! Experiment with different kale varieties. Try Lacinato (dinosaur kale) for its unique texture and nutty flavor, or Red Russian kale for its beautiful color and slightly sweeter taste. You can also companion plant with herbs like rosemary or thyme to deter pests and enhance the flavor of your kale. Consider adding a layer of mulch, such as straw or wood chips, to help retain moisture and suppress weeds even further. For those in colder climates, soil bags are easily moved indoors or into a greenhouse to extend the growing season.
Don’t be afraid to get creative with your soil bag setup. You can use different sizes of bags, arrange them in interesting patterns, or even paint them to add a touch of personality to your garden. The possibilities are endless!
We wholeheartedly encourage you to try this DIY trick and experience the joy of growing your own kale. It’s a rewarding, sustainable, and delicious way to connect with nature and nourish your body. Once you’ve harvested your first batch of homegrown kale, you’ll be hooked!
Now, we want to hear from you! Share your experiences, tips, and photos of your soil bag kale gardens. What varieties did you grow? What challenges did you face? What successes did you celebrate? Let’s create a community of kale-loving gardeners and inspire others to embrace this simple and effective method. Use the hashtag #SoilBagKale on social media to share your journey and connect with fellow growers. Happy gardening!
Frequently Asked Questions (FAQ)
What type of soil should I use for growing kale in soil bags?
The best type of soil for growing kale in soil bags is a well-draining, nutrient-rich potting mix. Avoid using garden soil directly, as it can be too heavy and compact, hindering drainage and root development. Look for a potting mix that contains a blend of peat moss, perlite, and vermiculite. You can also amend your potting mix with compost or aged manure to provide additional nutrients. A slightly acidic to neutral pH (around 6.0 to 7.0) is ideal for kale.
How often should I water my kale plants in soil bags?
Watering frequency depends on several factors, including the weather, the size of the soil bag, and the stage of growth of your kale plants. Generally, you should water your kale plants when the top inch of soil feels dry to the touch. During hot, dry weather, you may need to water daily, while during cooler, wetter periods, you may only need to water every few days. Be sure to water thoroughly, allowing the water to drain out of the bottom of the bag. Avoid overwatering, as this can lead to root rot. A good rule of thumb is to check the soil moisture regularly and adjust your watering schedule accordingly.
How much sunlight does kale need when grown in soil bags?
Kale thrives in full sun, which means it needs at least 6 hours of direct sunlight per day. However, it can also tolerate partial shade, especially in hotter climates. If you live in an area with intense summer heat, providing some afternoon shade can help prevent the leaves from scorching. When choosing a location for your soil bags, consider the amount of sunlight the area receives throughout the day. If you’re growing kale indoors, you may need to supplement with grow lights to ensure adequate light exposure.
What are some common pests and diseases that affect kale, and how can I prevent them?
Kale is susceptible to several pests and diseases, including aphids, cabbage worms, flea beetles, and downy mildew. To prevent pest infestations, inspect your plants regularly for signs of damage. You can handpick pests off the leaves or use insecticidal soap or neem oil to control them. Row covers can also be used to protect your plants from pests. To prevent diseases, ensure good air circulation around your plants and avoid overwatering. Remove any infected leaves promptly to prevent the spread of disease. Crop rotation can also help reduce the risk of soilborne diseases.
How do I harvest kale from soil bags?
You can start harvesting kale leaves when they are about 4-6 inches long. Harvest the outer leaves first, leaving the inner leaves to continue growing. Use a sharp knife or scissors to cut the leaves close to the stem. Avoid tearing the leaves, as this can damage the plant. You can harvest kale leaves continuously throughout the growing season. Regular harvesting encourages the plant to produce more leaves.
Can I grow kale in soil bags during the winter?
Yes, you can grow kale in soil bags during the winter, especially in milder climates. Kale is a cold-hardy vegetable that can tolerate frost and even snow. In colder climates, you may need to provide some protection for your plants, such as covering them with a frost blanket or moving them indoors to a greenhouse or sunny window. Choose winter-hardy kale varieties, such as Winterbor or Red Russian, for best results.
How do I fertilize kale plants grown in soil bags?
Kale is a heavy feeder, so it’s important to fertilize your plants regularly to ensure healthy growth. You can use a balanced organic fertilizer, such as compost tea or fish emulsion, every 2-3 weeks. Alternatively, you can incorporate slow-release fertilizer granules into the soil at planting time. Avoid over-fertilizing, as this can lead to excessive leaf growth and reduced flavor.
Can I reuse the soil bags for growing kale again next season?
Yes, you can reuse the soil bags for growing kale again next season, but it’s important to amend the soil with fresh compost or aged manure to replenish nutrients. You may also want to add some slow-release fertilizer granules. Before reusing the soil bags, remove any old plant debris and weeds. If you suspect that the soil is contaminated with pests or diseases, you may want to sterilize it by baking it in the oven or solarizing it in the sun.
What are some good companion plants for kale in soil bags?
Good companion plants for kale include herbs like rosemary, thyme, and sage, which can help deter pests. Marigolds are also effective at repelling nematodes and other soil pests. Other beneficial companion plants include onions, garlic, and nasturtiums. Avoid planting kale near members of the brassica family, such as broccoli, cabbage, and cauliflower, as they can attract the same pests and diseases.
How long does it take for kale to grow in soil bags?
The time it takes for kale to grow in soil bags depends on several factors, including the variety of kale, the growing conditions, and whether you started from seeds or seedlings. Generally, you can expect to harvest your first kale leaves about 50-60 days after planting seeds or 30-40 days after transplanting seedlings.

Leave a Comment