
Watermelon harvest growth hacks – who doesn’t dream of biting into a juicy, homegrown watermelon on a hot summer day? I know I do! But let’s be honest, getting those watermelons from tiny seedlings to ripe, delicious fruits can feel like a real challenge. That’s where these DIY tricks come in.
For centuries, gardeners around the world have been perfecting the art of watermelon cultivation. From ancient Egypt, where watermelons were depicted in hieroglyphics, to modern-day backyard gardens, this refreshing fruit has held a special place in our hearts (and stomachs!). But even with all that history, sometimes our watermelons need a little extra help to reach their full potential.
That’s why I’ve compiled these easy-to-implement watermelon harvest growth hacks. Whether you’re struggling with blossom end rot, dealing with pests, or simply want to maximize your yield, these tips and tricks will help you achieve a bountiful harvest. Imagine the satisfaction of serving up slices of your own homegrown watermelon at your next barbecue – your friends and family will be amazed! Plus, knowing exactly where your food comes from and how it was grown is incredibly rewarding. So, let’s dive in and unlock the secrets to growing the biggest, juiciest watermelons you’ve ever tasted!
Watermelon Harvest Growth Hacks: How to Maximize Your Harvest!
Hello dear garden friends! I’m thrilled to share my best DIY hacks for a bountiful watermelon harvest with you today. I’ve tried a lot over the years, and these tips have proven to be particularly effective. Let’s work together to make your watermelons really big and juicy this year!
The Basics: Preparation is Everything!
Before we get to the actual hacks, it’s important that the basics are right. Good soil preparation and proper care are crucial for success.
- Soil condition: Watermelons love loose, well-draining soil.
- Sun exposure: At least 6-8 hours of direct sunlight are a must.
- Watering: Regular, deep watering is important, especially during fruit development.
- Fertilizing: Watermelons are heavy feeders, so they need plenty of nutrients.
Hack 1: The “Watermelon Turbo” – Soil Improvement with Compost and Mulch
Watermelons need nutrient-rich soil to grow optimally. Here is my secret recipe for a “Watermelon Turbo” that really perks up the soil:
Materials Needed:
- Mature compost
- Well-rotted manure (optional)
- Mulch material (straw, wood chips, grass clippings)
Step-by-Step Instructions:
- Prepare the soil: Before you plant the watermelons, loosen the soil thoroughly. Remove stones and weeds.
- Incorporate compost: Spread a thick layer of compost (approx. 5-10 cm) on the planting area and work it carefully into the soil. If you use manure, mix it well with the compost.
- Plant: Plant the watermelon plants in the prepared soil. Ensure sufficient spacing (at least 1 meter between plants).
- Mulch: Cover the soil around the plants with a thick layer of mulch. This helps to retain moisture in the soil, suppress weeds, and protect the fruit from direct contact with the ground.
Why this works:
- Compost and manure provide important nutrients that promote watermelon growth.
- Mulch retains moisture in the soil and reduces evaporation.
- Mulch suppresses weeds that would otherwise compete with the watermelons for nutrients.
- The mulch protects the fruit from rot by preventing direct contact with the moist soil.
Hack 2: “Sweet Fruit Guarantee” – Targeted Fertilizing for More Flavor
Watermelons need different nutrients during different growth phases. With targeted fertilizing, you can significantly improve the taste and size of the fruit.
Materials Needed:
- Organic fertilizer (e.g., bone meal, comfrey tea)
- Potassium-rich fertilizer (e.g., wood ash)
Step-by-Step Instructions:
- Early phase (after planting): Fertilize the plants with an organic fertilizer rich in nitrogen (e.g., horn shavings). Nitrogen promotes the growth of leaves and shoots.
- Flowering phase: Once the plants are flowering, reduce the nitrogen supply and increase the phosphorus content. Phosphorus promotes flowering and fruit set.
- Fruit development: During fruit development, potassium is particularly important. Potassium ensures the transport of sugar to the fruit and improves the taste. Fertilize the plants with a potassium-rich fertilizer (e.g., wood ash).
- Regular fertilization: Fertilize the plants every 2-3 weeks with a diluted fertilizer solution. Be sure to follow the manufacturer’s dosage recommendations.
Why this works:
- Nitrogen promotes vegetative growth (leaves and shoots).
- Phosphorus promotes flowering and fruit set.
- Potassium promotes the transport of sugar to the fruit and improves the taste.
- Regular fertilization ensures that the plants are always supplied with sufficient nutrients.
Hack 3: “The Sunbed for Watermelons” – Reflective Mulch for More Warmth
Watermelons love warmth! With reflective mulch, you can intensify the sun’s rays and ripen the fruit faster.
Materials Needed:
- Reflective mulch material (e.g., silver foil, aluminum foil)
Step-by-Step Instructions:
- Prepare the soil: Prepare the soil as described in Hack 1.
- Lay out the mulch: Lay the reflective mulch material around the plants. Make sure that the leaves and fruit do not lie directly on the mulch, as they could burn.
- Secure: Secure the mulch with stones or ground anchors so that it is not blown away by the wind.
Why this works:
- Reflective mulch reflects sunlight and increases the temperature around the plants.
- The increased temperature accelerates the growth and ripening of the fruit.
- The reflected light also reaches the underside of the leaves, which improves photosynthesis.
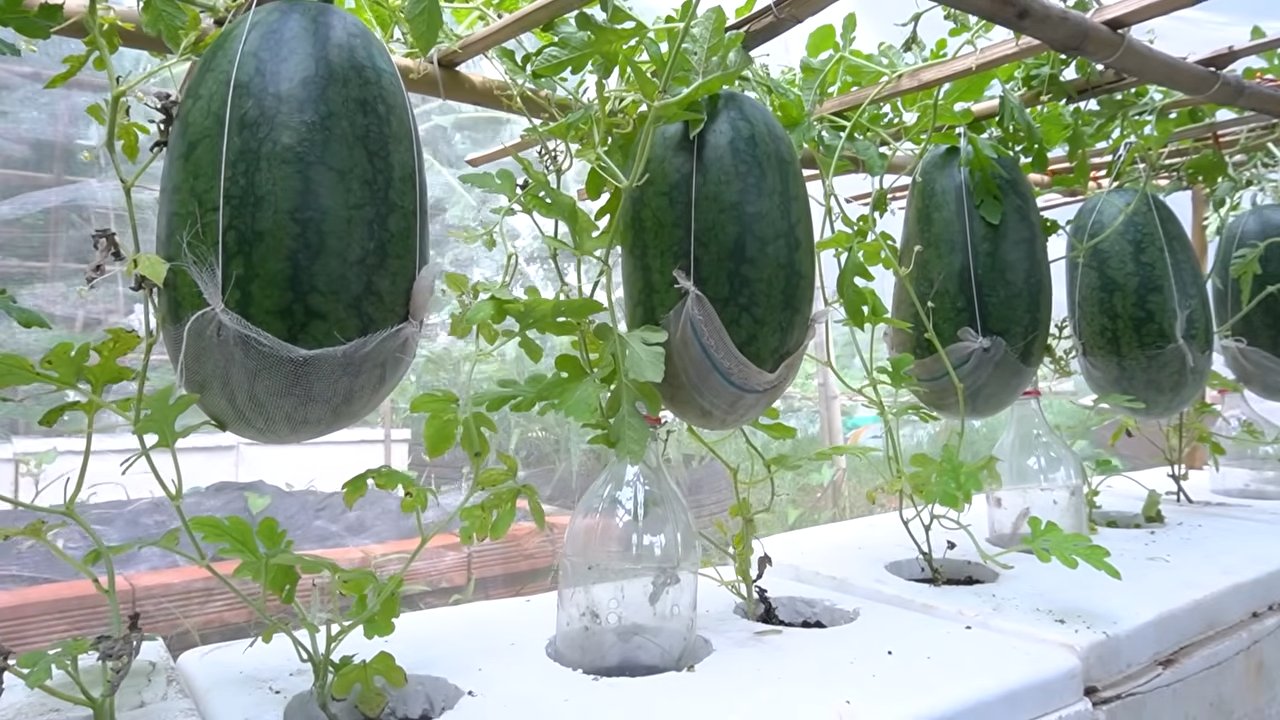
Hack 4: “The Watermelon Hammock” – Support for Heavy Fruits
Large watermelons can get quite heavy! To prevent the fruit from breaking off or rotting, you can support it with a “watermelon hammock.”
Materials Needed:
- Old fabric scraps (e.g., T-shirts, towels)
- Garden twine
Step-by-Step Instructions:
- Prepare the hammock: Cut small “hammocks” from the fabric scraps. The size of the hammocks should correspond to the size of the fruit.
- Attach the hammock: Place the hammock under the fruit and secure it with garden twine to a sturdy branch or a trellis. Make sure the fruit is well supported and not lying on the ground.
Why this works:
- The hammock supports the fruit and prevents it from breaking off or rotting.
- The hammock ensures better air circulation around the fruit, which reduces the risk of rot.
- The hammock protects the fruit from pests that like to stay on the ground.
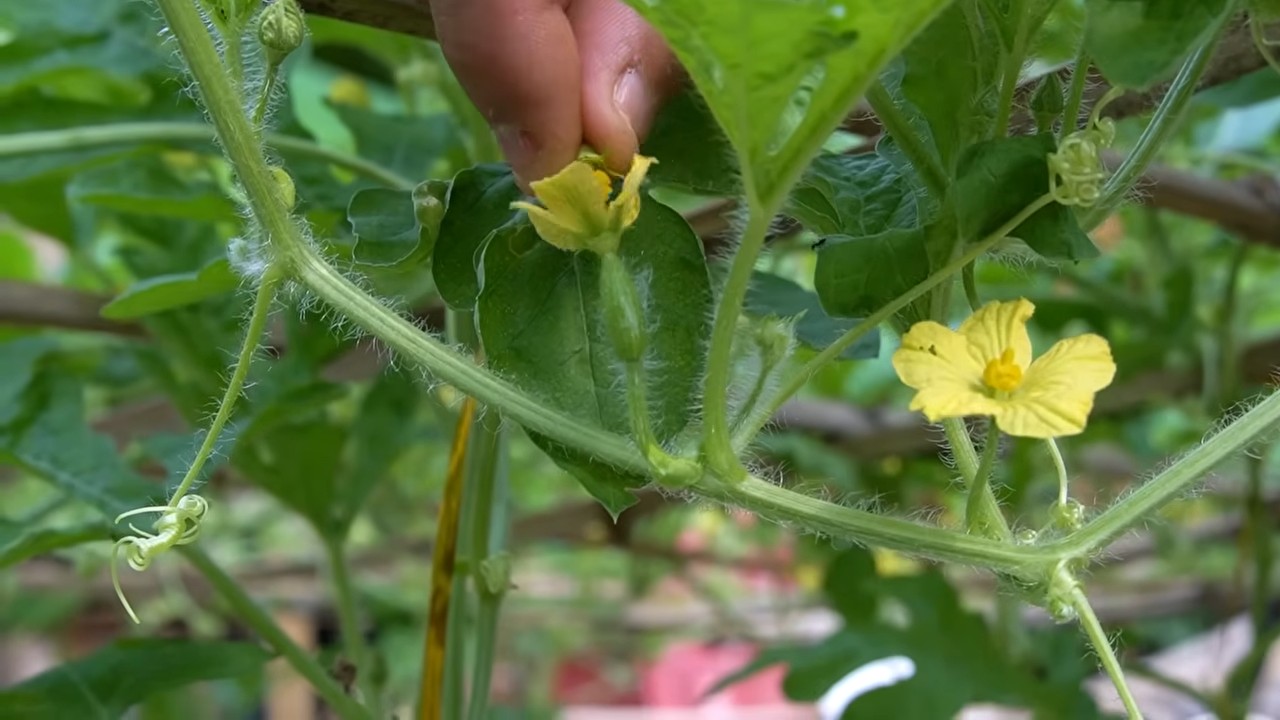
Hack 5: “The Bee Party” – Pollination Aid for More Fruits
Watermelons depend on pollination by bees and other insects. To ensure that enough pollinators are around in your garden, you can host a “bee party.”
Materials Needed:
- Flowering plants (e.g., lavender, sunflowers, marigolds)
- A shallow dish with water and stones
Step-by-Step Instructions:
Avoid pesticides: Avoid the use of pesticides, as they are harmful to bees and other pollinators.
Plant flowering plants: Plant flowering plants near your watermelons. Make sure the plants have different flowering times so that the bees can find food all summer long.
Set up a bee bath: Place a shallow dish with water and stones in your garden. The stones serve as a landing place for the bees.
Conclusion
So, there you have it! Mastering these watermelon harvest growth hacks isn’t just about getting bigger, juicier watermelons; it’s about taking control of your garden and experiencing the immense satisfaction of nurturing something truly delicious from seed to table. Forget relying solely on luck or generic gardening advice. These proven techniques, from strategic pruning to targeted fertilization, empower you to optimize your watermelon plants’ potential and reap a bountiful harvest.
Why is this a must-try? Because it works! We’ve seen firsthand the difference these methods make, and we’re confident you will too. Imagine biting into a perfectly ripe, intensely flavorful watermelon that you grew yourself, knowing you played an active role in its success. That’s the reward waiting for you.
But don’t stop there! Experiment with variations to tailor these hacks to your specific climate and soil conditions. For example, if you live in a particularly hot and dry region, consider using shade cloth during the hottest part of the day to prevent sunscald. Or, if your soil is naturally acidic, amend it with lime to raise the pH to the optimal range for watermelon growth. You can also try different types of mulch, such as straw or wood chips, to see which works best for moisture retention and weed suppression in your garden.
Another exciting variation is to explore different watermelon varieties. While these growth hacks will benefit most watermelons, some varieties are naturally more resistant to pests and diseases or better suited to specific climates. Consider trying heirloom varieties for unique flavors and colors, or seedless varieties for convenience.
We encourage you to dive in and try these watermelon harvest growth hacks this season. Don’t be afraid to experiment and adapt them to your own unique gardening situation. The most important thing is to observe your plants closely and learn from your experiences.
And most importantly, we want to hear from you! Share your results, your challenges, and your own tips and tricks in the comments below. Let’s create a community of watermelon growers who are passionate about maximizing their harvests and enjoying the fruits (or rather, vegetables!) of their labor. Your insights could help other gardeners achieve their watermelon dreams. Let’s grow together!
Frequently Asked Questions (FAQ)
What if I don’t have a lot of space for watermelon plants?
That’s a great question! Watermelons are known for their sprawling vines, but you can still grow them even with limited space. Consider growing bush or dwarf watermelon varieties, which are specifically bred to be more compact. You can also train the vines to grow vertically on a trellis or fence, which will save space and improve air circulation. Container gardening is another option, but make sure to choose a large container (at least 20 gallons) and provide adequate support for the developing fruit. Remember to adjust your watering and fertilization schedule accordingly, as container-grown plants tend to dry out and deplete nutrients faster than those grown in the ground.
How do I know when my watermelon is ripe and ready to harvest?
Determining watermelon ripeness can be tricky, but there are several telltale signs to look for. First, check the tendril closest to the fruit stem. When it turns brown and dries out, it’s a good indication that the watermelon is nearing maturity. Second, examine the underside of the watermelon where it rests on the ground. This spot, known as the ground spot, should turn from white to a creamy yellow color. Finally, give the watermelon a gentle thump. A ripe watermelon will sound hollow and deep, while an unripe one will sound dull and solid. With practice, you’ll develop a knack for identifying ripe watermelons by sound.
What are the most common pests and diseases that affect watermelon plants, and how can I prevent them?
Watermelon plants are susceptible to a variety of pests and diseases, including aphids, squash bugs, vine borers, powdery mildew, and fusarium wilt. To prevent these problems, start by choosing disease-resistant watermelon varieties. Practice good garden hygiene by removing weeds and debris that can harbor pests and diseases. Rotate your crops each year to prevent soilborne diseases from building up. Use row covers to protect young plants from pests. Inspect your plants regularly for signs of infestation or disease, and take action promptly if you spot any problems. Organic pest control methods, such as insecticidal soap and neem oil, can be effective for controlling aphids and other pests. For fungal diseases, consider using copper-based fungicides or baking soda sprays.
How often should I water my watermelon plants?
Watermelon plants need consistent moisture, especially during fruit development. Water deeply and regularly, aiming for about 1-2 inches of water per week. Avoid overhead watering, which can promote fungal diseases. Instead, water at the base of the plants or use a soaker hose or drip irrigation system. Monitor the soil moisture regularly and adjust your watering schedule accordingly, depending on the weather conditions. During hot, dry spells, you may need to water more frequently. Mulching around the plants can help retain moisture and reduce the need for frequent watering.
What kind of fertilizer should I use for my watermelon plants?
Watermelon plants are heavy feeders and require a balanced fertilizer to thrive. Before planting, amend your soil with compost or other organic matter to improve its fertility and drainage. During the early stages of growth, use a fertilizer that is high in nitrogen to promote leafy growth. Once the plants start to flower and set fruit, switch to a fertilizer that is higher in phosphorus and potassium to support fruit development. Avoid over-fertilizing, as this can lead to excessive vine growth and reduced fruit production. Follow the instructions on the fertilizer label carefully. You can also use organic fertilizers, such as compost tea or fish emulsion, to provide your watermelon plants with the nutrients they need.
Can I grow watermelons in containers?
Yes, you can absolutely grow watermelons in containers! Choose a large container, at least 20 gallons in size, with good drainage. Use a high-quality potting mix that is well-draining and rich in nutrients. Select bush or dwarf watermelon varieties, which are better suited for container growing. Provide a trellis or other support for the vines to climb on. Water regularly and fertilize frequently, as container-grown plants tend to dry out and deplete nutrients faster than those grown in the ground. Place the container in a sunny location that receives at least 6-8 hours of sunlight per day. Be prepared to hand-pollinate the flowers if necessary, as pollinators may not be as active in container gardens.

Leave a Comment