
Double Pepper Harvest Home: Imagine biting into a juicy, vibrant pepper, knowing you nurtured it from a tiny seed right in your own backyard. Sounds rewarding, right? Well, it absolutely is! For centuries, humans have cultivated gardens, not just for sustenance, but for the sheer joy of connecting with nature. From the hanging gardens of Babylon to the victory gardens of World War II, growing our own food has always been a source of pride and resilience.
But let’s be honest, sometimes our pepper plants just don’t produce as much as we’d hoped. That’s where this DIY trick comes in! I’m going to share a simple, yet incredibly effective method to achieve a double pepper harvest home. This isn’t just about getting more peppers; it’s about maximizing your gardening efforts, reducing food waste, and enjoying the fruits (or vegetables!) of your labor to the fullest.
Why do you need this hack? Because who wouldn’t want more peppers? Whether you’re a seasoned gardener or just starting out, this easy-to-follow guide will empower you to boost your pepper production and enjoy a bountiful harvest. Get ready to transform your pepper plants into prolific producers – let’s get started!
Double Your Pepper Harvest: My DIY Trick for a Bountiful Harvest
Hello dear garden friends! I am thrilled to share one of my absolute favorite DIY tricks with you today, one that I use to double (or even triple!) my pepper harvest every year. It’s easier than you think, and with a few simple steps, you too can look forward to a huge pepper harvest. Let’s get started!
What you need:
- Healthy pepper plants: Choose robust, well-developed pepper plants. Look for strong stems and lush green leaves.
- Sharp pruning shears or knife: A sharp tool is essential for clean cuts.
- Rooting hormone (optional): Speeds up root formation of the cuttings. I usually use it, but it also works without.
- Small pots or seed trays: For the cuttings.
- Seed starting mix: Light and low in nutrients, ideal for young plants.
- Watering can or spray bottle: For watering.
- Plastic wrap or mini-greenhouse (optional): To increase humidity for the cuttings.
- Plant stakes or trellis: to support the pepper plants, especially when they bear a lot of fruit.
- Patience: The most important thing!
The Trick: Propagating Peppers from Cuttings
The key to this whole thing is that we not only harvest the original pepper plant but also grow new plants from the side shoots. This way, we get “free” pepper plants, so to speak, and maximize our harvest area.
Why does this work?
Pepper plants are relatively easy to propagate from cuttings. The side shoots that we cut off have the potential to form their own roots and grow into independent plants. This is a great way to turn a single plant into several and thus multiply the harvest.
Step-by-Step Guide:
- Choose the right time: The best time to propagate peppers from cuttings is in the spring or early summer when the plants are actively growing. I usually do this when the pepper plants are about 20-30 cm tall.
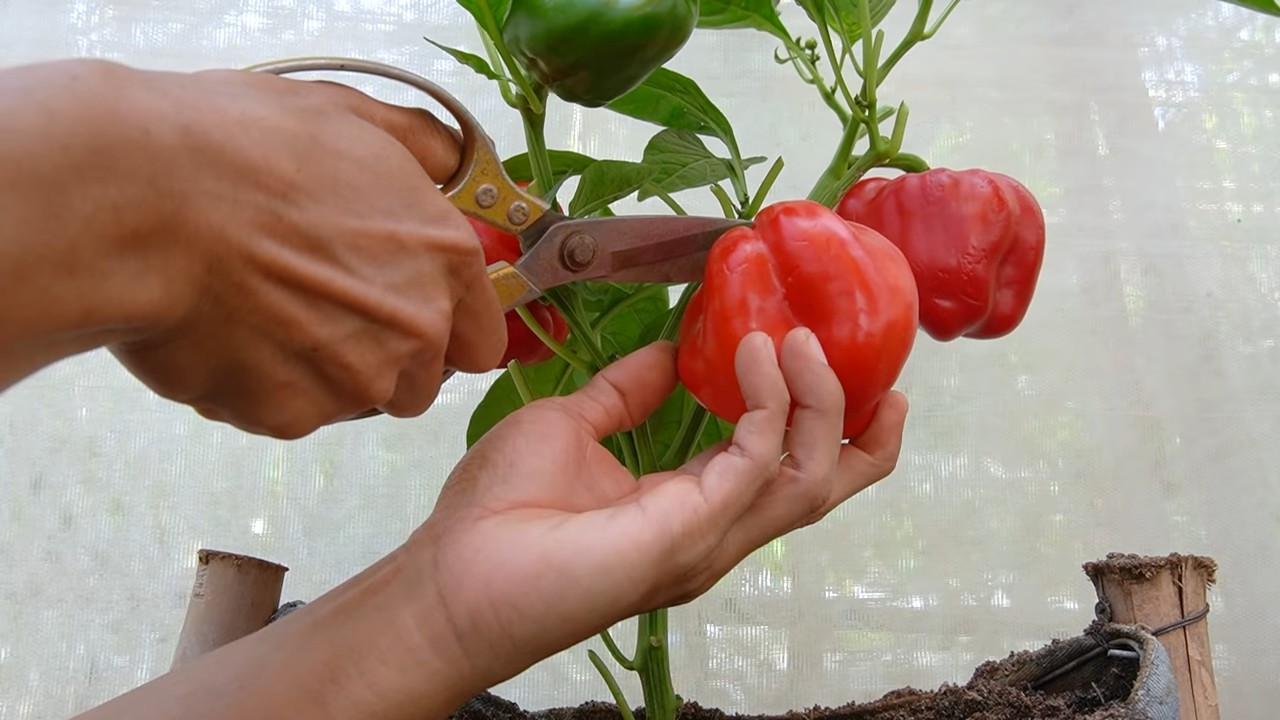
- Select the side shoots: Look for healthy, strong side shoots that are about 8-12 cm long. They should not have any flowers or fruits. I make sure they have at least 2-3 leaf nodes.
- Cut the cuttings: Using sharp pruning shears or a knife, cut the side shoots directly below a leaf node. Make sure to make a clean, smooth cut.
- Remove the lower leaves: Remove the lower leaves of the cutting, leaving only the top 2-3 leaves. This reduces evaporation and promotes root formation.
- Rooting hormone (optional): Dip the lower end of the cutting into rooting hormone. This is not strictly necessary, but it accelerates root formation and increases the success rate. I usually use a powder, but there are also liquid versions.
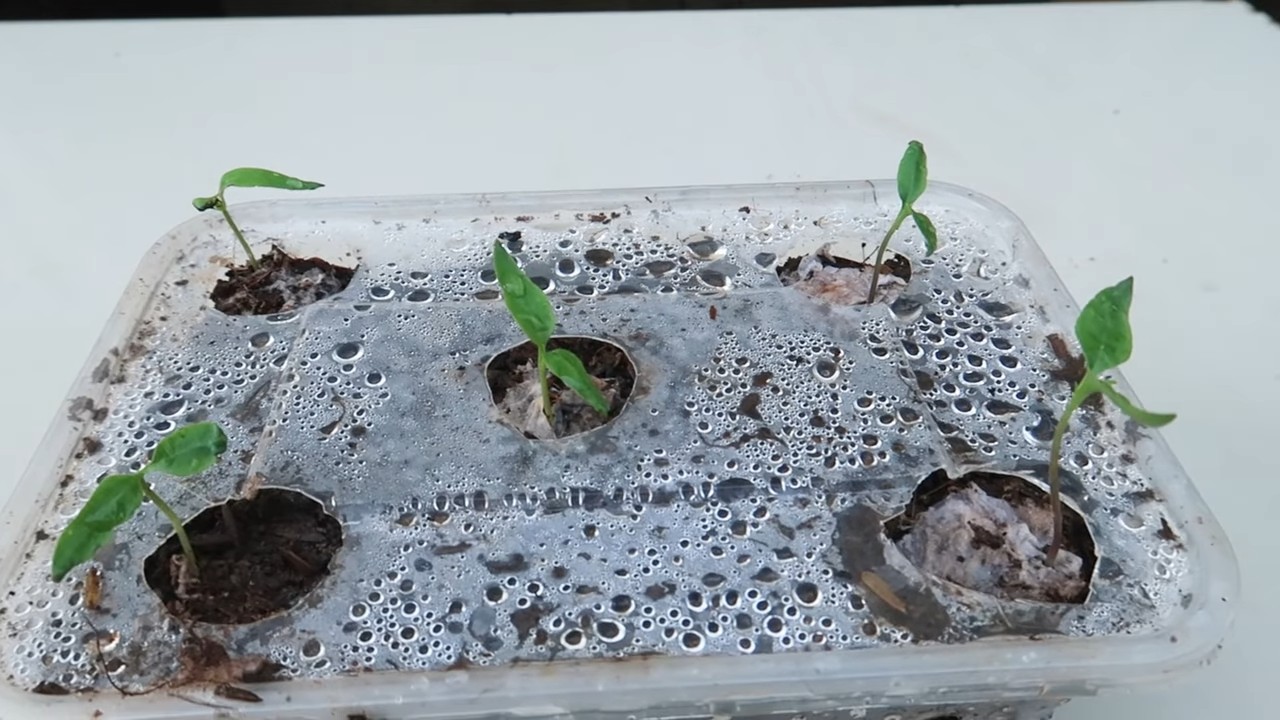
- Plant the cuttings: Fill small pots or seed trays with seed starting mix. Make a hole in the soil with a pencil or your finger and insert the cutting. Press the soil down lightly so that the cutting stands firm.
- Watering: Water the cuttings gently so that the soil is moist but not wet. I prefer to use a spray bottle for this to avoid overwatering the young plants.
- Provide high humidity: To increase humidity, you can cover the pots with plastic wrap or place them in a mini-greenhouse. This helps the cuttings from drying out before they have formed roots. Be sure to ventilate the plastic wrap or greenhouse regularly to prevent mold.
- The right location: Place the cuttings in a bright, warm place, but not in direct sunlight. A windowsill is ideal.
- Be patient: It usually takes 2-4 weeks for the cuttings to form roots. Keep the soil moist and ventilate regularly. You can gently tug on the cuttings to check if they have formed roots. If they offer resistance, they have rooted.
- Repotting: Once the cuttings have formed sufficient roots, you can transplant them into larger pots or directly into the garden bed. Use a high-quality vegetable soil for this.
- Care for the original plant: After you have removed the side shoots, it is important to take good care of the original pepper plant. Fertilize it regularly and ensure it has enough water. Removing the side shoots will encourage the plant to produce more fruit.
Additional Tips for a Successful Pepper Harvest:
- The right location: Peppers love the sun! Choose a sunny spot with at least 6 hours of direct sunlight per day.
- The right soil: Peppers prefer well-draining, nutrient-rich soil. Improve the soil with compost or other organic material before planting.
- Regular watering: Peppers need regular water, especially during fruit formation. Make sure to keep the soil moist, but not overwatered.
- Regular fertilizing: Peppers are heavy feeders and need regular fertilizer. Use a special vegetable fertilizer or compost tea.
- Support: Pepper plants can collapse under the weight of the fruit. Support them with plant stakes or trellises.
- Pests and diseases: Watch out for pests and diseases and combat them early. I prefer to use natural remedies like neem oil or nettle tea.
- Regular harvesting: Harvest the peppers regularly as soon as they are ripe. This encourages the plant to produce more fruit.
Avoiding Common Mistakes:
- Planting too deep: Do not plant the cuttings too deep, as this can lead to rot.
- Overwatering: Avoid waterlogging, as this can damage the roots.
- Direct sunlight: Do not place the cuttings in direct sunlight, as this can cause them to burn.
- Impatience: Be patient! It takes a while for the cuttings to form roots.
Why This Trick is So Great:
- Free plants: You get additional pepper plants without having to buy new seeds.
- Higher yield: With the additional plants, you can significantly increase your pepper harvest.
- Sustainability: You propagate your plants yourself, reducing the need for new plants from the garden center.
- Joy of gardening: It’s just fun to see new plants grow from small cuttings.
Another little tip from me:
I have found that the cuttings take root particularly well when I place them in a mini-greenhouse on the windowsill. The high humidity and warmth greatly promote root formation. Give it a try!
I hope this DIY trick helps you double your pepper harvest. Have fun gardening and enjoy your meal! If you have any questions, feel free to write them in the comments. I look forward to hearing about your experiences
Conclusion
So, there you have it! Mastering the art of the Double Pepper Harvest Home isn’t just about maximizing your yield; it’s about embracing a more sustainable and rewarding gardening experience. We’ve explored a simple yet incredibly effective method to coax your pepper plants into producing a bounty that will have you swimming in salsa, stuffing peppers until your heart’s content, and sharing the abundance with friends and neighbors.
Why is this a must-try? Because it’s efficient, cost-effective, and, frankly, quite satisfying. Instead of settling for a modest pepper harvest, you can unlock the full potential of your plants with just a few strategic tweaks. Imagine the pride you’ll feel as you survey your garden, overflowing with vibrant, juicy peppers, all thanks to your own ingenuity.
But the beauty of gardening lies in experimentation. Feel free to adapt this Double Pepper Harvest Home technique to suit your specific needs and preferences. For instance, if you’re growing smaller pepper varieties like chili peppers or sweet peppers, you might find that slightly less aggressive pruning is sufficient. Conversely, for larger bell peppers or more robust varieties, you might need to adjust the staking or support system to accommodate the increased weight of the fruit.
Consider experimenting with different types of fertilizer to further boost your pepper production. A balanced fertilizer with a slightly higher phosphorus content can encourage flowering and fruit development. Organic options like bone meal or compost tea are also excellent choices for providing your plants with the nutrients they need.
Don’t be afraid to get creative with your pest control methods, too. Companion planting with herbs like basil or marigolds can help deter common pepper pests. Regularly inspecting your plants for signs of infestation and addressing any issues promptly will also go a long way in ensuring a healthy and abundant harvest.
Ultimately, the key to success with the Double Pepper Harvest Home is observation and adaptation. Pay close attention to your plants, monitor their growth, and adjust your approach as needed. Gardening is a journey of learning and discovery, and every season brings new opportunities to refine your skills and techniques.
We wholeheartedly encourage you to give this Double Pepper Harvest Home method a try. It’s a game-changer for pepper enthusiasts of all levels, from novice gardeners to seasoned pros. And once you’ve experienced the joy of harvesting a double yield of peppers, we’re confident you’ll be hooked.
But don’t just take our word for it. We want to hear about your experiences! Share your photos, tips, and stories with us in the comments section below. Let’s create a community of pepper-loving gardeners who are passionate about maximizing their harvests and sharing their knowledge with others. Together, we can unlock the full potential of our gardens and enjoy the delicious rewards of our labor. Happy gardening!
Frequently Asked Questions (FAQ)
What exactly is the “Double Pepper Harvest Home” technique?
The Double Pepper Harvest Home is a method designed to significantly increase the yield of your pepper plants. It typically involves a combination of strategic pruning, proper fertilization, adequate watering, and providing sufficient support for the plant as it becomes laden with peppers. The goal is to encourage the plant to produce more flowers and, consequently, more fruit. It’s about creating an optimal environment for pepper production within your home garden.
What types of peppers does this technique work best for?
While the Double Pepper Harvest Home technique can be applied to most pepper varieties, it tends to be particularly effective for bell peppers, jalapeños, and other medium to large-sized peppers. Smaller pepper varieties, like chili peppers, may also benefit, but the pruning and support requirements might be slightly different. Experimentation is key to finding what works best for your specific pepper variety.
How often should I prune my pepper plants using this method?
The frequency of pruning depends on the growth rate of your pepper plants. Generally, you should aim to prune them every 2-3 weeks during the active growing season. Focus on removing suckers (the small shoots that grow between the main stem and branches) and any yellowing or damaged leaves. Regular pruning encourages the plant to focus its energy on producing fruit rather than foliage.
What kind of fertilizer is best for the Double Pepper Harvest Home technique?
A balanced fertilizer with a slightly higher phosphorus content is ideal for promoting flowering and fruit development. Look for a fertilizer with an NPK ratio (nitrogen, phosphorus, potassium) of around 5-10-5 or 10-15-10. Organic options like bone meal, compost tea, or fish emulsion are also excellent choices. Avoid over-fertilizing, as this can lead to excessive foliage growth at the expense of fruit production.
How much water do pepper plants need when using this technique?
Pepper plants need consistent moisture, especially when they are actively producing fruit. Water deeply and regularly, ensuring that the soil remains moist but not waterlogged. The frequency of watering will depend on the weather conditions and the type of soil you have. Check the soil moisture level regularly by sticking your finger about an inch into the soil. If it feels dry, it’s time to water.
What kind of support system is recommended for pepper plants?
As pepper plants become laden with fruit, they may need additional support to prevent the branches from breaking. Staking is a common and effective method. Use sturdy stakes made of wood, bamboo, or metal, and tie the main stem of the plant to the stake with soft twine or plant ties. You can also use tomato cages or netting to provide support for the entire plant.
Are there any specific pests or diseases I should be aware of?
Pepper plants are susceptible to various pests and diseases, including aphids, whiteflies, spider mites, and fungal diseases like blossom end rot. Regularly inspect your plants for signs of infestation or disease. Use organic pest control methods like insecticidal soap or neem oil to control pests. Ensure good air circulation around your plants to prevent fungal diseases. Blossom end rot is often caused by calcium deficiency, so consider adding calcium to the soil or using a calcium-rich foliar spray.
Can I use this technique in containers or raised beds?
Yes, the Double Pepper Harvest Home technique can be successfully implemented in containers or raised beds. Just make sure that your containers are large enough to accommodate the mature size of your pepper plants and that they have adequate drainage. Raised beds offer excellent drainage and soil control, making them ideal for growing peppers.
How long does it take to see results from this technique?
You should start to see results within a few weeks of implementing the Double Pepper Harvest Home technique. You’ll notice increased flowering and fruit set, and your plants will generally appear healthier and more vigorous. The exact timing will depend on the variety of pepper you’re growing, the growing conditions, and your overall gardening practices.
What if I don’t have a “green thumb”? Can I still do this?
Absolutely! The Double Pepper Harvest Home technique is designed to be accessible to gardeners of all skill levels. While some gardening experience is helpful, it’s not essential. Just follow the instructions carefully, pay attention to your plants, and don’t be afraid to experiment. Gardening is a learning process, and even experienced gardeners encounter challenges along the way. The most important thing is to have fun and enjoy the process. And remember, we’re here to help! Feel free to ask any questions you may have in the comments section below.

Leave a Comment