
Growing Sweet Potatoes Beginner? Absolutely! You’ve come to the right place. Imagine harvesting a bounty of vibrant, delicious sweet potatoes right from your own backyard – it’s easier than you think! For centuries, sweet potatoes have been a staple in diets around the world, originating in Central and South America and spreading globally thanks to their adaptability and nutritional value. They’re not just tasty; they’re packed with vitamins and fiber, making them a healthy and rewarding addition to any home garden.
But let’s be honest, the idea of growing your own food can sometimes feel a little daunting, especially if you’re just starting out. That’s where these simple, DIY tricks and hacks come in. I’m here to guide you through the process, demystifying the steps and showing you how to successfully cultivate these amazing root vegetables, even if you’re a complete beginner.
Why do you need these tricks? Because growing sweet potatoes beginner-friendly doesn’t have to be a struggle! These tips will help you avoid common pitfalls, maximize your yield, and enjoy the satisfaction of harvesting your own homegrown goodness. Get ready to get your hands dirty and discover the joy of growing your own sweet potatoes!
Growing Sweet Potatoes: Your DIY Guide for Beginners
Hey garden friends! Growing sweet potatoes yourself is not as difficult as you might think. I’ll show you how to harvest your own delicious sweet potatoes with simple tools and a little patience. Let’s get started!
What You Need: The Preparation
Before we begin, we’ll need the right equipment and materials. Here’s a list to have everything ready:
- Sweet potatoes: Organic sweet potatoes are best, as they have not been treated with sprout inhibitors.
- Water glass or container: A glass or bowl to place the sweet potato in.
- Toothpicks: To stabilize the sweet potato in the water.
- Seed starting mix: For the first shoots.
- Pots or seed starting containers: For the young plants.
- Garden soil: For the final garden bed or container.
- Compost or organic fertilizer: To enrich the soil.
- Watering can or hose: For watering.
- Spade or shovel: For digging and planting.
- Patience: The most important thing of all!
Phase 1: Growing the “Slips” – Making Your Own Sweet Potato Seedlings
The small shoots that we will plant later are called “slips.” We grow these from the sweet potato itself. Don’t worry, this is easier than it sounds!
- Prepare the sweet potato: Take your sweet potato and wash it thoroughly. This removes any dirt.
- Insert toothpicks: Stick four toothpicks into the middle of the sweet potato, so they cross each other. These will act as a support to prevent the sweet potato from sinking completely into the water.
- Place in water: Fill your glass or container with water. The sweet potato should be about halfway in the water. Make sure the bottom end is in the water, as that’s where the roots will grow.
- Place in a warm and bright spot: Put the glass in a warm and bright place, but not in direct sun. A windowsill is ideal.
- Check the water level: Regularly check the water level and add more water as needed. The water should always be clean, so change it every few days.
- Wait and watch: Now it’s time to wait! After a few weeks (approx. 2-4), small shoots should form on the sweet potato. These “slips” are our future sweet potato plants.
Phase 2: Planting the Slips – From Tuber to Young Plant
Once the slips have reached a length of about 15-20 cm and have formed their own roots, we can separate them from the mother tuber and plant them.
- Gently break off the slips: Carefully break the slips off the sweet potato. Be careful not to damage the roots. If they don’t come off easily, you can also cut them with a sharp knife.
- Root in water (optional): You can also place the slips in a glass of water for a few more days to develop more roots. This is not a must.
- Plant in seed starting mix: Fill your pots or seed starting containers with seed starting mix. Make a small hole in the soil and place the slip inside. The roots should be well covered with soil.
- Water in: Gently water the slips. The soil should be moist, but not wet.
- Place in a warm and bright spot: Put the pots in a warm and bright place. A windowsill is ideal here as well.
- Water regularly: Keep the soil moist, but avoid waterlogging.
- Harden off: Before planting the young plants outdoors, you should harden them off. This means you put them outside during the day for a few days to get them used to the sun and wind.
Phase 3: Planting Out in the Bed or in Containers
Once the young plants are strong enough and the temperatures rise (after the last frost in mid-May), we can plant them in the bed or in containers.
- Prepare the location: Sweet potatoes love the sun! Choose a sunny spot with well-draining soil.
- Prepare the soil: Dig over the soil and loosen it. Mix in compost or organic fertilizer to enrich the soil. Sweet potatoes need nutrient-rich soil.
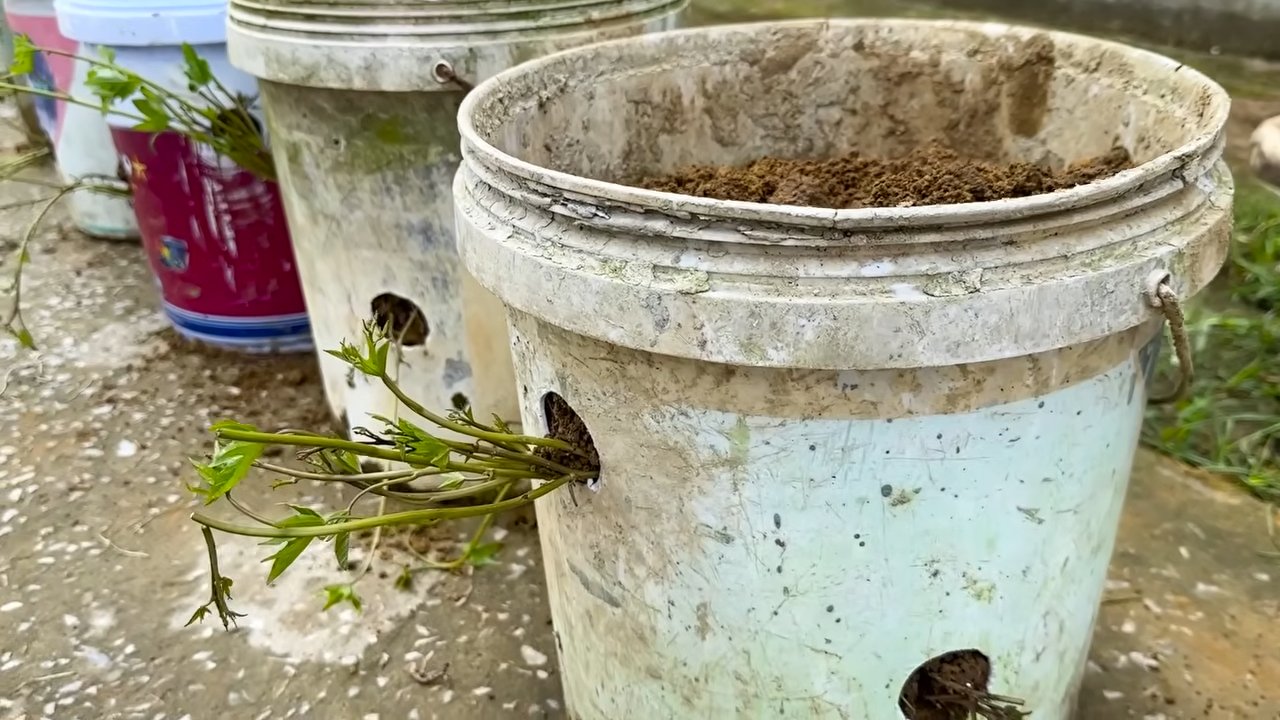
- Mind the planting distance: Plant the young plants about 30-40 cm apart. If you’re planting them in containers, the container should be at least 30 cm in diameter.
- Planting: Dig a hole large enough to accommodate the root ball of the young plant. Place the plant inside and fill the hole with soil. Press the soil down lightly.
- Water in: Water the plants thoroughly.
- Mulch (optional): You can cover the soil around the plants with mulch. This helps to retain moisture in the soil and suppress weeds.
Phase 4: Care and Harvest – Patience is Rewarded!
Now it’s time to care for them and wait. Sweet potatoes are relatively low-maintenance, but there are a few things you should keep in mind.
- Water regularly: Sweet potatoes need regular water, especially during dry periods. Make sure the soil is always moist, but avoid waterlogging.
- Fertilize (optional): You can fertilize the plants once or twice during the growing season with an organic fertilizer.
- Remove weeds: Keep the bed or container free of weeds.
- Control pests: Sweet potatoes are relatively resistant to pests. If pests do appear, you can combat them with natural methods.
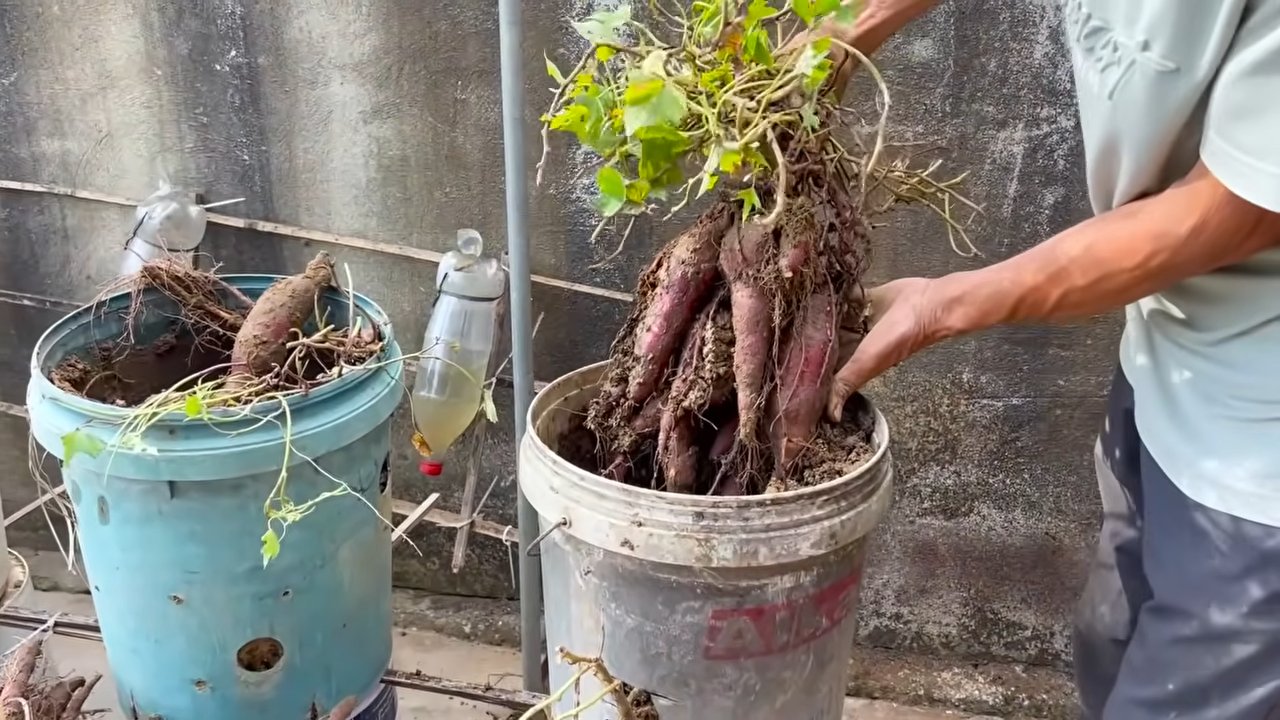
- Harvest time: The harvest time is in the fall, before the first frost. The leaves of the sweet potatoes will turn yellow and begin to die back.
- Harvesting: Carefully dig up the sweet potatoes. Be careful not to damage them.
- Curing: Let the sweet potatoes dry for a few days in a warm and dry place after harvesting. This hardens the skin and makes them more durable.
- Storing: Store the sweet potatoes in a cool, dry, and dark place. They will keep for several months this way.
Additional Tips for Growing Sweet Potatoes
- Variety selection: There are different varieties of sweet potatoes. Find out which variety is best suited for your climate and taste.
- Starting early: You can also start sweet potatoes in pots to get an earlier harvest.
- Trellis: Sweet potatoes form long vines. You can give them a trellis so they don’t lie on the ground.
- Diseases: Sweet potatoes are relatively resistant to diseases. If diseases do occur, find out how to combat them.
- Experiment: Try different growing methods and find out what works best for you.
I hope this guide helps you grow your own sweet potatoes. Good luck and have fun gardening! And remember: patience is the key to success
Conclusion
So, there you have it! Growing sweet potatoes, even for beginners, is not only achievable but also incredibly rewarding. This DIY trick, starting your slips from store-bought sweet potatoes, is a game-changer for anyone looking to cultivate these nutritional powerhouses without breaking the bank or relying solely on commercially grown starts. It’s a sustainable, cost-effective, and frankly, quite fascinating way to connect with your food source.
Why is this a must-try? Because it empowers you to take control of your garden, even if you’re a complete novice. It transforms a simple sweet potato from the grocery store into a thriving plant, offering a tangible demonstration of nature’s resilience and your own gardening capabilities. Plus, the satisfaction of harvesting your own sweet potatoes, knowing you nurtured them from the very beginning, is simply unmatched.
But don’t stop there! Experiment with different varieties of sweet potatoes. Try using organic sweet potatoes for your slips, as they are less likely to be treated with growth inhibitors. Consider different sprouting methods – some gardeners prefer suspending the sweet potato in water, while others have success burying it halfway in moist soil. Observe which method works best for you and your local climate.
Once your slips are ready for transplanting, think about companion planting. Sweet potatoes thrive alongside beans, peas, and thyme, which can help deter pests and improve soil health. And when it comes to harvesting, be patient! Sweet potatoes need a good long growing season to reach their full potential.
We encourage you to embrace this DIY trick and embark on your own sweet potato growing adventure. It’s a journey filled with learning, discovery, and ultimately, a delicious harvest. Don’t be afraid to experiment, adapt, and most importantly, have fun!
And finally, we want to hear from you! Share your experiences, successes, and even your challenges in the comments below. What varieties did you try? What sprouting method worked best? What tips and tricks did you discover along the way? Your insights will not only enrich our community but also inspire other beginners to take the plunge and experience the joy of growing their own sweet potatoes. Let’s cultivate a community of thriving sweet potato growers, one slip at a time!
Frequently Asked Questions (FAQ)
What kind of sweet potato should I use to grow slips?
You can use almost any sweet potato from the grocery store, but organic sweet potatoes are generally preferred. Non-organic sweet potatoes may be treated with growth inhibitors to prevent sprouting during storage, which can hinder slip production. Look for firm, healthy sweet potatoes without any signs of rot or damage. Jewel, Garnet, and Beauregard varieties are all popular choices and readily available. Experiment to see which variety thrives best in your local climate.
How long does it take for sweet potato slips to grow?
The time it takes for slips to grow varies depending on factors like temperature, humidity, and the variety of sweet potato. Generally, you can expect to see sprouts emerging within 2-4 weeks. Once the sprouts reach a length of 6-8 inches, they are ready to be carefully removed and planted. Be patient, and ensure the sweet potato is kept in a warm, bright location to encourage sprouting.
What’s the best way to remove the slips from the sweet potato?
Gently twist or snap the slips off the sweet potato. If the slips are firmly attached, you can use a sharp knife or scissors to carefully cut them off, leaving a small piece of the sweet potato attached. This can help the slip establish roots more quickly. Place the slips in a glass of water, ensuring that the bottom portion of the stem is submerged, and allow them to root for a few days before planting.
How do I prepare the soil for planting sweet potato slips?
Sweet potatoes prefer well-drained, sandy loam soil. Amend your soil with compost or other organic matter to improve drainage and fertility. Create raised beds or hills to further enhance drainage, as sweet potatoes are susceptible to root rot in overly wet conditions. The ideal soil pH for sweet potatoes is between 5.5 and 6.5.
When is the best time to plant sweet potato slips?
Plant sweet potato slips after the last frost, when the soil has warmed to at least 60°F (15°C). Sweet potatoes are heat-loving plants and require a long growing season of at least 100-120 days. In cooler climates, you may need to start your slips indoors earlier to ensure a sufficient growing period.
How far apart should I plant sweet potato slips?
Space sweet potato slips about 12-18 inches apart in rows that are 3-4 feet apart. This spacing allows the vines to spread out and provides adequate room for the sweet potatoes to develop underground.
How often should I water sweet potatoes?
Water sweet potatoes regularly, especially during dry periods. Aim to keep the soil consistently moist but not waterlogged. Once the plants are established, they are relatively drought-tolerant, but consistent watering will promote optimal growth and yield.
What are some common pests and diseases that affect sweet potatoes?
Common pests of sweet potatoes include sweet potato weevils, flea beetles, and aphids. Diseases include stem rot, black rot, and scurf. Practice crop rotation, use disease-resistant varieties, and monitor your plants regularly for signs of pests or diseases. Organic pest control methods, such as neem oil or insecticidal soap, can be effective in managing infestations.
How do I know when my sweet potatoes are ready to harvest?
Sweet potatoes are typically ready to harvest about 90-120 days after planting. The leaves will start to turn yellow and the vines may begin to die back. To test for readiness, carefully dig up a sample sweet potato. If it is of a good size and the skin is firm, the rest of the crop is likely ready for harvest.
How should I cure and store sweet potatoes after harvesting?
Curing sweet potatoes is essential for improving their flavor and storage life. After harvesting, gently brush off any excess soil and allow the sweet potatoes to dry in a warm, humid place (80-85°F and 85-90% humidity) for 7-10 days. This process allows the skins to harden and any minor wounds to heal. After curing, store the sweet potatoes in a cool, dark, and dry place (55-60°F) with good ventilation. Properly cured and stored sweet potatoes can last for several months.
Can I grow sweet potatoes in containers?
Yes, you can grow sweet potatoes in containers, but you’ll need a large container (at least 20 gallons) with good drainage. Choose a bush-type variety of sweet potato, as they are more compact and better suited for container growing. Provide plenty of sunlight and water regularly.
What are some good companion plants for sweet potatoes?
Good companion plants for sweet potatoes include beans, peas, thyme, oregano, and marigolds. Beans and peas help fix nitrogen in the soil, which benefits sweet potatoes. Thyme and oregano can help deter pests, while marigolds attract beneficial insects. Avoid planting sweet potatoes near fennel or rosemary, as they can inhibit growth.
Leave a Comment