
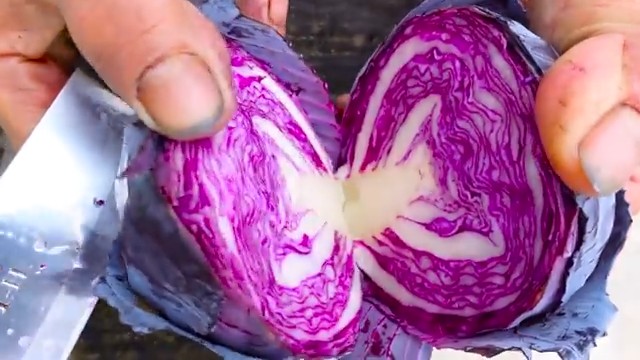
Growing Queen Cabbage at Home might sound like something reserved for seasoned gardeners with acres of land, but I’m here to tell you it’s totally achievable, even if you’re working with a small balcony or a sunny windowsill! Forget those bland, store-bought cabbages – imagine harvesting your own vibrant, flavorful Queen Cabbage, bursting with freshness and packed with nutrients.
Cabbage, in general, has a rich history, dating back thousands of years. Ancient Romans and Greeks prized it for its medicinal properties and nutritional value. Over time, different varieties emerged, each with its unique characteristics. The Queen Cabbage, with its regal name and impressive size, is a testament to the enduring appeal of this humble vegetable.
But why should you bother with the effort of growing your own? Well, for starters, the taste is simply incomparable. Freshly harvested cabbage has a sweetness and crispness that you just can’t find in the supermarket. Plus, you have complete control over the growing process, ensuring that your Queen Cabbage is free from harmful pesticides and chemicals. In this DIY article, I’ll share my favorite tricks and hacks for successfully growing Queen Cabbage at Home, regardless of your experience level. Get ready to impress your friends and family with your homegrown culinary masterpiece!
Growing King Cabbage Yourself: Your Comprehensive DIY Guide
Hello, garden friends! Have you ever heard of king cabbage? This isn’t just any cabbage, but a real superfood that is incredibly versatile and looks great too. I’ll show you how you can easily grow this impressive cabbage yourself – even if you don’t have a huge garden!
What is King Cabbage Anyway?
King cabbage, also known as kale, is a leafy cabbage known for its health benefits and robustness. It is rich in vitamins, minerals, and antioxidants. There are different varieties, each with its own unique characteristics. Some are curly, others are smooth, and the colors range from deep green to purple.
Why Grow King Cabbage Yourself?
- Freshness: Nothing tastes better than freshly harvested king cabbage from your own garden.
- Control: You know exactly what’s in your cabbage, without pesticides or chemical fertilizers.
- Sustainability: You reduce your ecological footprint by growing locally.
- Cost-effectiveness: Homegrown king cabbage is often cheaper than store-bought.
- Therapy: Gardening is relaxing and good for the soul!
Choosing the Right Variety
There are many different varieties of king cabbage, and choosing the right one depends on your preferences and the climatic conditions in your region. Here are some popular varieties:
- ‘Lacinato’ (Dinosaur Kale): Known for its long, dark leaves and mild flavor.
- ‘Red Russian’: Has reddish-purple stems and leaves and a slightly sweet taste.
- ‘Dwarf Blue Curled Vates’: A compact variety with heavily curled leaves, ideal for smaller gardens or pots.
- ‘Scarlet’: A beautiful variety with deep red leaves that become even more intense in winter.
Preparation is Everything: The Right Location and Soil
King cabbage is relatively undemanding, but a good location and nutrient-rich soil are crucial for a successful harvest.
- Location: King cabbage needs at least 6 hours of sunlight per day. A sunny location ensures strong growth and healthy leaves.
- Soil: The soil should be well-drained and rich in organic matter. A pH between 6.0 and 7.5 is ideal.
- Soil Improvement: Before planting, you should enrich the soil with compost or well-rotted manure. This improves the soil structure and provides important nutrients.
Sowing and Cultivation: How to Do It Right
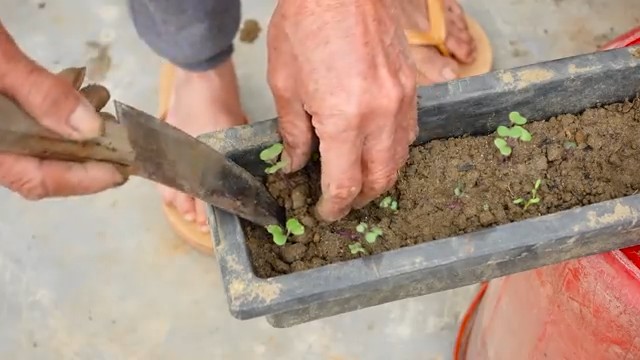
You can either sow king cabbage directly in the bed or start it indoors. I recommend starting it indoors, as this gives you control over germination and protects the young plants from pests.
Sowing Indoors (Pre-cultivation):
- Prepare sowing containers: Fill small pots or seed trays with seed starting mix.
- Sow seeds: Place 2-3 seeds per pot about 1 cm deep in the soil.
- Water: Moisten the soil gently with a spray bottle.
- Location: Place the pots in a warm, bright place (e.g., on a windowsill).
- Germination: The seeds usually germinate within 5-10 days.
- Pricking out: Once the seedlings have 2-3 true leaves, you can transplant them into larger pots. Choose only the strongest seedling per pot.
Direct Sowing in the Bed:
- Prepare the soil: Loosen the soil and remove weeds.
- Make seed drills: Make shallow seed drills about 45 cm apart.
- Sow seeds: Sow the seeds about 1 cm deep in the drills.
- Water: Moisten the soil gently.
- Thin out: Once the seedlings are large enough, thin them to a distance of about 45 cm.
Planting: Into the Bed!
Once the young king cabbage plants are about 15-20 cm tall, they can be planted in the bed.
- Prepare the soil: Loosen the soil again and remove weeds.
- Dig planting holes: Dig planting holes about 45 cm apart.
- Insert plants: Carefully place the plants in the holes and fill them with soil.
- Water in: Water the plants thoroughly.
- Mulch: Cover the soil around the plants with mulch (e.g., straw or grass clippings). This helps to retain moisture in the soil and suppress weeds.
Care: Keeping Your King Cabbage Healthy and Strong
King cabbage is relatively low-maintenance, but regular care is important for a good harvest.
- Watering: Water the plants regularly, especially during dry periods. Make sure the soil does not dry out.
- Fertilizing: Fertilize the plants every 2-3 weeks with an organic fertilizer (e.g., compost tea or nettle manure).
- Weeding: Remove weeds regularly to reduce competition for nutrients and water.
- Pests and Diseases: Watch out for pests like cabbage whites, aphids, and slugs. If necessary, you can use biological pesticides. Clubroot is a common disease caused by a fungus. Ensure good crop rotation to minimize the risk.
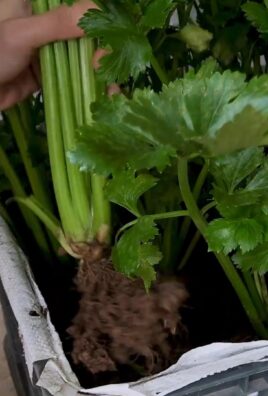
Harvesting: The Reward for Your Work
You can harvest king cabbage as soon as the leaves are large enough. It usually takes about 50-70 days from sowing to harvesting.
- Harvest leaves: Harvest the outer leaves by gently twisting or cutting them off. The inner leaves can continue to grow.
- Regular harvesting: Regular harvesting encourages the growth of new leaves.
- Storage: King cabbage can be stored in the refrigerator for up to a week. It is best to wrap it in a damp cloth.
King Cabbage in the Kitchen: Versatile Uses
King cabbage is incredibly versatile and can be prepared in many different ways.
- Raw: Young, tender leaves can be used raw in salads.
- Steamed: King cabbage can be steamed or boiled and served as a side dish.
- Sautéed: Sautéed king cabbage is a delicious and crispy side dish.
- Smoothies: King cabbage is a healthy ingredient for green smoothies.
- Chips: Kale chips are a healthy and delicious snack.
Common Problems and Solutions
- Yellow leaves: Can indicate a nutrient deficiency or overwatering. Fertilize the plants and ensure good drainage.
- Holes in the leaves: Often caused by cabbage whites or other pests. Use biological pesticides.
- Clubroot: A fungal disease that leads to thickened roots. Ensure good crop rotation and improve the soil.
Additional Tips for Growing King Cabbage
Crop Rotation: Do not plant king cabbage in the same spot every year to prevent diseases.
Conclusion
So, there you have it! Growing Queen Cabbage at home isn’t just a gardening project; it’s an investment in fresh, flavorful, and incredibly rewarding produce. We’ve walked through the steps, from seed to harvest, and hopefully demystified the process of cultivating this regal vegetable. The benefits extend far beyond simply having cabbage on hand. Think about the satisfaction of serving a meal featuring ingredients you nurtured yourself, the cost savings compared to buying from the store, and the sheer joy of connecting with nature in your own backyard.
This DIY approach to growing Queen Cabbage offers a level of control and customization you simply can’t achieve with store-bought options. You get to choose the exact variety you want, ensuring it perfectly suits your culinary preferences. You also have complete control over the growing environment, allowing you to minimize or eliminate the use of pesticides and herbicides, resulting in a healthier and more sustainable food source.
But the real magic lies in the variations you can explore. Consider experimenting with different soil amendments to see how they impact the size and flavor of your Queen Cabbage. Try companion planting with herbs like rosemary or thyme to deter pests naturally and potentially enhance the cabbage’s taste. For those with limited space, container gardening is a fantastic option, allowing you to enjoy fresh Queen Cabbage even on a small balcony or patio. You could even try succession planting, staggering your planting times to ensure a continuous harvest throughout the growing season.
Don’t be afraid to get your hands dirty and embrace the learning process. Gardening is an art as much as it is a science, and there’s always something new to discover. The key is to start, observe, and adapt. Your first attempt might not be perfect, but with each subsequent planting, you’ll gain valuable experience and refine your techniques.
We believe that anyone, regardless of their gardening experience, can successfully grow Queen Cabbage at home. It’s a project that offers both tangible rewards and a deep sense of accomplishment. So, grab your seeds, prepare your soil, and embark on this exciting gardening adventure.
We’re confident that you’ll be amazed by the results. And most importantly, we want to hear about your experience! Share your tips, tricks, and triumphs in the comments below. Let’s create a community of Queen Cabbage enthusiasts, sharing our knowledge and inspiring each other to grow the best possible produce. Your insights could be invaluable to other aspiring gardeners. So, what are you waiting for? Start growing your own Queen Cabbage today!
Frequently Asked Questions (FAQ)
1. What exactly is Queen Cabbage, and how is it different from other cabbages?
Queen Cabbage is a specific variety of cabbage known for its large size, dense head, and sweet, mild flavor. It tends to be less pungent than some other cabbage varieties, making it a versatile ingredient in various dishes. While the exact characteristics can vary slightly depending on the specific cultivar, Queen Cabbage generally offers a more delicate and palatable experience compared to standard green cabbage. It’s also often prized for its excellent storage qualities, allowing you to enjoy your harvest for longer.
2. How much space does Queen Cabbage need to grow successfully?
Queen Cabbage requires ample space to develop its large head. As a general rule, provide at least 18-24 inches between plants in rows that are 24-36 inches apart. This spacing allows for adequate air circulation, which helps prevent fungal diseases, and ensures that each plant has enough room to access sunlight and nutrients. If you’re growing in containers, choose pots that are at least 12 inches in diameter and depth to accommodate the root system. Remember, overcrowding can lead to smaller heads and increased susceptibility to pests and diseases.
3. What kind of soil is best for growing Queen Cabbage?
Queen Cabbage thrives in well-drained, fertile soil that is rich in organic matter. The ideal soil pH is between 6.0 and 7.0. Before planting, amend the soil with compost, well-rotted manure, or other organic materials to improve its structure, drainage, and nutrient content. If your soil is heavy clay, consider adding sand or perlite to improve drainage. A soil test can help you determine the specific nutrient deficiencies and adjust accordingly with appropriate fertilizers.
4. How often should I water my Queen Cabbage plants?
Consistent watering is crucial for healthy Queen Cabbage growth, especially during hot and dry periods. Aim to keep the soil consistently moist but not waterlogged. Water deeply at the base of the plants, avoiding wetting the foliage, which can encourage fungal diseases. The frequency of watering will depend on the weather conditions and soil type. Check the soil moisture regularly by inserting your finger about an inch deep. If the soil feels dry, it’s time to water. Mulching around the plants can help retain moisture and suppress weeds.
5. What are some common pests and diseases that affect Queen Cabbage, and how can I prevent them?
Queen Cabbage can be susceptible to various pests and diseases, including cabbage worms, aphids, flea beetles, clubroot, and black rot. To prevent these problems, practice good garden hygiene, such as removing plant debris and weeds regularly. Use row covers to protect young plants from pests. Companion planting with herbs like rosemary, thyme, or marigolds can also help deter pests. Inspect your plants regularly for signs of infestation or disease and take action promptly. Organic pest control methods, such as insecticidal soap or Bacillus thuringiensis (Bt), can be effective against many common pests. For diseases, ensure good air circulation and avoid overhead watering. Crop rotation can also help prevent soilborne diseases.
6. When is the best time to harvest Queen Cabbage?
Queen Cabbage is typically ready to harvest when the head is firm and dense. The exact time will depend on the variety and growing conditions, but generally, it takes about 80-100 days from transplanting to harvest. To check for ripeness, gently squeeze the head. If it feels solid and doesn’t give easily, it’s likely ready to harvest. Use a sharp knife to cut the head from the stem, leaving a few outer leaves attached.
7. Can I grow Queen Cabbage in containers?
Yes, Queen Cabbage can be successfully grown in containers, making it a great option for gardeners with limited space. Choose a container that is at least 12 inches in diameter and depth to accommodate the root system. Use a high-quality potting mix that is well-draining and rich in organic matter. Water regularly and fertilize as needed. Container-grown cabbages may require more frequent watering and fertilization than those grown in the ground.
8. How can I store Queen Cabbage after harvesting?
Queen Cabbage can be stored for several weeks if properly handled. After harvesting, remove any damaged or yellowing outer leaves. Wrap the head loosely in plastic wrap or place it in a perforated plastic bag. Store it in the refrigerator’s crisper drawer at a temperature between 32°F and 40°F (0°C and 4°C). Avoid storing cabbage near fruits like apples or bananas, as they release ethylene gas, which can cause the cabbage to spoil more quickly.
9. What are some delicious ways to use Queen Cabbage in cooking?
Queen Cabbage is a versatile ingredient that can be used in a wide variety of dishes. It can be shredded and used in salads, coleslaw, or stir-fries. It can also be cooked in soups, stews, or braised dishes. Queen Cabbage is also excellent when fermented into sauerkraut or kimchi. Its mild flavor makes it a great addition to many recipes.
10. Is growing Queen Cabbage at home really worth the effort?
Absolutely! While it requires some effort and attention, growing Queen Cabbage at home offers numerous benefits. You’ll have access to fresh, flavorful, and healthy produce that is free from harmful pesticides and herbicides. You’ll also save money compared to buying cabbage from the store. And perhaps most importantly, you’ll experience the satisfaction and joy of growing your own food. The taste of homegrown Queen Cabbage is simply unmatched, making it a truly rewarding gardening experience.
Leave a Comment