
Grow Celery at Home – and ditch those sad, limp stalks from the grocery store! Have you ever dreamed of snipping fresh, crisp celery right from your own backyard? I know I have! It’s easier than you think, and this DIY guide will unlock the secrets to cultivating this crunchy veggie right in your own space.
Celery has a surprisingly rich history, dating back to ancient times where it was valued more for its medicinal properties than its culinary uses. The ancient Greeks even crowned athletes with celery leaves! While we might not be awarding Olympic medals with it today, growing your own celery connects you to that long lineage of appreciating this versatile plant.
But why bother with the effort? Well, store-bought celery can often be expensive, and let’s be honest, it rarely has that vibrant, fresh flavor we crave. Plus, think about the environmental impact of transporting produce across long distances. By learning how to grow celery at home, you’re not only saving money and enjoying superior taste, but you’re also contributing to a more sustainable lifestyle. This DIY project is perfect for beginners and experienced gardeners alike, offering a rewarding experience and a delicious harvest. So, grab your gardening gloves, and let’s get started!
Grow Your Own Celery at Home: A Comprehensive DIY Guide
Hey garden friends! Have you ever wondered if you can grow your own celery at home? The answer is a clear YES! It’s easier than you think and super satisfying when you can harvest your own crunchy celery stalks. In this article, I’ll show you step-by-step how to do it. Let’s get started!
What You Need: The Right Equipment and Materials
Before we begin, let’s make sure we have everything we need. Here is a list of the most important things:
- A celery base: Preferably a fresh one from the supermarket or farmers’ market. Make sure it has a healthy base.
- A glass or bowl: Large enough to hold the celery base.
- Water: Tap water is fine.
- A sunny spot: A windowsill or another place with plenty of light.
- Potting soil: High-quality potting soil for later transplanting into a pot.
- A pot: With drainage holes to prevent waterlogging.
- Optional: Liquid fertilizer: For additional growth.
Phase 1: Bringing the Celery Base to Life
This first step is crucial to get the celery base to sprout new roots.
- Prepare the celery: Cut the celery about 5-7 cm from the bottom end. You should keep the base with the root nubs. You can, of course, use the upper part for soups, salads, or smoothies!
- Place it in water: Place the celery base in your glass or bowl. Fill the container with water so that the base is about halfway covered. Make sure the leaves are not in the water, as they could rot.
- Sunny location: Place the glass in a sunny spot, e.g., on a windowsill. Celery loves light!
- Change the water: Change the water every one to two days to keep it fresh and clean. This prevents the formation of bacteria and mold.
- Be patient: After about 5-7 days, you should see small roots sprouting from the base. New leaves will also form. This is a good sign!
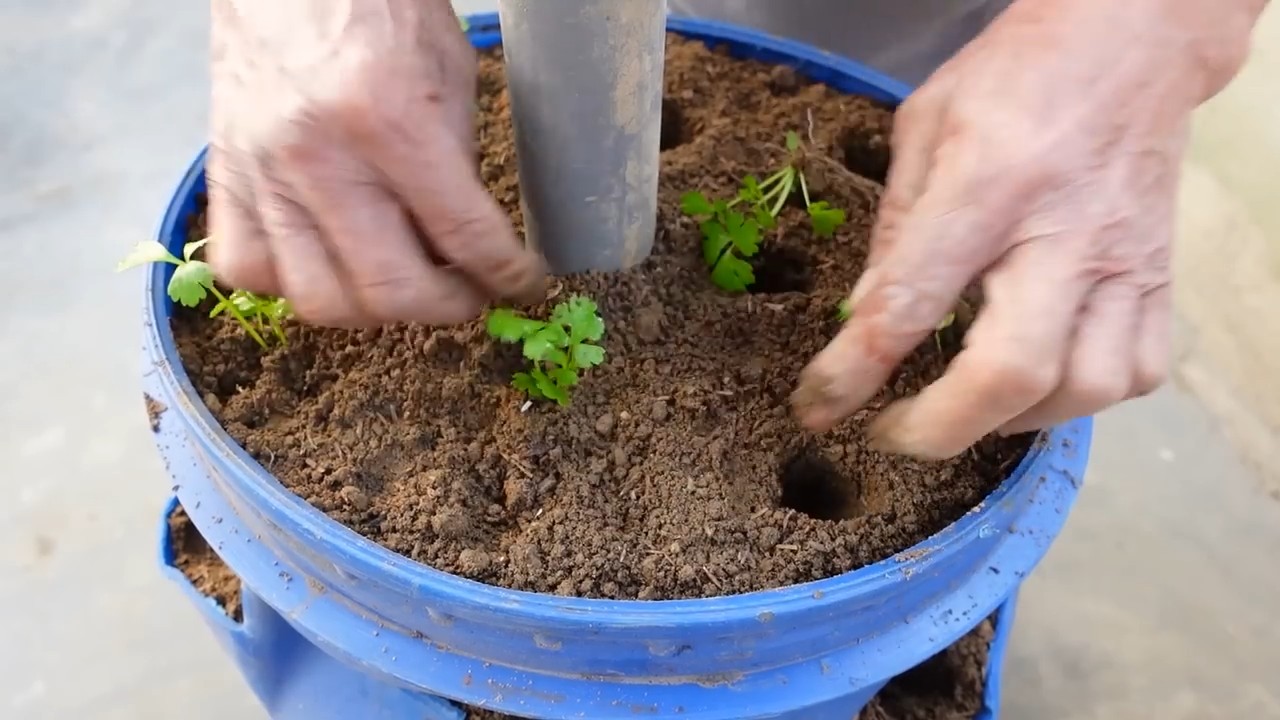
Phase 2: Repotting in Soil
Once the roots are well-developed, it’s time to repot the celery in soil.
- Prepare the pot: Fill your pot with potting soil. Leave about 2-3 cm of space to the rim.
- Plant the celery: Make a small hole in the soil, large enough for the celery base. Carefully place the celery in it and cover the roots with soil. Make sure the base is not too deep in the soil.
- Water thoroughly: Water the celery well after planting. This helps the soil settle around the roots.
- Sunny location: Place the pot back in a sunny spot.
- Water regularly: Keep the soil moist, but not soggy. Check the moisture by sticking your finger about 2 cm deep into the soil. If it feels dry, it’s time to water.
Phase 3: Care and Growth
Now it’s all about caring for the celery and helping it grow.
- Fertilizing (optional): If you wish, you can fertilize the celery every two weeks with a liquid fertilizer. Follow the instructions on the packaging.
- Watch for pests: Look out for pests like aphids or slugs. If you spot any, you can combat them with natural remedies, e.g., with a soap solution or neem oil.
- Rotate: Rotate the pot regularly so that the celery grows evenly and doesn’t lean towards the light.
- Be patient: Celery takes time to grow. It can take several weeks or even months before you have a decent harvest.
Additional Tips and Tricks for Successful Celery Cultivation
- Celery varieties: There are different varieties of celery. Some are better suited for growing in pots than others. Find out which variety grows well in your region.
- Blanching: To get lighter-colored celery stalks, you can cover the stalks with soil or cardboard a few weeks before harvesting. This is called blanching.
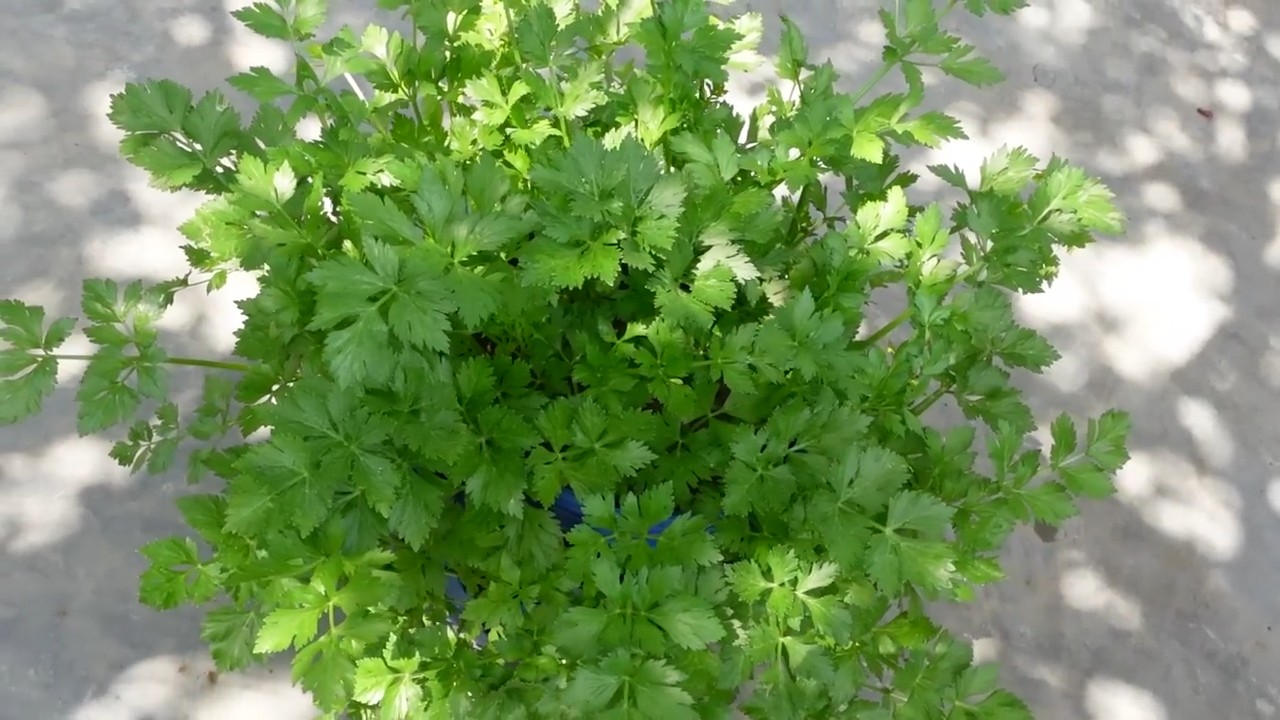
- Harvesting: You can harvest individual stalks as soon as they are large enough. Simply cut them off at the base. The rest of the plant will continue to grow.
- Overwintering: In colder regions, you can bring the celery indoors for the winter. Place it in a bright, cool spot and water it sparingly.
- Sowing: You can also grow celery from seed. This is a bit more involved, but it allows you to try out different varieties.
- Soil quality: Celery prefers a humus-rich, well-drained soil. Make sure your potting soil has these properties.
- Sunlight exposure: Celery needs at least 6 hours of sunlight per day.
- Watering: Regular watering is important, especially during hot periods.
- Mulching: A layer of mulch around the celery plant helps to retain moisture in the soil and suppress weeds.
- Diseases: Watch for signs of diseases like celery leaf spot. Remove affected leaves immediately.
Common Problems and Solutions
- Yellow leaves: Yellow leaves can be a sign of overwatering, nutrient deficiency, or too little light. Check your watering habits and fertilize the celery if necessary.
- Poor growth: Poor growth can be caused by too little light, nutrient deficiency, or a pot that is too small. Move the celery to a sunnier spot, fertilize it, or repot it into a larger pot.
- Pests: Pests like aphids or slugs can infest the celery. Combat them with natural remedies.
- Rot: Rot can be caused by overwatering or poor ventilation. Make sure the soil is well-drained and don’t water the celery too often.
Why Grow Your Own Celery?
There are many reasons why it’s worth growing your own celery:
- Freshness: Homegrown celery is much fresher and more aromatic than store-bought.
- Sustainability: You reduce your ecological footprint by avoiding long transport routes.
- Control: You know exactly what’s in your celery because you grew it yourself.
- Satisfaction: It’s a great feeling to grow and harvest something yourself.
- Cost savings: In the long run, you can save money by growing your own celery.
Conclusion: Good Luck with Your Celery Growing!
I hope this guide has helped you to grow your own celery at home. With a little patience and care, you’ll soon be able to harvest your own crunchy celery stalks. Happy gardening! And don’t forget to share your successes with me! I’m excited to hear your celery stories
Conclusion
So, there you have it! Growing celery at home from scraps isn’t just a fun experiment; it’s a sustainable way to reduce food waste, enjoy fresh, flavorful celery, and connect with the natural world. It’s a surprisingly simple process that yields impressive results, transforming what would otherwise be kitchen scraps into a vibrant, thriving plant.
Why is this DIY trick a must-try? Because it empowers you to take control of your food source, even in a small way. Imagine the satisfaction of snipping off fresh celery stalks for your salads, soups, or snacks, knowing you nurtured them from a humble celery base. Beyond the practical benefits, it’s an educational experience, especially for children, demonstrating the magic of plant regeneration and the cyclical nature of life. Plus, it’s incredibly budget-friendly! You’re essentially getting free celery from something you’d normally throw away.
But the fun doesn’t stop there! Feel free to experiment with different varieties of celery. While the standard green celery is readily available, you might find success with other types, each offering a slightly different flavor profile. Consider planting your regrown celery in different locations – a sunny windowsill, a raised garden bed, or even a container on your patio. Observe how the environment affects its growth and flavor.
For those seeking a bit more of a challenge, try propagating celery from seed. While it requires more patience and attention, the reward is even greater. You can select specific celery varieties and cultivate them from the very beginning, tailoring your harvest to your exact preferences.
Don’t be afraid to get creative with your celery cultivation! You can even try companion planting, pairing your celery with other vegetables and herbs that benefit from its presence. Marigolds, for example, can help deter pests, while onions and garlic can enhance the flavor of your celery.
We wholeheartedly encourage you to embark on this rewarding journey of growing celery at home. It’s a simple, sustainable, and satisfying way to add fresh, flavorful produce to your table. And most importantly, share your experiences! Post photos of your celery plants on social media, tag us, and let us know what you’ve learned. Your insights and tips can inspire others to embrace this wonderful DIY trick and discover the joy of growing their own food. Let’s cultivate a community of home gardeners, one celery stalk at a time! This method of growing celery at home is a great way to reduce waste and enjoy fresh produce.
Frequently Asked Questions (FAQ)
1. What part of the celery do I need to start growing it?
You’ll need the base of the celery stalk, the part you usually cut off and discard. This includes the root end and about 2-3 inches of the stalks. Make sure the base is firm and healthy-looking, without any signs of rot or decay. The fresher the base, the better your chances of successful regrowth.
2. How long does it take for celery to regrow?
The initial regrowth, where you see new leaves sprouting from the center, usually takes about 5-7 days. However, it will take several weeks, even months, to grow a full-sized celery stalk. Be patient and continue to provide the plant with adequate water, sunlight, and nutrients. The exact time will depend on factors like temperature, sunlight exposure, and the specific celery variety.
3. What kind of water should I use?
Tap water is generally fine, but if your tap water is heavily chlorinated, it’s best to let it sit out for 24 hours before using it. This allows the chlorine to dissipate. Alternatively, you can use filtered water or rainwater. Avoid using softened water, as it can contain high levels of sodium, which can be harmful to plants.
4. How much sunlight does the celery need?
Celery thrives in bright, indirect sunlight. A spot near a sunny window is ideal. Avoid direct sunlight, especially during the hottest part of the day, as it can scorch the leaves. If you don’t have a sunny window, you can supplement with a grow light. Aim for at least 6 hours of light per day.
5. When should I transplant the celery to soil?
Once the celery base has developed roots that are about 2-3 inches long and you see significant new growth from the center, it’s time to transplant it to soil. This usually takes about a week or two. Choose a pot that is at least 6 inches in diameter and fill it with well-draining potting mix.
6. What kind of soil should I use?
Use a high-quality potting mix that is rich in organic matter and drains well. You can also amend your potting mix with compost or other organic materials to improve its fertility. Avoid using garden soil, as it can be too heavy and may contain pests or diseases.
7. How often should I water the celery after transplanting?
Keep the soil consistently moist, but not waterlogged. Water when the top inch of soil feels dry to the touch. Avoid letting the soil dry out completely, as this can stress the plant. Overwatering can also lead to root rot, so make sure the pot has good drainage.
8. Do I need to fertilize the celery?
Yes, celery benefits from regular fertilization. Use a balanced liquid fertilizer diluted to half strength every 2-3 weeks. You can also use a slow-release fertilizer at the time of planting. Avoid over-fertilizing, as this can burn the roots.
9. What are some common problems when growing celery, and how can I fix them?
Some common problems include:
* **Yellowing leaves:** This can be caused by overwatering, underwatering, nutrient deficiencies, or pests. Adjust your watering schedule, fertilize the plant, and inspect it for pests.
* **Stunted growth:** This can be caused by insufficient sunlight, poor soil, or pests. Move the plant to a sunnier location, repot it with fresh potting mix, and inspect it for pests.
* **Pests:** Celery can be susceptible to pests like aphids, spider mites, and whiteflies. Treat infestations with insecticidal soap or neem oil.
* **Bolting (premature flowering):** This can be caused by stress, such as extreme temperatures or inconsistent watering. Try to maintain a consistent environment for your celery plant.
10. Can I grow celery indoors year-round?
Yes, you can grow celery indoors year-round, provided you provide it with adequate light, water, and nutrients. Use a grow light if you don’t have a sunny window. Maintain a consistent temperature and humidity level.
11. How do I harvest the celery?
You can harvest individual stalks as needed, starting with the outer stalks. Simply cut them off at the base of the plant. Alternatively, you can harvest the entire plant at once by cutting it off at the base.
12. Is regrown celery as flavorful as store-bought celery?
Regrown celery can be just as flavorful as store-bought celery, if not more so. The flavor will depend on the variety of celery and the growing conditions. Homegrown celery often has a fresher, more intense flavor than store-bought celery, which may have been stored for a long time.
13. Can I eat the leaves of the regrown celery?
Yes, the leaves of regrown celery are perfectly edible and have a similar flavor to the stalks. They can be used in salads, soups, stews, or as a garnish.
14. How can I prevent my celery from becoming bitter?
Bitterness in celery can be caused by stress, such as extreme temperatures, inconsistent watering, or nutrient deficiencies. Try to maintain a consistent environment for your celery plant and provide it with adequate water and nutrients.
15. What are some creative ways to use my homegrown celery?
Besides the usual salads, soups, and snacks, you can use your homegrown celery in smoothies, juices, stir-fries, and even as a natural flavoring agent for stocks and broths. Get creative and experiment with different recipes!


Leave a Comment