
Furniture polish hacks – who knew they could be so game-changing? I’m always on the lookout for ways to make my home sparkle without breaking the bank, and let me tell you, I’ve stumbled upon some real gems! For generations, people have relied on elbow grease and commercial cleaners to keep their furniture looking its best. But what if I told you that the secret to a gleaming, dust-free home might already be hiding in your pantry or bathroom cabinet?
Think about it: our ancestors used natural oils and waxes to protect and beautify their wooden treasures long before fancy furniture polish bottles lined store shelves. This DIY spirit is something I truly admire, and it’s what inspired me to dive deep into the world of furniture polish hacks.
In today’s busy world, who has time to spend hours scrubbing and polishing? We all crave efficiency and effective solutions. That’s why I’m so excited to share these simple, yet brilliant, DIY tricks that will not only save you money but also give your furniture a stunning, long-lasting shine. Get ready to ditch those expensive cleaners and unlock the secrets to a beautifully polished home with these easy-to-follow hacks!
Furniture Polish Hacks: Revive, Protect, and Shine!
Hey there, fellow DIY enthusiasts! I’m always on the lookout for ways to make my home sparkle without breaking the bank. And guess what? I’ve discovered some amazing furniture polish hacks that go way beyond just dusting your tables. Get ready to unleash the power of that bottle of polish you probably already have!
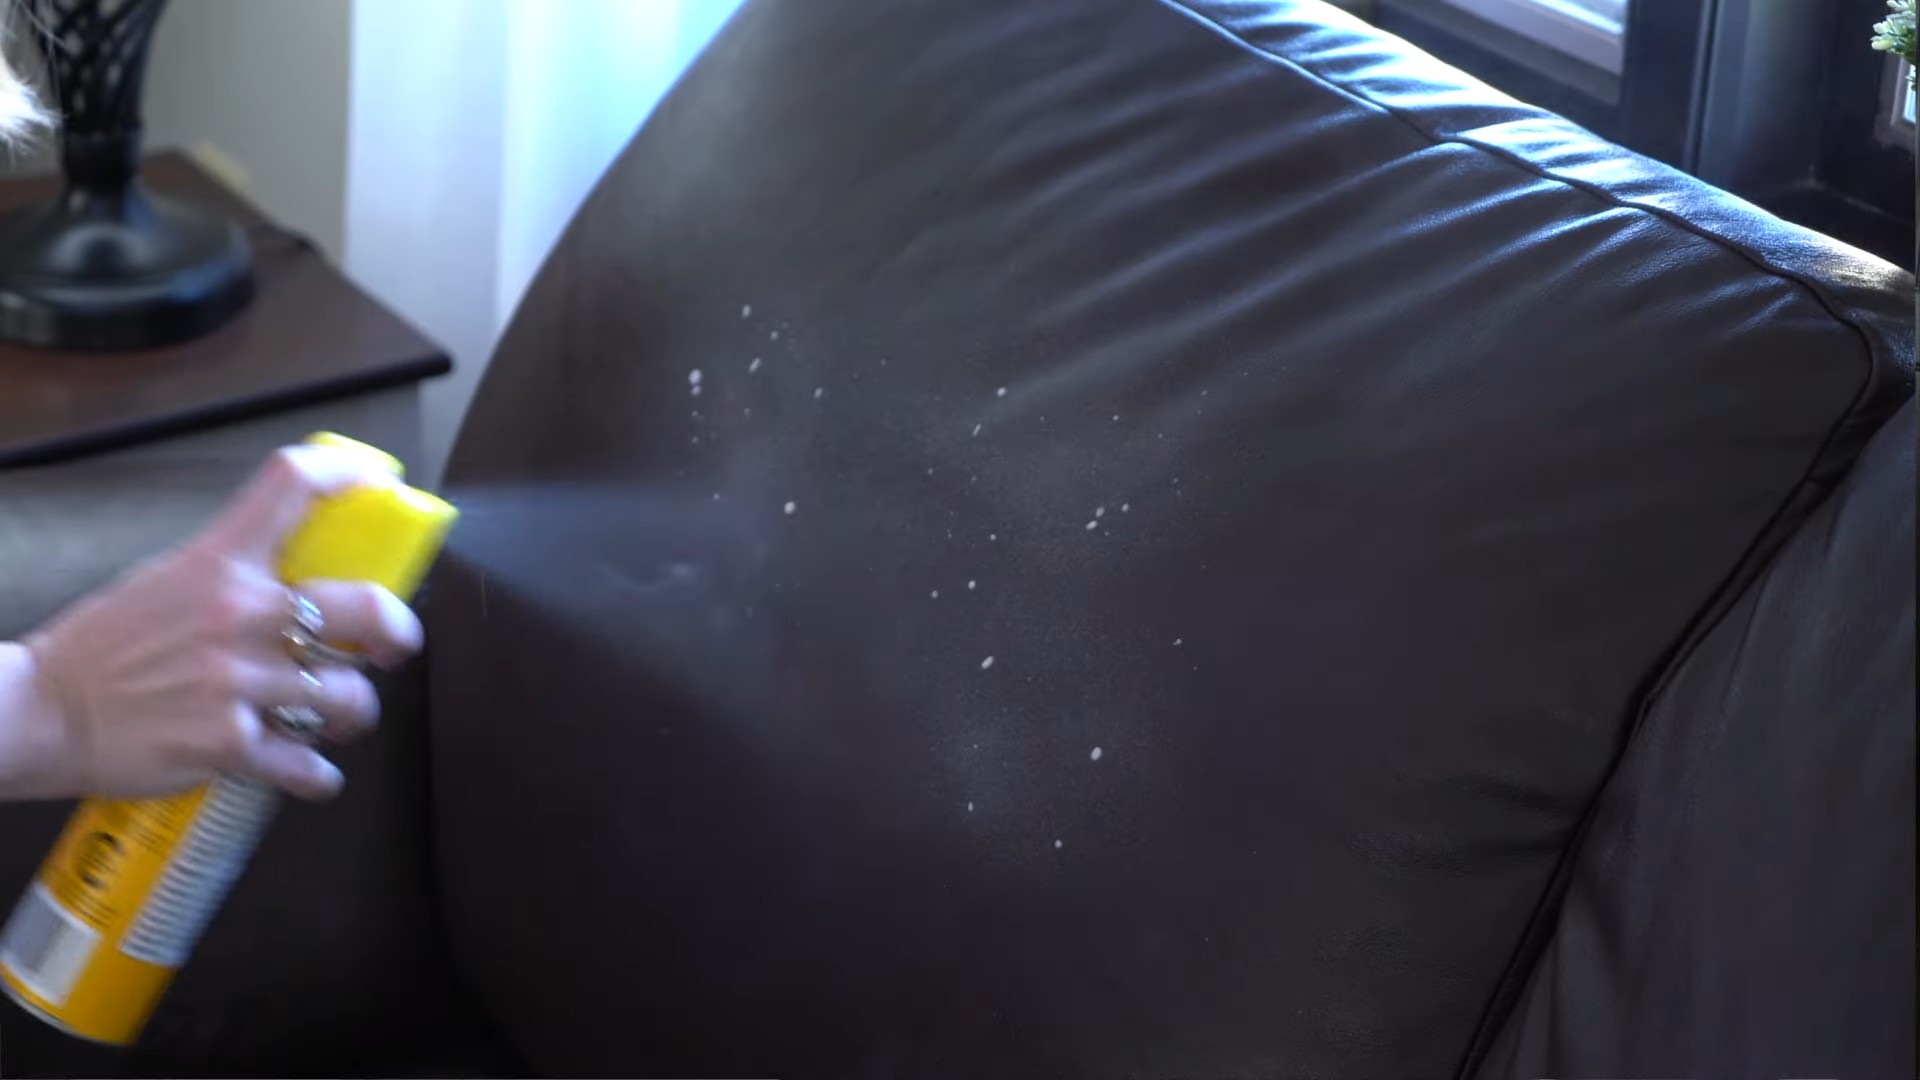
Leather Love: Conditioning and Cleaning
Did you know furniture polish can work wonders on leather? It’s true! It can help condition, clean, and even add a bit of shine to your leather goods. Just be sure to test it in an inconspicuous area first, especially on delicate or antique leather.
What You’ll Need:
* Furniture polish (I prefer a beeswax-based one for leather)
* Soft, clean cloths (microfiber works great)
* A small bowl of warm water (optional, for cleaning)
Step-by-Step Instructions:
1. Dust it Off: Before you even think about polish, give your leather item a good dusting. Use a dry cloth to remove any loose dirt or debris.
2. Spot Test (Crucial!): Find a hidden area, like the back of a chair or under a cushion. Apply a tiny amount of furniture polish to the cloth and gently rub it onto the leather. Wait a few minutes to see if there’s any discoloration or adverse reaction. If all looks good, proceed to the next step.
3. Clean (Optional): If your leather is particularly dirty, you can lightly dampen a cloth with warm water and gently wipe down the surface. Make sure it’s not soaking wet! Let it air dry completely before moving on.
4. Apply the Polish: Apply a small amount of furniture polish to a clean cloth. Remember, a little goes a long way!
5. Work it In: Gently rub the polish onto the leather in circular motions. Make sure you’re covering the entire surface evenly.
6. Buff it Up: After applying the polish, let it sit for a few minutes (usually 5-10 minutes is enough). Then, take a clean, dry cloth and buff the leather until it shines. This will remove any excess polish and bring out the natural luster.
7. Admire Your Work: Step back and admire your beautifully conditioned and polished leather!
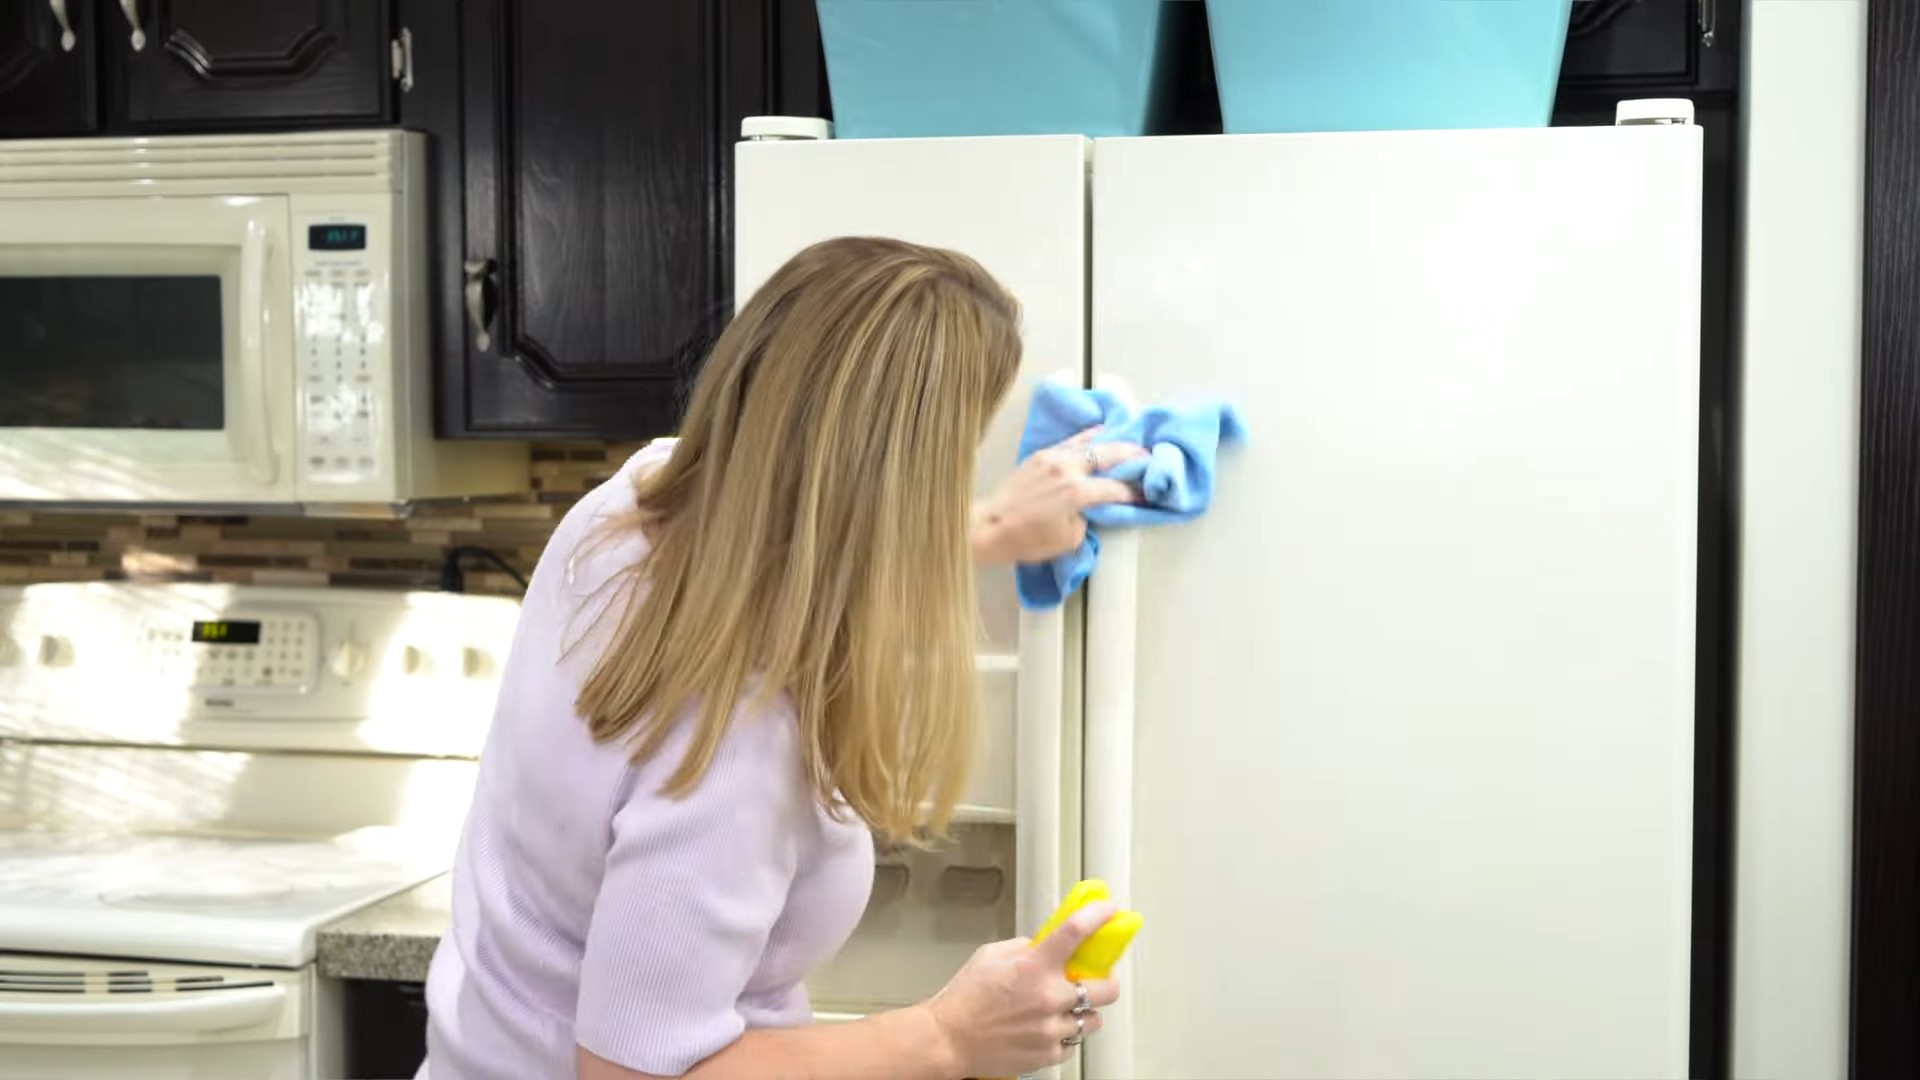
Stainless Steel Savior: Fingerprint-Free Shine
Ugh, fingerprints on stainless steel appliances are the bane of my existence! But guess what? Furniture polish can help with that too! It creates a protective barrier that repels fingerprints and smudges.
What You’ll Need:
* Furniture polish (a spray polish works best for this)
* Two soft, clean cloths (microfiber is your friend)
Step-by-Step Instructions:
1. Clean the Surface: Start with a clean stainless steel surface. Wipe it down with a damp cloth and a mild dish soap solution to remove any existing grime or grease. Dry it thoroughly.
2. Spray Lightly: Lightly spray the furniture polish onto one of the clean cloths. Don’t spray it directly onto the appliance, as this can lead to uneven coverage and buildup.
3. Wipe it On: Wipe the stainless steel surface with the polish-dampened cloth, following the grain of the metal.
4. Buff to Perfection: Use the second clean, dry cloth to buff the surface until it shines. This will remove any excess polish and leave a streak-free finish.
5. Enjoy Fingerprint-Free Bliss: Say goodbye to those pesky fingerprints! Your stainless steel appliances will look cleaner and shinier for longer.
Dusting Dynamo: Repel Dust and Allergens
Tired of dusting every other day? Furniture polish can help with that too! It creates a protective layer on your furniture that repels dust and allergens, keeping your home cleaner for longer.
What You’ll Need:
* Furniture polish (again, a spray polish is convenient)
* A soft, clean cloth (microfiber is ideal)
Step-by-Step Instructions:
1. Dust First: Before applying the polish, give your furniture a good dusting with a dry cloth or duster. This will remove any loose dust and debris.
2. Spray Sparingly: Lightly spray the furniture polish onto the clean cloth. Avoid spraying it directly onto the furniture.
3. Wipe it Down: Wipe the furniture surface with the polish-dampened cloth, making sure to cover the entire area evenly.
4. Buff it Up: Use a clean, dry part of the cloth to buff the surface until it shines. This will remove any excess polish and leave a smooth, dust-repellent finish.
5. Breathe Easier: Enjoy a cleaner, less dusty home! You’ll find that you don’t have to dust as often, and your allergies might even thank you.
Wood Floor Wonder: Restore Shine (Use with Caution!)
Okay, this one comes with a big disclaimer: Use furniture polish on wood floors with extreme caution! It can make them very slippery, so it’s best to test it in a small, inconspicuous area first. I only recommend this for restoring shine to floors that are already in good condition and not heavily worn.
What You’ll Need:
* Furniture polish (a liquid or paste polish is best for floors)
* Two soft, clean cloths or a microfiber mop
* A bucket of warm water (optional, for cleaning)
Step-by-Step Instructions:
1. Clean the Floor: Start with a clean floor. Sweep or vacuum to remove any loose dirt and debris. If necessary, mop the floor with a mild soap and water solution. Make sure the floor is completely dry before proceeding.
2. Spot Test (Absolutely Essential!): Find a hidden area, like under a rug or in a closet. Apply a tiny amount of furniture polish to the cloth and gently rub it onto the floor. Wait a few minutes to see if it becomes slippery or discolors the floor. If all looks good, proceed to the next step, but be very careful!
3. Apply the Polish (Sparingly!): Apply a very small amount of furniture polish to a clean cloth or microfiber mop. Remember, a little goes a very long way!
4. Work it In: Gently rub the polish onto the floor in small sections, following the grain of the wood. Be careful not to apply too much polish, as this can make the floor slippery.
5. Buff it Up: Use a clean, dry cloth or microfiber mop to buff the floor until it shines. This will remove any excess polish and leave a smooth, glossy finish.
6. Be Careful! Walk carefully on the floor after polishing, especially if you have pets or children. Consider placing rugs or mats in high-traffic areas to prevent slips.
7. Ventilate: Open windows to ventilate the area and allow the polish to dry completely.
Plant Power: Shine Those Leaves
Want to give your houseplants a healthy, vibrant look? Furniture polish can help! It removes dust and grime from the leaves, allowing them to absorb more sunlight and thrive.
What You’ll Need:
* Furniture polish (a spray polish is easiest to use)
* A soft, clean cloth
Step-by-Step Instructions:
1. Dust the Leaves: Before applying the polish, gently dust the leaves of your plants with a dry cloth. This will remove any loose dust and debris.
2. Spray Lightly: Lightly spray the furniture polish onto the clean cloth. Avoid spraying it directly onto the leaves, as this can damage them.
3. Wipe the Leaves: Gently wipe the leaves of your plants with the polish-dampened cloth, making sure to cover the entire surface.
4. Admire Your Shiny Plants: Your plants will look healthier and more vibrant! Plus, they’ll be able to absorb more sunlight and grow stronger.
Shoe Savior: Polish and Protect
Yes, you can use furniture polish on your shoes! It’s a great way to add shine and protect them from the elements. This works best on leather shoes, but you can also use it on other materials.
What You’ll Need:
* Furniture polish (a cream or paste polish is best for shoes)
* Two soft, clean cloths
* A shoe brush (optional)
Step-by-Step Instructions:
1. Clean Your Shoes: Start with clean shoes. Use a damp cloth to remove any dirt or grime. Let them dry completely.
2. Apply the Polish: Apply a small amount of furniture polish to a clean cloth.
3. Work it In: Gently rub the polish onto the shoes in circular motions, making sure to cover the entire surface.
4. Let it Sit: Let the polish sit for a few minutes (5-10 minutes is usually enough).
5. Buff to
Conclusion
So, there you have it! This simple DIY furniture polish trick is more than just a cost-effective alternative to store-bought products; it’s a gateway to reviving your beloved furniture and breathing new life into your home. We’ve explored how readily available ingredients, likely already in your pantry, can be transformed into a potent and effective furniture polish that cleans, protects, and enhances the natural beauty of wood.
Why is this a must-try? Because it’s economical, environmentally friendly, and incredibly effective. You’re ditching harsh chemicals and embracing a natural solution that’s gentle on your furniture and your health. Plus, the satisfaction of creating something yourself and seeing the immediate results is truly rewarding. Forget those expensive, mass-produced polishes filled with unpronounceable ingredients. This DIY approach puts you in control, allowing you to tailor the formula to your specific needs and preferences.
Looking for variations? Consider adding a few drops of your favorite essential oil, like lavender or lemon, for a subtle and refreshing scent. For darker woods, a touch of brewed black tea can deepen the color and enhance the richness. If you’re dealing with particularly stubborn stains or scratches, a small amount of beeswax can be melted and added to the mixture for extra protection and restoration. Remember to always test any variation on an inconspicuous area first to ensure compatibility.
This DIY furniture polish is not just about cleaning; it’s about caring for your furniture and preserving its beauty for years to come. It’s about embracing a sustainable approach to home care and reducing your reliance on potentially harmful chemicals. It’s about taking pride in your home and creating a space that reflects your values.
We wholeheartedly encourage you to give this DIY furniture polish a try. The process is simple, the ingredients are accessible, and the results are truly remarkable. You’ll be amazed at how easily you can transform dull, lifeless furniture into gleaming, cherished pieces.
But don’t just take our word for it! We want to hear about your experiences. Share your before-and-after photos, your favorite variations, and any tips or tricks you discover along the way. Let’s create a community of DIY enthusiasts who are passionate about restoring and preserving the beauty of their furniture. Use the hashtag #DIYFurniturePolish on social media and let’s see your amazing transformations! We are confident that once you experience the magic of this homemade furniture polish, you’ll never go back to store-bought alternatives. So, grab your ingredients, roll up your sleeves, and get ready to unleash the natural beauty of your furniture!
Frequently Asked Questions (FAQ)
What kind of wood is this DIY furniture polish safe for?
This DIY furniture polish is generally safe for most finished wood surfaces, including hardwoods like oak, maple, cherry, and walnut, as well as softer woods like pine. However, it’s crucial to test the polish on an inconspicuous area first, especially if you’re unsure about the type of finish or if the furniture is antique or delicate. Avoid using this polish on unfinished wood, as it may absorb too much of the oil and leave a greasy residue. For antique furniture, consult with a professional before using any cleaning or polishing products.
How often should I use this DIY furniture polish?
The frequency of polishing depends on the usage and environment of your furniture. For furniture that’s frequently used or exposed to dust and sunlight, polishing every one to two months is recommended. For furniture that’s less frequently used, polishing every three to six months may be sufficient. Over-polishing can lead to a buildup of residue, so it’s best to err on the side of caution. Always observe your furniture and polish only when it appears dull or dusty.
Can I use this DIY furniture polish on leather furniture?
No, this DIY furniture polish is specifically formulated for wood surfaces and is not suitable for leather furniture. Leather requires specialized cleaning and conditioning products to maintain its suppleness and prevent cracking. Using this wood polish on leather could damage the surface and lead to discoloration or deterioration.
What if I don’t have olive oil? Can I use another type of oil?
Yes, you can substitute olive oil with other types of oils, such as coconut oil, almond oil, or jojoba oil. However, each oil has its own unique properties, so the results may vary slightly. Coconut oil, for example, may solidify at cooler temperatures, so it’s best to use it in a warm environment or melt it slightly before mixing. Almond oil is a good option for its light scent and moisturizing properties. Jojoba oil is similar to the natural oils produced by the skin, making it a gentle and effective option. Always test any oil on an inconspicuous area first to ensure compatibility.
How should I store the leftover DIY furniture polish?
Store the leftover DIY furniture polish in an airtight container in a cool, dark place. A glass jar with a tight-fitting lid is ideal. Avoid storing the polish in direct sunlight or near heat sources, as this can cause the oils to degrade and the mixture to spoil. Properly stored, the polish should last for several months. If you notice any changes in color, odor, or consistency, discard the polish.
My furniture has a lot of scratches. Will this polish remove them?
While this DIY furniture polish can help to minimize the appearance of minor scratches and scuffs, it’s not designed to remove deep scratches. The polish works by filling in the scratches and creating a smooth, even surface. For deeper scratches, you may need to use a specialized wood filler or consult with a professional furniture restorer.
The polish seems to be leaving a greasy residue. What am I doing wrong?
A greasy residue can be caused by using too much polish or not buffing the surface thoroughly enough. When applying the polish, use a small amount and spread it evenly over the surface. Allow the polish to sit for a few minutes to penetrate the wood, then buff the surface vigorously with a clean, dry cloth until all the excess polish is removed. If the residue persists, try using a slightly damp cloth to remove the excess polish, followed by a dry cloth to buff the surface.
Can I add essential oils to this polish? If so, which ones are best?
Yes, adding essential oils to this DIY furniture polish can enhance its scent and provide additional benefits. Lemon, orange, and other citrus oils are great for their cleaning and degreasing properties. Lavender oil is known for its calming and relaxing scent. Tea tree oil has antibacterial and antifungal properties. When adding essential oils, use only a few drops (5-10 drops per cup of polish) and be sure to mix them thoroughly. Always test the polish on an inconspicuous area first to ensure that the essential oils don’t damage the finish.
Is this DIY furniture polish safe for children and pets?
While this DIY furniture polish is made with natural ingredients, it’s still important to keep it out of reach of children and pets. The oils and vinegar can be irritating if ingested or come into contact with the eyes. If a child or pet accidentally ingests the polish, contact a medical professional or veterinarian immediately. When polishing furniture, ensure that the area is well-ventilated and that children and pets are kept away until the polish has dried completely.
What kind of cloth should I use to apply and buff the polish?
A soft, lint-free cloth is best for applying and buffing the polish. Microfiber cloths are an excellent choice, as they are gentle on the surface and effectively remove dirt and grime. Avoid using abrasive cloths or paper towels, as they can scratch the finish. Use a clean cloth for each application and buffing to prevent the spread of dirt and grime.


Leave a Comment