
Innovative Onion Growing: Tired of those tiny, lackluster onions from the grocery store? I know I am! There’s nothing quite like the satisfaction of harvesting plump, flavorful onions that you’ve nurtured yourself. For centuries, onions have been a staple in cuisines around the world, dating back to ancient Egypt where they were even revered as symbols of eternity. But let’s face it, growing them can sometimes feel like a bit of a gamble.
That’s where these DIY tricks come in! This article is packed with simple, yet effective, methods to revolutionize your onion patch. We’ll explore some innovative onion growing techniques that will help you maximize your yield, combat common pests, and ultimately, enjoy a bountiful harvest. Whether you’re a seasoned gardener or just starting out, these hacks will empower you to grow bigger, better onions than ever before. So, grab your gardening gloves, and let’s dive into the secrets of successful onion cultivation!
Grow Onions Like a Pro: The Upside-Down Bottle Method
Hey there, fellow gardening enthusiasts! I’m so excited to share one of my favorite gardening hacks with you: growing onions in upside-down water bottles! This method is fantastic for several reasons. It saves space, protects your seedlings from pests, and provides a mini-greenhouse effect that encourages faster growth. Plus, it’s a great way to recycle those plastic bottles we all seem to accumulate. Let’s dive in!
What You’ll Need
Before we get started, gather your supplies. Here’s a list of everything you’ll need for this project:
* Empty plastic water bottles (2-liter bottles work best, but smaller ones can work too)
* Healthy onion sets or onion seedlings (sets are easier for beginners)
* Potting mix (a well-draining mix is crucial)
* Scissors or a utility knife
* Drill or nail (for drainage holes)
* Watering can or hose
* Optional: Liquid fertilizer (for boosting growth)
* Optional: Gloves (to keep your hands clean)
Preparing the Bottles
This is a crucial step, so pay close attention! We need to transform those bottles into mini onion planters.
1. Clean the Bottles: Start by thoroughly cleaning your plastic bottles. Remove any labels and residue. I usually wash them with warm soapy water and rinse them well. This ensures there are no lingering chemicals that could harm your onions.
2. Cut the Bottoms Off: Using your scissors or utility knife, carefully cut off the bottom of each bottle. You want to remove the entire bottom, creating an opening. Be careful when using the knife! I recommend using a cutting board underneath to protect your work surface.
3. Drill Drainage Holes: Now, we need to create drainage holes in the bottle caps. This is essential to prevent waterlogging, which can lead to root rot. Use your drill or nail to poke several holes in each cap. I usually make about 4-5 holes, ensuring they’re evenly spaced. If you’re using a nail, heat it up slightly with a lighter (carefully!) to make it easier to pierce the plastic.
Planting Your Onions
Now for the fun part – planting those onions!
1. Fill the Bottles with Potting Mix: Turn the bottles upside down (cap side down) and fill them with your potting mix. Leave about an inch or two of space at the top. Gently pat down the soil to remove any air pockets. I like to use a good quality potting mix that’s specifically designed for vegetables.
2. Plant the Onion Sets or Seedlings: Now, carefully plant your onion sets or seedlings. If you’re using sets, push them into the soil, leaving the very top of the set exposed. If you’re using seedlings, gently separate them and plant them at the same depth they were growing in their original container. I usually plant one onion set or seedling per bottle.
3. Water Thoroughly: After planting, water your onions thoroughly. Water until you see water draining from the holes in the cap. This ensures that the soil is evenly moistened.
Caring for Your Onions
Proper care is essential for healthy onion growth. Here’s what you need to do:
1. Sunlight: Onions need plenty of sunlight, so place your upside-down bottle planters in a sunny location. Aim for at least 6-8 hours of direct sunlight per day. If you don’t have a sunny spot, you can use grow lights.
2. Watering: Water your onions regularly, especially during dry periods. Check the soil moisture by sticking your finger into the soil. If the top inch feels dry, it’s time to water. Avoid overwatering, as this can lead to root rot.
3. Fertilizing: To boost growth, fertilize your onions every few weeks with a liquid fertilizer. Follow the instructions on the fertilizer label. I like to use a balanced fertilizer that’s specifically formulated for vegetables.
4. Pest Control: Keep an eye out for pests, such as onion maggots and thrips. If you notice any pests, take action immediately. You can use insecticidal soap or neem oil to control pests. The upside-down bottle method actually helps to deter some pests, as it creates a barrier around the seedlings.
5. Weeding: Keep the area around your onion planters free of weeds. Weeds can compete with your onions for nutrients and water.
Harvesting Your Onions
The moment we’ve all been waiting for! Knowing when to harvest your onions is key to getting the best flavor and size.
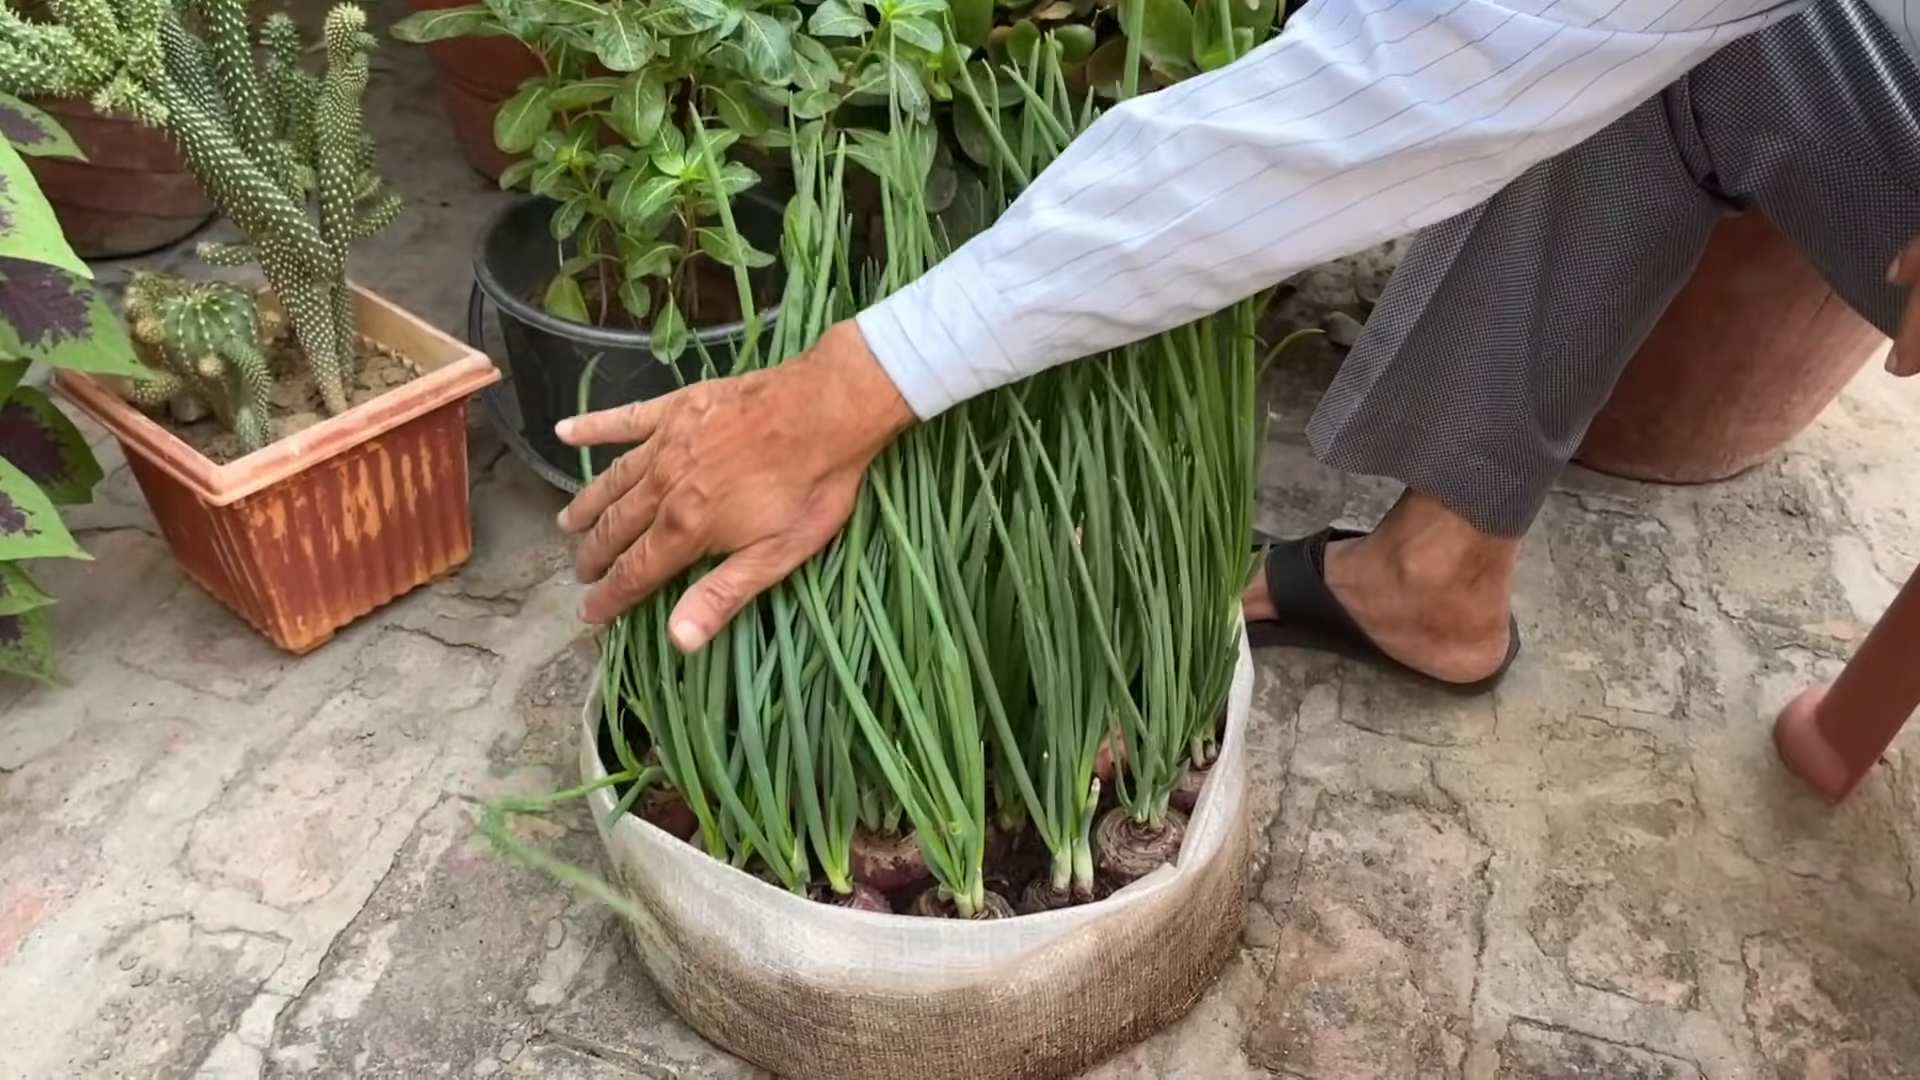
1. When to Harvest: Onions are typically ready to harvest when the tops start to fall over and turn yellow or brown. This usually happens about 90-120 days after planting.
2. How to Harvest: To harvest your onions, gently pull them out of the bottle. If the soil is dry, you may need to loosen it first.
3. Curing Your Onions: After harvesting, you’ll need to cure your onions. This helps to dry them out and prevent them from rotting. To cure your onions, spread them out in a single layer in a warm, dry, and well-ventilated place. Allow them to cure for about 2-3 weeks, or until the necks are completely dry and the outer skins are papery.
4. Storing Your Onions: Once your onions are cured, you can store them in a cool, dry, and dark place. A mesh bag or basket works well for storing onions. Avoid storing them in the refrigerator, as this can cause them to sprout. Properly cured and stored onions can last for several months.
Troubleshooting
Even with the best planning, sometimes things don’t go as expected. Here are some common problems you might encounter and how to fix them:
* Yellowing Leaves: Yellowing leaves can be a sign of overwatering, underwatering, or nutrient deficiency. Check the soil moisture and adjust your watering accordingly. If you suspect a nutrient deficiency, fertilize your onions with a balanced fertilizer.
* Slow Growth: Slow growth can be caused by lack of sunlight, poor soil, or pests. Make sure your onions are getting enough sunlight and that the soil is well-draining and fertile. Check for pests and take action if necessary.
* Root Rot: Root rot is caused by overwatering and poor drainage. Make sure your bottle caps have adequate drainage holes and avoid overwatering. If you suspect root rot, you may need to transplant your onions into fresh soil.
* Pests: Keep an eye out for pests, such as onion maggots and thrips. Use insecticidal soap or neem oil to control pests.
Why This Method Works So Well
I’ve found this method to be incredibly effective, and here’s why:
* Space Saving: This method is perfect for small spaces, such as balconies or patios. You can grow a lot of onions in a small area.
* Pest Protection: The upside-down bottle acts as a barrier, protecting your seedlings from pests.
* Mini-Greenhouse Effect: The plastic bottle creates a mini-greenhouse effect, which helps to warm the soil and encourage faster growth.
* Recycling: This is a great way to recycle plastic bottles and reduce waste.
Tips for Success
Here are a few extra tips to help you succeed with this method:
* Choose the Right Onion Variety: Some onion varieties are better suited for container growing than others. Look for varieties that are compact and early-maturing.
* Use High-Quality Potting Mix: A well-draining potting mix is essential for healthy onion growth. Avoid using garden soil, as it can be too heavy and compact.
* Water Regularly: Onions need consistent moisture, so water them regularly, especially during dry periods.
* Fertilize Regularly: Fertilize your onions every few weeks to provide them with the nutrients they need to grow.
* Monitor for Pests: Keep an eye out for pests and take action immediately if you notice any.
Experiment and Have Fun!
Don’t be afraid to experiment and try different things. Gardening is all about learning and having fun. Try different onion varieties, different potting mixes, and different fertilizers. See what works best for you and your growing conditions.
I hope you found this guide helpful. Happy gardening, and I can’t wait to hear about your success growing onions in upside-down water bottles!
Conclusion
So, there you have it! This innovative onion growing trick isn’t just a fun experiment; it’s a game-changer for anyone looking to maximize their yield, minimize waste, and enjoy the freshest, most flavorful onions possible. By utilizing the bottom of your store-bought onions, you’re essentially giving new life to what would otherwise be discarded, contributing to a more sustainable and resourceful approach to gardening.
Think about it: no more throwing away those perfectly good onion bottoms! Instead, you’re transforming them into a thriving source of delicious, homegrown onions. This method is particularly beneficial for urban gardeners with limited space, as it allows you to make the most of every inch of your garden or even a simple container on your balcony.
But the benefits don’t stop there. This DIY onion growing method is incredibly cost-effective. You’re essentially getting free onion starts, reducing your reliance on expensive seedlings or sets from the garden center. Plus, the satisfaction of nurturing something from what was once considered waste is truly rewarding.
Ready to take your onion growing to the next level?
Don’t be afraid to experiment with different varieties of onions. Try regrowing red onions, yellow onions, or even shallots using this technique. You can also explore different growing mediums, such as hydroponics or aquaponics, for a more advanced approach. Consider adding companion plants like carrots or chamomile to your onion patch to deter pests and promote healthy growth.
For those in colder climates, starting the onion bottoms indoors during the winter months can give them a head start before transplanting them outdoors in the spring. This will ensure a longer growing season and a more abundant harvest.
We’re confident that once you try this innovative onion growing trick, you’ll be amazed by the results. It’s a simple, effective, and environmentally friendly way to enjoy fresh, homegrown onions all season long.
So, grab those onion bottoms, prepare your soil, and get ready to witness the magic of regeneration. We encourage you to share your experiences with us! Post pictures of your thriving onion plants on social media using #InnovativeOnionGrowing and let us know what tips and tricks you’ve discovered along the way. We can’t wait to see your success stories! Happy gardening!
Frequently Asked Questions (FAQ)
1. What kind of onions work best for regrowing from the bottom?
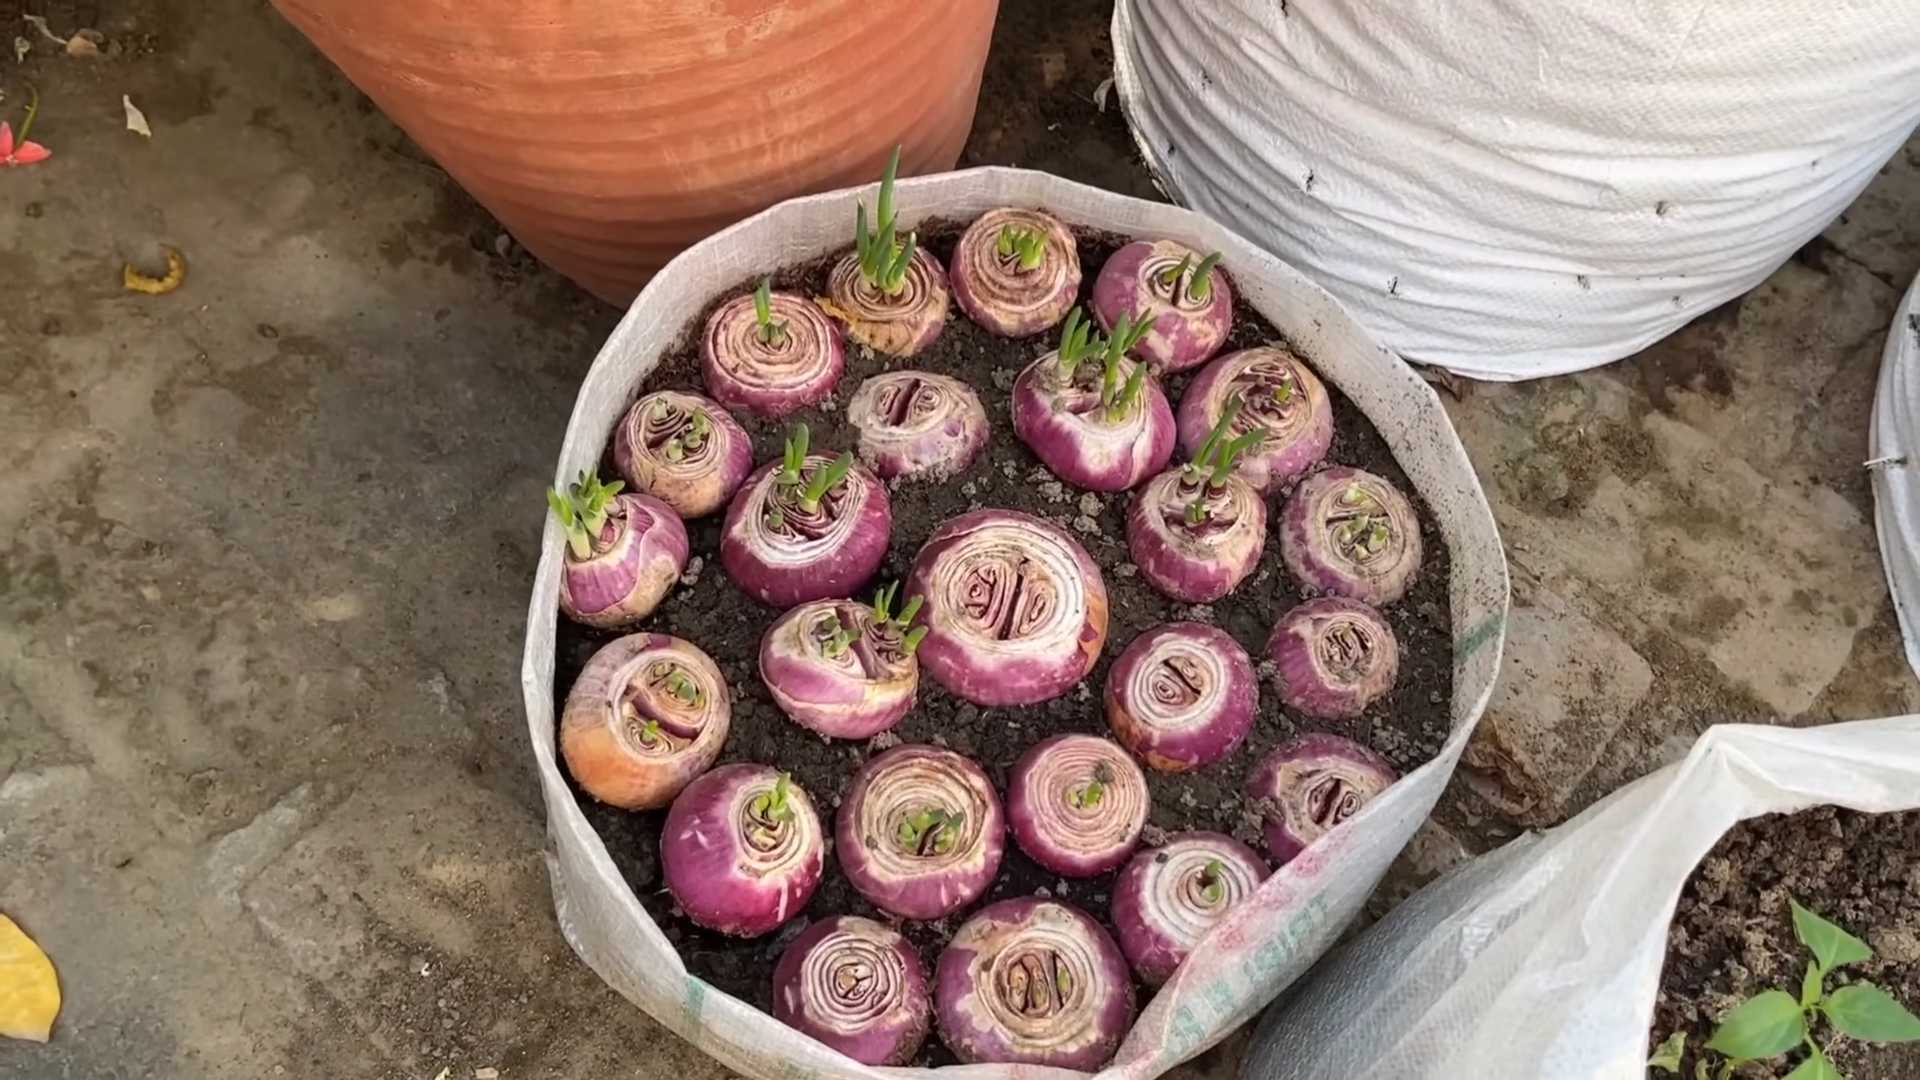
Generally, any onion you buy from the grocery store can be used for this method. However, onions that are firm and haven’t started to sprout or rot are the best candidates. Organic onions are often preferred, as they are less likely to have been treated with growth inhibitors. Yellow, white, and red onions all work well. Shallots can also be regrown using this method. The key is to ensure the bottom portion with the roots is intact and healthy.
2. How long does it take for the onion bottom to start growing?
You should start to see new green shoots emerging from the onion bottom within 1-2 weeks of planting. The speed of growth depends on factors like temperature, sunlight, and soil moisture. Keeping the soil consistently moist but not waterlogged is crucial for optimal growth. Providing ample sunlight will also encourage faster development.
3. Can I grow onions from the bottom in water instead of soil?
Yes, you can initially sprout the onion bottom in water. Place the onion bottom in a shallow dish or jar with just enough water to cover the roots. Change the water every 1-2 days to prevent bacterial growth. Once the roots have developed significantly and green shoots have emerged, you can transplant the onion bottom into soil for continued growth. Growing in soil will provide the necessary nutrients for the onion to bulb properly.
4. How much sunlight do regrown onions need?
Onions require at least 6-8 hours of direct sunlight per day to thrive. Choose a sunny location in your garden or on your balcony for your onion plants. If you’re growing them indoors, place them near a south-facing window or use grow lights to supplement natural sunlight. Insufficient sunlight can lead to weak, leggy growth and reduced bulb size.
5. What type of soil is best for growing onions?
Onions prefer well-draining, fertile soil that is rich in organic matter. Amend your garden soil with compost or well-rotted manure before planting to improve its structure and nutrient content. A slightly acidic to neutral soil pH (6.0-7.0) is ideal. Avoid heavy clay soils, as they can retain too much moisture and lead to root rot. If you have clay soil, consider growing your onions in raised beds or containers with a well-draining potting mix.
6. How often should I water my regrown onions?
Water your onions regularly, especially during dry periods. Keep the soil consistently moist but not waterlogged. Overwatering can lead to root rot, while underwatering can stunt growth. A good rule of thumb is to water deeply when the top inch of soil feels dry to the touch. Mulching around the onion plants can help retain moisture and suppress weeds.
7. Do I need to fertilize my regrown onions?
Yes, onions are heavy feeders and benefit from regular fertilization. Use a balanced fertilizer (e.g., 10-10-10) or a fertilizer specifically formulated for vegetables. Apply the fertilizer according to the package instructions, typically every 2-3 weeks during the growing season. You can also supplement with organic fertilizers like compost tea or fish emulsion. Avoid over-fertilizing, as this can lead to excessive foliage growth at the expense of bulb development.
8. How do I know when my regrown onions are ready to harvest?
The time it takes for regrown onions to mature depends on the variety and growing conditions. Generally, onions are ready to harvest when the tops start to turn yellow and fall over. You can also gently dig around the base of the plant to check the size of the bulb. If the bulb is large enough for your liking, you can harvest the onion.
9. Can I regrow onions from the bottom multiple times?
While it’s possible to get a second or even third harvest from the same onion bottom, the subsequent yields will typically be smaller than the first. The onion bottom will eventually exhaust its nutrient reserves. For best results, it’s recommended to start with fresh onion bottoms each time.
10. What are some common problems when growing onions and how can I prevent them?
Some common problems when growing onions include onion maggots, thrips, and fungal diseases like downy mildew. To prevent these problems, practice good garden hygiene, such as removing plant debris and weeds. Use row covers to protect your plants from pests. Ensure good air circulation to prevent fungal diseases. Rotate your crops each year to avoid soilborne pathogens. If you encounter pests or diseases, treat them promptly with appropriate organic or chemical controls.
Leave a Comment