
Growing Unique Melons might sound like something only seasoned gardeners can achieve, but trust me, with a few clever tricks and a dash of DIY spirit, you can cultivate these delicious and unusual fruits right in your own backyard! Forget the same old supermarket watermelon; we’re talking about honeydew with a surprising twist, cantaloupes bursting with flavor you’ve never imagined, and maybe even a quirky-looking horned melon to impress your friends.
Melons have a rich history, dating back to ancient Egypt and beyond, where they were prized for their sweetness and refreshing qualities. Throughout the centuries, different cultures have developed unique varieties, each with its own distinct taste and appearance. Now, you can tap into that legacy and bring some of that history to your own garden!
Why bother with these DIY tricks for growing unique melons? Well, for starters, you’ll have access to flavors and varieties you simply can’t find in stores. Plus, there’s nothing quite like the satisfaction of nurturing a plant from seed to harvest, knowing you’ve created something truly special. In this article, I’ll share my favorite tips and hacks to help you successfully grow these amazing melons, even if you’re a beginner. Get ready to impress your taste buds and your neighbors with your homegrown melon masterpieces!

Growing Unique Melons Yourself: Your DIY Guide for Extraordinary Varieties
I love to experiment in the garden, and melons are no exception! There are so many fascinating and delicious melon varieties that you can’t find in the supermarket. In this article, I’ll show you how you can grow unique melons yourself, from selecting the right varieties to harvesting the ripe fruits. Don’t worry, it’s easier than you think!
Choosing the Right Melon Variety
Before we get started, it’s important to choose the right melon variety for your garden and climate. Some varieties are better suited for short summers, while others need more warmth and sun. Here are a few of my favorites and what you should look for when choosing:
- ‘Blacktail Mountain’ Watermelon: This variety is perfect for cooler climates as it ripens quickly. It produces small to medium-sized, dark green melons with sweet, red flesh.
- ‘Tigger’ Honeydew Melon: This honeydew melon is a real eye-catcher with its striped rind. It’s not only beautiful but also incredibly aromatic and sweet.
- ‘Charentais’ Cantaloupe: This French cantaloupe variety is known for its intense aroma and juicy, orange flesh. It requires a bit more warmth but is well worth the effort.
- ‘Galia’ Melon: A cross between a cantaloupe and a honeydew, the Galia is sweet, aromatic, and has a slightly green rind that turns yellow when ripe. It is relatively easy to grow and resistant to diseases.
- ‘Kiku’ Melon: This Japanese variety is known for its cream-colored flesh and its sweet, mild flavor. It is a bit more demanding to grow, but a real delicacy.
What to look for when choosing a variety:
- Climate Zone: Choose varieties that are suitable for your climate zone. Inform yourself about the required growing time and temperature requirements.
- Space Requirements: Melon plants need a lot of space. Consider the size of the mature plant when planning your garden.
- Soil Condition: Melons prefer well-draining, nutrient-rich soil.
- Disease Resistance: Choose varieties that are resistant to common melon diseases to avoid problems.
Start Melons Indoors or Sow Directly?
You have two options for growing your melons: you can either start them indoors or sow them directly into the open ground. Starting them indoors has the advantage of giving the plants a head start and extending the harvest season. Direct sowing is easier, but the plants take longer to mature.
Starting Melons Indoors (Recommended)
- Prepare seeding containers: Fill small pots or seed trays with seed-starting mix.
- Sow seeds: Place 2-3 seeds per pot about 2 cm deep into the soil.
- Water: Water the soil gently so that it is moist but not wet.
- Keep warm: Place the pots in a warm, bright place (e.g., on a windowsill or in a greenhouse). The ideal germination temperature is 25-30°C.
- Keep moist: Keep the soil evenly moist, but avoid waterlogging.
- Thin out: Once the seedlings have 2-3 true leaves, you can thin them to the strongest seedling per pot if you sowed multiple seeds.
Sowing Melons Directly
- Prepare the soil: Loosen the soil thoroughly and enrich it with compost or well-rotted manure.
- Sow: Sow the seeds about 2 cm deep into the soil. Maintain a distance of about 60-90 cm between plants.
- Water: Water the soil gently.
- Keep warm: Cover the seeds with a plastic sheet or fleece to retain heat and speed up germination.
- Thin out: Once the seedlings have emerged, thin them to the strongest seedling per spot.
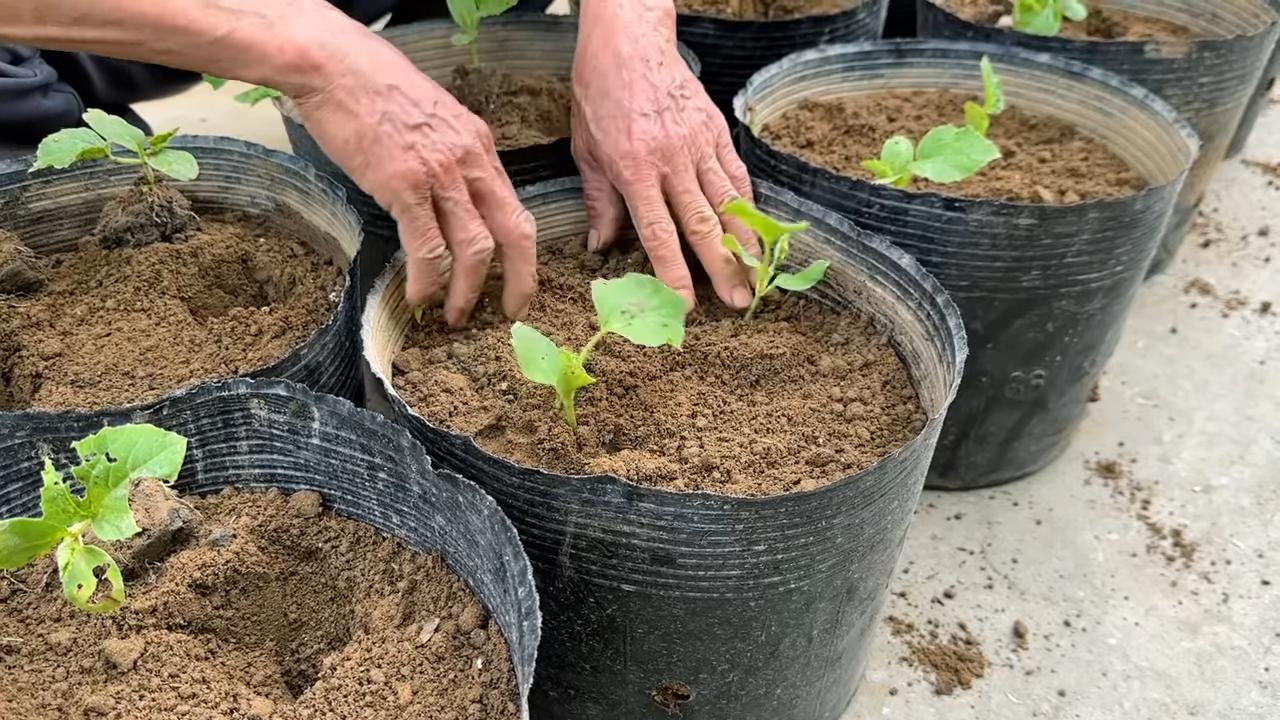
Planting and Caring for Melons
Whether you started your melons indoors or sowed them directly, the next step is planting them outdoors.
- Choose the right time: Wait until there is no more danger of frost and the soil has warmed up (at least 15°C). Melons love warmth!
- Prepare planting holes: Dig planting holes that are slightly larger than the root balls of the young plants.
- Plant: Carefully place the young plants in the holes and fill them with soil. Make sure the root ball is completely covered.
- Water: Water the plants thoroughly.
- Mulch: Cover the soil around the plants with mulch (e.g., straw or wood chips) to retain moisture and suppress weeds.
Care during the growing season:
- Watering: Melons need regular water, especially during fruit formation. It’s best to water in the morning so the leaves can dry off during the day. Avoid waterlogging.
- Fertilizing: Fertilize the plants regularly with an organic fertilizer to provide them with sufficient nutrients. I like to use compost tea or diluted nettle tea.
- Remove weeds: Keep the area around the plants weed-free to avoid competition for nutrients and water.
- Trellis: Some melon varieties can benefit from a trellis, especially if you have limited space. You can use a climbing grid or a fence.
- Promote fruit set: To promote fruit set, you can hand-pollinate the female flowers (identifiable by the small fruit base behind the flower). Use a brush to transfer pollen from the male flowers (without a fruit base) to the female flowers.
Protection from Pests and Diseases
Melons can be affected by various pests and diseases. Here are a few tips on how you can protect your plants:
- Slugs: Slugs can devour young melon seedlings. Protect your plants with slug pellets or slug fences.
- Aphids: Aphids suck plant sap and can transmit diseases. Combat them with a jet of water or with natural insecticides like neem oil.
- Powdery mildew: Powdery mildew is a fungal disease that appears as a white coating on the leaves. Ensure good ventilation and avoid wetting the leaves when watering. If infested, you can use a fungicide.
- Fusarium wilt: This fungal disease leads to wilting and death of the plants. Choose resistant varieties and ensure good soil drainage.
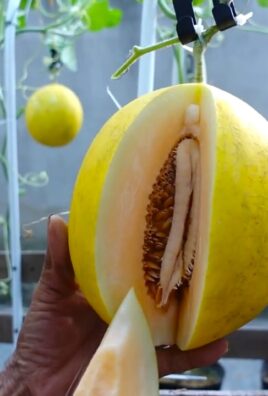
Harvesting Melons
Harvest time is the most exciting part! But how do you know when a melon is ripe? Here are a few signs:
Scent: Ripe honeydew and cantaloupe melons give off a sweet fragrance.
Sound test: Tap the melon lightly. A ripe watermelon sounds hollow, an unripe one more dull.
Stem end: The stem end should be dry and slightly cracked.
Ground spot: The ground spot (the place where the melon lay on the ground) should be yellowish or cream-colored.
Conclusion
So, there you have it! Mastering the art of growing unique melons isn’t just about planting seeds and hoping for the best; it’s about understanding the nuances of their care and employing clever DIY tricks to give them the best possible start. This method, especially when it comes to nurturing those delicate seedlings, is a game-changer. It’s a must-try for anyone serious about harvesting a truly exceptional and flavorful melon crop.
Why is this DIY approach so crucial? Because it addresses the most vulnerable stage of a melon’s life: its infancy. By creating a controlled, nurturing environment, you dramatically increase the chances of strong, healthy seedlings that are ready to thrive once transplanted. This translates to more robust plants, better disease resistance, and ultimately, a more abundant and delicious harvest.
But don’t stop there! Experimentation is key to unlocking the full potential of your melon patch. Consider these variations to tailor the DIY trick to your specific needs and environment:
* **Greenhouse Enhancement:** If you have a greenhouse, use it! The consistent temperature and humidity will further boost seedling growth. You can even integrate a small, automated watering system to maintain optimal moisture levels.
* **Soil Amendments:** Before transplanting, enrich your garden soil with compost, well-rotted manure, or other organic matter. This will provide essential nutrients and improve drainage, creating the perfect foundation for your melons to flourish.
* **Vertical Growing:** For smaller gardens, consider training your melon vines to grow vertically on trellises or supports. This not only saves space but also improves air circulation, reducing the risk of fungal diseases. Choose smaller melon varieties for this method.
* **Companion Planting:** Plant beneficial herbs and flowers alongside your melons to attract pollinators and deter pests. Marigolds, basil, and nasturtiums are excellent choices.
* **Sun Protection:** In particularly hot climates, provide some afternoon shade for your melon plants to prevent sunscald. Shade cloth or strategically placed taller plants can offer protection.
* **Watering Techniques:** Implement drip irrigation or soaker hoses to deliver water directly to the roots, minimizing water waste and reducing the risk of foliar diseases.
* **DIY Pollination:** If you’re growing melons in an area with limited bee activity, consider hand-pollinating the flowers yourself. Use a small paintbrush to transfer pollen from the male flowers to the female flowers.
The beauty of this DIY trick lies in its adaptability. Feel free to modify it to suit your specific growing conditions and preferences. The most important thing is to provide your melon seedlings with the care and attention they need to thrive.
We are confident that this method will significantly improve your melon-growing success. Don’t just take our word for it, though! We wholeheartedly encourage you to try this DIY trick for growing unique melons and share your experiences with us. Let us know what varieties you’re growing, what modifications you’ve made to the method, and what results you’ve achieved. Your insights will not only benefit other gardeners but also help us refine and improve this technique even further. Share your photos, tips, and stories in the comments section below. Let’s cultivate a community of passionate melon growers and unlock the secrets to harvesting the most delicious and unique melons imaginable! We can’t wait to hear about your melon-growing adventures!
Frequently Asked Questions (FAQ)
What types of melons does this DIY trick work best for?
This DIY trick is beneficial for virtually all types of melons, but it’s particularly advantageous for more delicate or less common varieties that may require extra care during their early stages. Think of heirloom melons, cantaloupes with unique flavor profiles, or even smaller watermelon varieties. The controlled environment helps ensure these seedlings get a strong start, increasing their chances of survival and productivity. However, even common varieties like honeydew and standard watermelons will benefit from this method, resulting in healthier, more vigorous plants. The key is to tailor the specific conditions (temperature, humidity, light) to the specific needs of the melon variety you’re growing.
How long should I keep the melon seedlings in their protected environment?
The ideal duration depends on your local climate and the specific melon variety. Generally, you should keep the seedlings in their protected environment until they have developed several sets of true leaves and are showing signs of robust growth. This typically takes around 2-4 weeks. Before transplanting, gradually acclimate the seedlings to outdoor conditions by exposing them to increasing amounts of sunlight and fresh air each day. This process, known as hardening off, helps them adjust to the harsher environment and reduces the risk of transplant shock. Start with just an hour or two of outdoor exposure and gradually increase the time over a week or so.
What kind of soil should I use for starting melon seedlings?
A well-draining, nutrient-rich potting mix is essential for starting melon seedlings. Avoid using garden soil, as it can be too heavy and may contain pathogens that can harm the seedlings. A good quality seed-starting mix or a blend of peat moss, perlite, and vermiculite is ideal. You can also add a small amount of compost to provide additional nutrients. Ensure the soil is moist but not waterlogged, as excessive moisture can lead to root rot. Consider using biodegradable pots or seed trays to minimize root disturbance during transplanting.
How often should I water the melon seedlings?
Watering frequency depends on the humidity, temperature, and the type of container you’re using. Generally, you should water the seedlings when the top inch of soil feels dry to the touch. Avoid overwatering, as this can lead to root rot. Use a gentle watering can or spray bottle to avoid disturbing the delicate seedlings. Bottom watering, where you place the container in a tray of water and allow the soil to absorb the moisture from below, is also a good option.
What are some common problems I might encounter when growing melon seedlings, and how can I prevent them?
Some common problems include damping-off (a fungal disease that causes seedlings to collapse), leggy growth (caused by insufficient light), and pest infestations (such as aphids or spider mites). To prevent damping-off, use a sterile potting mix, avoid overwatering, and ensure good air circulation. To prevent leggy growth, provide adequate light, either through a sunny window or grow lights. To prevent pest infestations, inspect your seedlings regularly and take action at the first sign of trouble. Insecticidal soap or neem oil can be effective treatments for many common pests.
Can I use this DIY trick for other types of plants besides melons?
Absolutely! This DIY trick can be adapted for starting a wide variety of plants, especially those that are sensitive to cold temperatures or require a long growing season. Tomatoes, peppers, eggplants, and cucumbers are all excellent candidates for this method. The principles of providing a controlled, nurturing environment apply to many different types of seedlings. Just be sure to adjust the specific conditions (temperature, humidity, light) to the needs of the particular plant you’re growing.
What if I don’t have a lot of space for starting melon seedlings indoors?
Even if you have limited space, you can still successfully start melon seedlings indoors. Consider using compact seed-starting trays or vertical growing systems to maximize your space. You can also use a small, portable grow light to provide adequate light in a confined area. Remember that you only need to provide a protected environment for a few weeks, so you don’t need a large, permanent setup. Even a small windowsill can be sufficient for starting a few melon seedlings.
How do I know when my melons are ripe and ready to harvest?
Determining ripeness varies depending on the melon variety, but here are some general guidelines:
* **Watermelons:** Look for a dull, rather than shiny, rind. The spot where the melon rests on the ground (the field spot) should be yellow or cream-colored. Thump the melon; a ripe watermelon will sound hollow.
* **Cantaloupes:** The melon should have a fragrant aroma, and the stem should slip easily from the vine with gentle pressure. The rind should have a distinct netting pattern.
* **Honeydew Melons:** The rind should be creamy yellow, and the blossom end should be slightly soft and yielding to pressure. The melon should feel heavy for its size.
Remember that experience is the best teacher. As you grow more melons, you’ll become more adept at recognizing the signs of ripeness.

Leave a Comment