
Plant Cauliflower in Backyard: Imagine stepping outside your back door and harvesting fresh, crisp cauliflower, ready to be transformed into a delicious and healthy meal. Sounds idyllic, right? Well, it’s more achievable than you might think! For generations, home gardeners have cultivated cauliflower, a member of the Brassica family, prized for its nutritional value and versatility in the kitchen. From ancient Roman gardens to modern-day urban farms, this vegetable has held a special place in our diets.
But let’s be honest, growing cauliflower can sometimes feel a little intimidating. I know I felt that way when I first started! That’s why I’ve put together this guide packed with easy-to-follow DIY tricks and hacks to help you successfully plant cauliflower in your backyard, even if you’re a complete beginner. We’ll demystify the process, from choosing the right variety to protecting your precious plants from pests.
Why do you need these DIY tricks? Because store-bought cauliflower simply can’t compare to the flavor and satisfaction of growing your own. Plus, you’ll know exactly what’s gone into your food, avoiding harmful pesticides and supporting a more sustainable lifestyle. So, grab your gardening gloves, and let’s get started on your cauliflower-growing adventure! I promise, with a little know-how, you’ll be enjoying homegrown cauliflower in no time.
Growing Cauliflower in Your Backyard: A Step-by-Step Guide
Okay, so you want to grow cauliflower in your backyard? Awesome! It’s totally doable, and there’s nothing quite like the satisfaction of harvesting your own fresh, delicious cauliflower. It might seem a little intimidating at first, but trust me, with a little planning and effort, you’ll be enjoying homegrown cauliflower in no time. I’m going to walk you through everything you need to know, from choosing the right variety to dealing with pests. Let’s get started!
Choosing the Right Cauliflower Variety
First things first, let’s talk about cauliflower varieties. There are tons of different types out there, and the best one for you will depend on your climate and when you want to harvest.
* Consider your climate: Some varieties are better suited for warmer climates, while others can handle cooler temperatures.
* Think about timing: Early-maturing varieties are great if you want a quick harvest, while late-maturing varieties can be planted for a fall harvest.
* Color matters (sort of!): While white cauliflower is the most common, you can also find orange, purple, and green varieties. These are fun to grow and add a pop of color to your garden and your plate!
Some popular and reliable varieties include:
* Snowball Y Improved: A classic white variety that’s relatively easy to grow.
* Cheddar: An orange variety that’s packed with Vitamin A.
* Graffiti: A beautiful purple variety that adds visual interest to your garden.
* Romanesco: A unique green variety with a fractal-like head.
Once you’ve chosen your variety, it’s time to get your seeds or seedlings! I usually start with seedlings because it gives me a head start, but you can definitely start from seed if you prefer.
Preparing Your Garden Bed
Cauliflower needs a sunny spot with well-drained soil. It’s also a heavy feeder, so you’ll want to make sure your soil is rich in nutrients.
* Sunlight: Aim for at least 6 hours of direct sunlight per day.
* Soil: Cauliflower prefers slightly acidic soil with a pH of 6.0 to 7.0.
* Drainage: Make sure your soil drains well. Cauliflower doesn’t like to sit in soggy soil.
Here’s how I prepare my garden bed:
1. Clear the area: Remove any weeds, rocks, or debris from the area where you’ll be planting.
2. Amend the soil: This is super important! I like to add plenty of compost or well-rotted manure to my soil. This will improve drainage, add nutrients, and help retain moisture. You can also add some fertilizer specifically formulated for vegetables. Follow the instructions on the package.
3. Till the soil: Use a garden fork or tiller to loosen the soil to a depth of about 12 inches. This will make it easier for the cauliflower roots to grow.
4. Smooth the surface: Rake the soil to create a smooth, even surface.
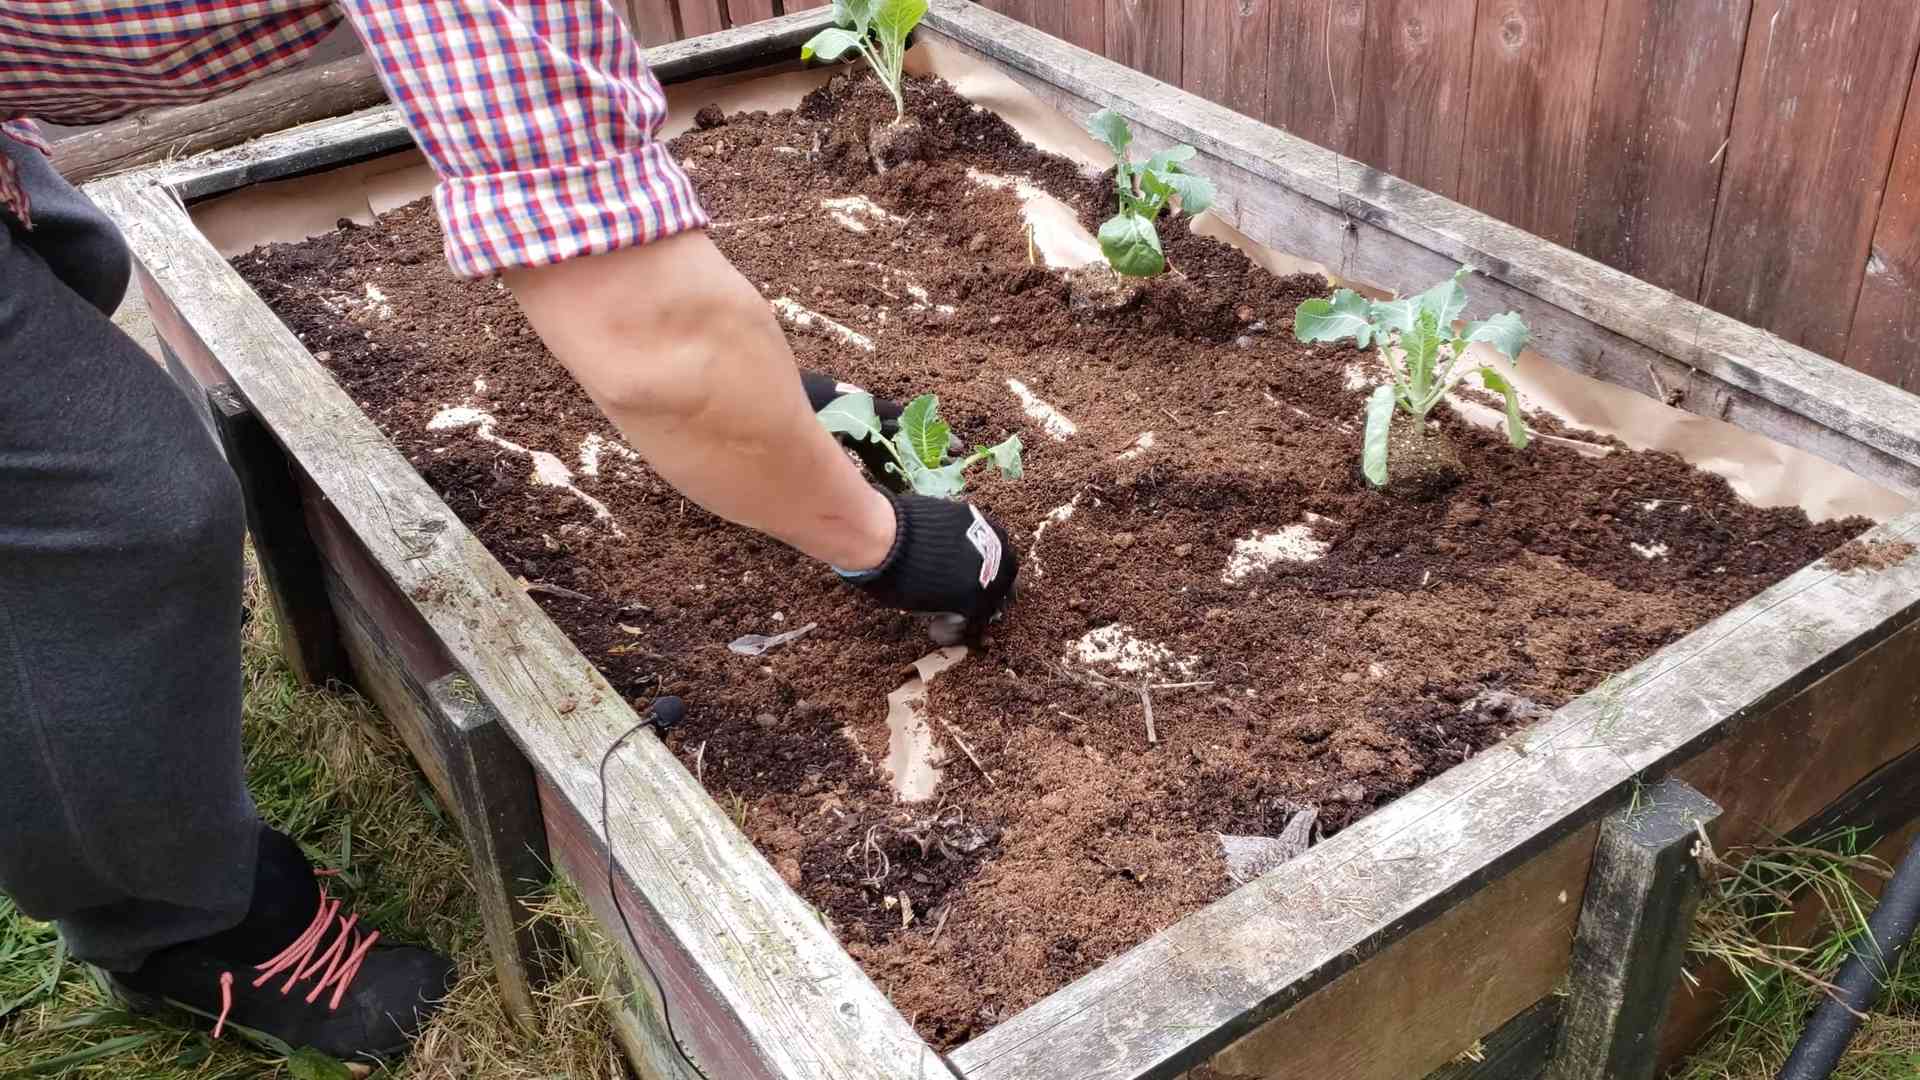
Planting Your Cauliflower
Now for the fun part – planting! Whether you’re starting with seeds or seedlings, here’s what you need to do:
Planting from Seedlings:
1. Dig holes: Dig holes that are slightly larger than the root ball of your seedlings. Space the holes about 18-24 inches apart. This gives the cauliflower plants enough room to grow.
2. Remove seedlings from containers: Gently remove the seedlings from their containers. If the roots are tightly bound, gently loosen them with your fingers.
3. Plant the seedlings: Place the seedlings in the holes and backfill with soil. Make sure the top of the root ball is level with the soil surface.
4. Water thoroughly: Water the seedlings well after planting. This will help them settle in and establish their roots.
Planting from Seeds:
1. Sow seeds indoors (optional): If you want to get a head start, you can sow your cauliflower seeds indoors about 4-6 weeks before the last expected frost. Plant the seeds about ½ inch deep in seed-starting mix. Keep the soil moist and warm.
2. Harden off seedlings (if started indoors): Before transplanting your seedlings outdoors, you’ll need to harden them off. This means gradually exposing them to outdoor conditions over a period of about a week. Start by placing them in a sheltered spot for a few hours each day, gradually increasing the amount of time they spend outdoors.
3. Direct sow seeds (if weather permits): You can also direct sow cauliflower seeds directly into your garden bed. Plant the seeds about ½ inch deep and space them about 18-24 inches apart.
4. Thin seedlings: Once the seedlings emerge, thin them to the strongest plant in each spot.
Caring for Your Cauliflower
Cauliflower needs consistent care to thrive. Here’s what you need to do:
1. Watering: Cauliflower needs consistent moisture, especially during hot, dry weather. Water deeply and regularly, aiming for about 1-2 inches of water per week. Avoid overhead watering, as this can lead to fungal diseases. I prefer using a soaker hose or drip irrigation.
2. Fertilizing: As I mentioned before, cauliflower is a heavy feeder. Fertilize your plants every 2-3 weeks with a balanced fertilizer. You can also side-dress with compost or well-rotted manure.
3. Weeding: Keep your garden bed free of weeds. Weeds compete with cauliflower for nutrients and water. Hand-pull weeds regularly or use a hoe to cultivate the soil.
4. Mulching: Apply a layer of mulch around your cauliflower plants. Mulch helps retain moisture, suppress weeds, and regulate soil temperature. I like to use straw or wood chips.
5. Blanching (for white varieties): This is an important step if you’re growing white cauliflower. Blanching prevents the head from turning yellow or brown. When the head is about 2-3 inches in diameter, tie the outer leaves together over the head with twine or rubber bands. This will block sunlight and keep the head white. Check the head regularly and harvest when it’s the desired size.
Dealing with Pests and Diseases
Unfortunately, cauliflower is susceptible to a few pests and diseases. Here’s what to watch out for and how to deal with them:
* Cabbage worms: These little green caterpillars can wreak havoc on your cauliflower plants. They chew holes in the leaves and can even damage the head. To control cabbage worms, you can hand-pick them off the plants, use row covers to prevent them from laying eggs, or spray with Bacillus thuringiensis (Bt), a natural insecticide.
* Aphids: These tiny insects suck the sap from plants, causing them to weaken and become distorted. To control aphids, you can spray them with a strong stream of water, use insecticidal soap, or introduce beneficial insects like ladybugs.
* Clubroot: This fungal disease causes the roots of cauliflower plants to become swollen and distorted. To prevent clubroot, plant resistant varieties, improve soil drainage, and rotate your crops.
* Black rot: This bacterial disease causes dark, sunken lesions on the leaves and head of cauliflower. To prevent black rot, plant disease-free seeds, avoid overhead watering, and practice crop rotation.
I always try to use organic methods to control pests and diseases whenever possible. It’s better for the environment and for your health!
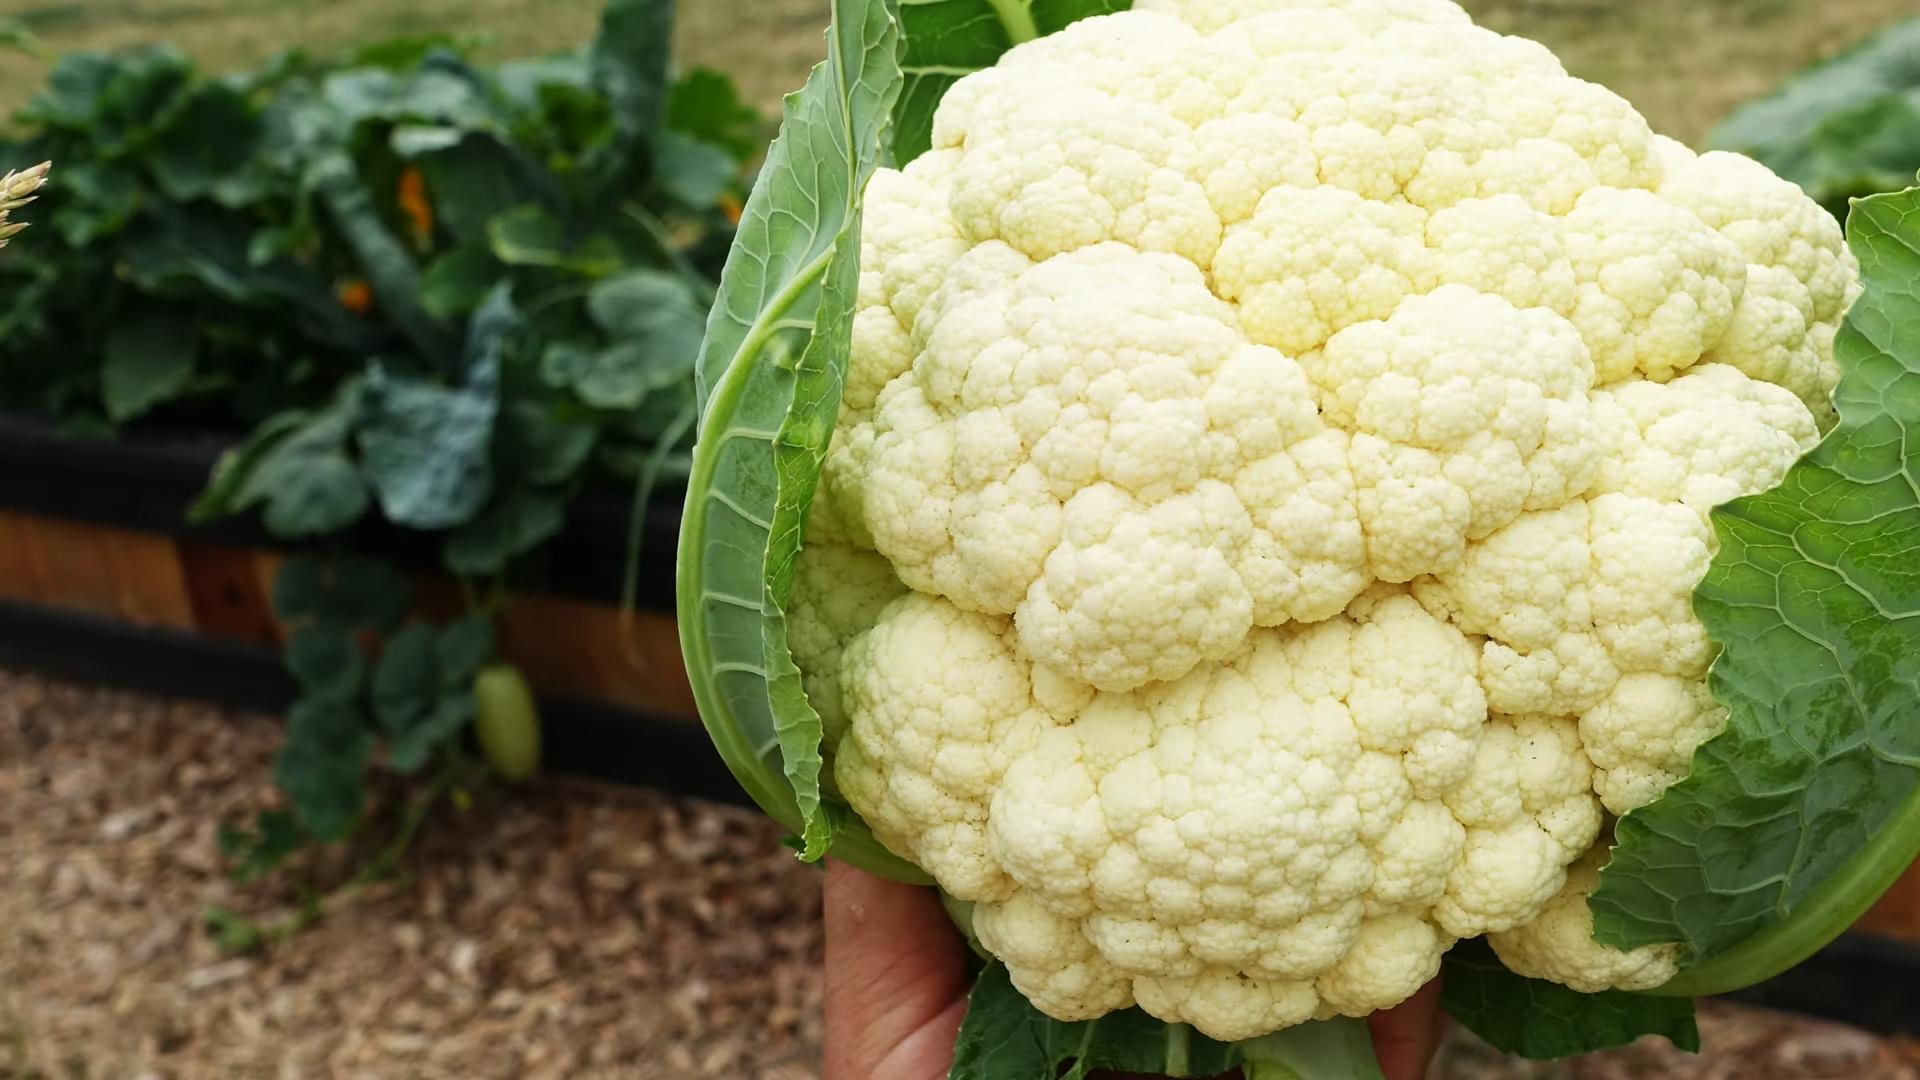
Harvesting Your Cauliflower
The moment you’ve been waiting for! Cauliflower is usually ready to harvest about 50-100 days after planting, depending on the variety.
* Check the head: The head should be firm, compact, and the desired size.
* Cut the stem: Use a sharp knife to cut the stem just below the head. Leave a few leaves attached to protect the head.
* Harvest in the morning: Harvest cauliflower in the morning, when the head is cool and crisp.
Once you’ve harvested your cauliflower, you can store it in the refrigerator for up to a week.
Enjoying Your Homegrown Cauliflower
Now for the best part – eating your homegrown cauliflower! There are so many ways to enjoy it. You can roast it, steam it, grill it, or even eat it raw. You can also use it to make cauliflower rice, cauliflower pizza crust, or cauliflower soup. The possibilities are endless!
I hope this guide has helped you feel confident about growing cauliflower in your backyard. It’s a rewarding experience, and I know you’ll love the taste of your own homegrown cauliflower. Happy gardening!
Conclusion
So, there you have it! Planting cauliflower in your backyard isn’t just a gardening project; it’s an investment in fresh, delicious, and healthy eating. We’ve walked you through the steps, from selecting the right variety to nurturing your plants to a bountiful harvest. But why is this DIY trick a must-try?
Firstly, the taste difference is undeniable. Store-bought cauliflower simply can’t compare to the crisp, slightly sweet flavor of a head you’ve grown yourself. You control the entire process, ensuring no unwanted chemicals or pesticides come near your precious plants. Secondly, it’s incredibly rewarding. Watching a tiny seedling transform into a robust cauliflower head is a deeply satisfying experience, connecting you to the natural world in a tangible way. Thirdly, it’s cost-effective. While there’s an initial investment in seeds or seedlings and soil amendments, you’ll quickly recoup that cost with the abundance of cauliflower you’ll harvest.
But the benefits don’t stop there. Growing your own cauliflower allows you to experiment with different varieties. Consider trying vibrant purple cauliflower for a stunning visual addition to your garden and plate. Or perhaps Romanesco cauliflower, with its fractal florets, for a truly unique culinary experience. You can also adjust the planting schedule to stagger your harvests, ensuring a continuous supply of fresh cauliflower throughout the growing season.
Don’t be afraid to get creative with your approach. Companion planting can significantly improve your cauliflower’s health and yield. Marigolds deter pests, while herbs like rosemary and thyme can enhance the flavor of your cauliflower. Experiment with different soil amendments to find what works best for your specific soil type. Consider using raised beds or containers if your soil is particularly poor or if you have limited space.
This DIY cauliflower growing trick is more than just a recipe for success; it’s an invitation to connect with nature, nourish your body, and discover the joy of homegrown food.
We understand that gardening can sometimes feel daunting, especially for beginners. But with a little patience, attention, and the guidance provided in this article, you’ll be well on your way to harvesting your own delicious cauliflower. Remember to monitor your plants regularly for pests and diseases, and don’t hesitate to adjust your watering and fertilizing schedule as needed.
Now, it’s your turn! We encourage you to take the plunge and try planting cauliflower in your backyard. Share your experiences with us! We’d love to hear about your successes, challenges, and any unique tips or tricks you discover along the way. Post photos of your cauliflower plants on social media using #HomegrownCauliflower and tag us so we can celebrate your gardening journey with you. Let’s build a community of passionate gardeners who are dedicated to growing their own food and sharing their knowledge with others. Happy gardening!
Frequently Asked Questions (FAQ)
Q: What is the best time of year to plant cauliflower?
A: The best time to plant cauliflower depends on your climate. Cauliflower thrives in cool weather, so it’s typically planted in the spring or fall. For a spring crop, start seeds indoors 6-8 weeks before the last expected frost. Transplant seedlings outdoors 2-3 weeks before the last frost. For a fall crop, start seeds indoors in mid-summer and transplant seedlings outdoors in late summer or early fall. In warmer climates, you can plant cauliflower throughout the winter. Pay attention to your local weather patterns and adjust your planting schedule accordingly.
Q: What kind of soil does cauliflower need?
A: Cauliflower prefers well-drained, fertile soil that is rich in organic matter. The ideal soil pH is between 6.0 and 7.0. Before planting, amend your soil with compost, aged manure, or other organic matter to improve its fertility and drainage. You can also add a slow-release fertilizer to provide your cauliflower plants with the nutrients they need to thrive. If your soil is heavy clay, consider growing cauliflower in raised beds or containers to improve drainage.
Q: How much sunlight does cauliflower need?
A: Cauliflower needs at least 6 hours of sunlight per day to thrive. Choose a planting location that receives full sun for most of the day. If you live in a hot climate, some afternoon shade can be beneficial to prevent the cauliflower heads from bolting (going to seed prematurely).
Q: How often should I water cauliflower?
A: Cauliflower needs consistent moisture to grow properly. Water your plants deeply and regularly, especially during dry periods. Aim to keep the soil consistently moist but not waterlogged. Mulching around your cauliflower plants can help to retain moisture and suppress weeds. Check the soil moisture regularly by sticking your finger into the soil. If the top inch of soil feels dry, it’s time to water.
Q: What are some common pests and diseases that affect cauliflower?
A: Cauliflower is susceptible to a variety of pests and diseases, including cabbage worms, aphids, flea beetles, clubroot, and black rot. Regularly inspect your plants for signs of pests or diseases. If you find any problems, take action immediately to prevent them from spreading. You can use organic pest control methods, such as insecticidal soap or neem oil, to control pests. To prevent diseases, practice crop rotation, avoid overhead watering, and ensure good air circulation around your plants.
Q: How do I know when my cauliflower is ready to harvest?
A: Cauliflower is ready to harvest when the head is firm, compact, and has reached the desired size. The size of the head will vary depending on the variety, but most cauliflower heads are ready to harvest when they are 6-8 inches in diameter. The florets should be tightly packed together and free from blemishes. To harvest, cut the stem of the cauliflower head with a sharp knife, leaving a few leaves attached to protect the head.
Q: Can I grow cauliflower in containers?
A: Yes, you can grow cauliflower in containers, but you’ll need to choose a large container that is at least 12 inches in diameter and 12 inches deep. Use a well-draining potting mix and provide your cauliflower plants with plenty of sunlight and water. Container-grown cauliflower may need to be fertilized more frequently than cauliflower grown in the ground.
Q: How can I prevent cauliflower from turning yellow?
A: Cauliflower heads can turn yellow if they are exposed to too much sunlight. To prevent this, you can blanch the cauliflower head by tying the outer leaves together over the head when it is about half its mature size. This will protect the head from the sun and keep it white.
Q: What are some creative ways to use homegrown cauliflower?
A: Homegrown cauliflower is incredibly versatile and can be used in a variety of dishes. You can roast it, steam it, grill it, or even eat it raw. Cauliflower can be used as a substitute for rice, potatoes, or other starchy vegetables. Try making cauliflower rice, mashed cauliflower, or cauliflower pizza crust. You can also add cauliflower to soups, stews, and stir-fries. Get creative and experiment with different flavors and seasonings to discover your favorite ways to enjoy homegrown cauliflower.


Leave a Comment