
Mop hacks with old towels – who knew cleaning could be so resourceful and, dare I say, fun? Let’s be honest, the history of cleaning isn’t exactly glamorous, but the ingenuity of finding new uses for old items? That’s a story worth telling! For generations, resourceful homemakers have been finding clever ways to repurpose textiles, and this is just a modern twist on that tradition.
Are you tired of flimsy mop heads that fall apart after a few uses? Or maybe you’re just looking for a more eco-friendly and budget-conscious way to keep your floors sparkling? I totally get it! That’s why I’m so excited to share these amazing mop hacks with old towels. Not only will you be saving money and reducing waste, but you’ll also be amazed at how effective these DIY solutions are.
In this article, I’m going to show you some simple, step-by-step methods to transform those forgotten towels into super-absorbent, floor-cleaning powerhouses. Get ready to ditch those expensive disposable mop heads and embrace a more sustainable and satisfying cleaning routine. Let’s get started!

DIY Mop Hacks: Giving Old Towels a New Life!
Hey there, fellow DIY enthusiasts! Are you tired of throwing away those old, worn-out towels? Well, I’ve got some fantastic news for you! Instead of tossing them in the trash, we can transform them into super-absorbent, eco-friendly mop heads. Not only will you be saving money, but you’ll also be reducing waste. It’s a win-win! Let’s dive into these awesome mop hacks.
What You’ll Need:
Before we get started, let’s gather our supplies. This is what you’ll need to turn those old towels into amazing mop heads:
* Old Towels: The star of the show! Any size or type will work, but thicker towels like bath towels will be more absorbent.
* Mop Head Frame: You can use an existing mop head frame from a worn-out mop, or purchase a new one. Make sure it’s compatible with the type of mop you have (flat mop, string mop, etc.).
* Scissors: For cutting the towels into the desired shapes.
* Sewing Machine (Optional): If you want a more durable and professional finish, a sewing machine is your best friend. But don’t worry, hand-sewing works just fine too!
* Needle and Thread: For hand-sewing the towel pieces together. Choose a strong thread that matches the color of your towels.
* Measuring Tape or Ruler: To ensure accurate measurements and consistent sizing.
* Pins: To hold the towel pieces in place while sewing.
* Velcro Strips (Optional): For creating a detachable mop head, especially useful for flat mops.
* Hot Glue Gun (Optional): For quick fixes and attaching Velcro strips.
* Marker or Pen: To mark cutting lines on the towels.
Hack #1: The Classic Towel Strip Mop Head
This is probably the easiest and most straightforward method. It’s perfect for string mops or any mop head frame that uses strips of material.
Step-by-Step Instructions:
1. Prepare the Towels: Start by washing your old towels to remove any dirt or debris. This will also help them become more absorbent. Once they’re clean and dry, lay them flat on a work surface.
2. Cut the Towels into Strips: Using your measuring tape and marker, measure and mark strips that are approximately 2-3 inches wide. The length of the strips will depend on the size of your mop head frame. A good rule of thumb is to make them twice the length of the frame so you can fold them over. I usually aim for strips that are around 12-18 inches long.
3. Cut Along the Marked Lines: Carefully cut along the marked lines with your scissors. You should now have a pile of towel strips.
4. Attach the Strips to the Mop Head Frame: This is where the magic happens! If you’re using a string mop frame, simply fold each strip in half and loop it around the frame, pulling the ends through the loop to secure it. If you’re using a different type of frame, you might need to get a little creative. You can sew the strips directly onto the frame, or use hot glue for a quick and easy fix.
5. Secure the Strips: For added durability, especially if you’re hand-sewing, you can reinforce the attachment points with a few extra stitches. This will prevent the strips from coming loose during use.
6. Fluff and Trim (Optional): Once all the strips are attached, fluff them out to create a full and absorbent mop head. If any strips are too long or uneven, trim them with your scissors.
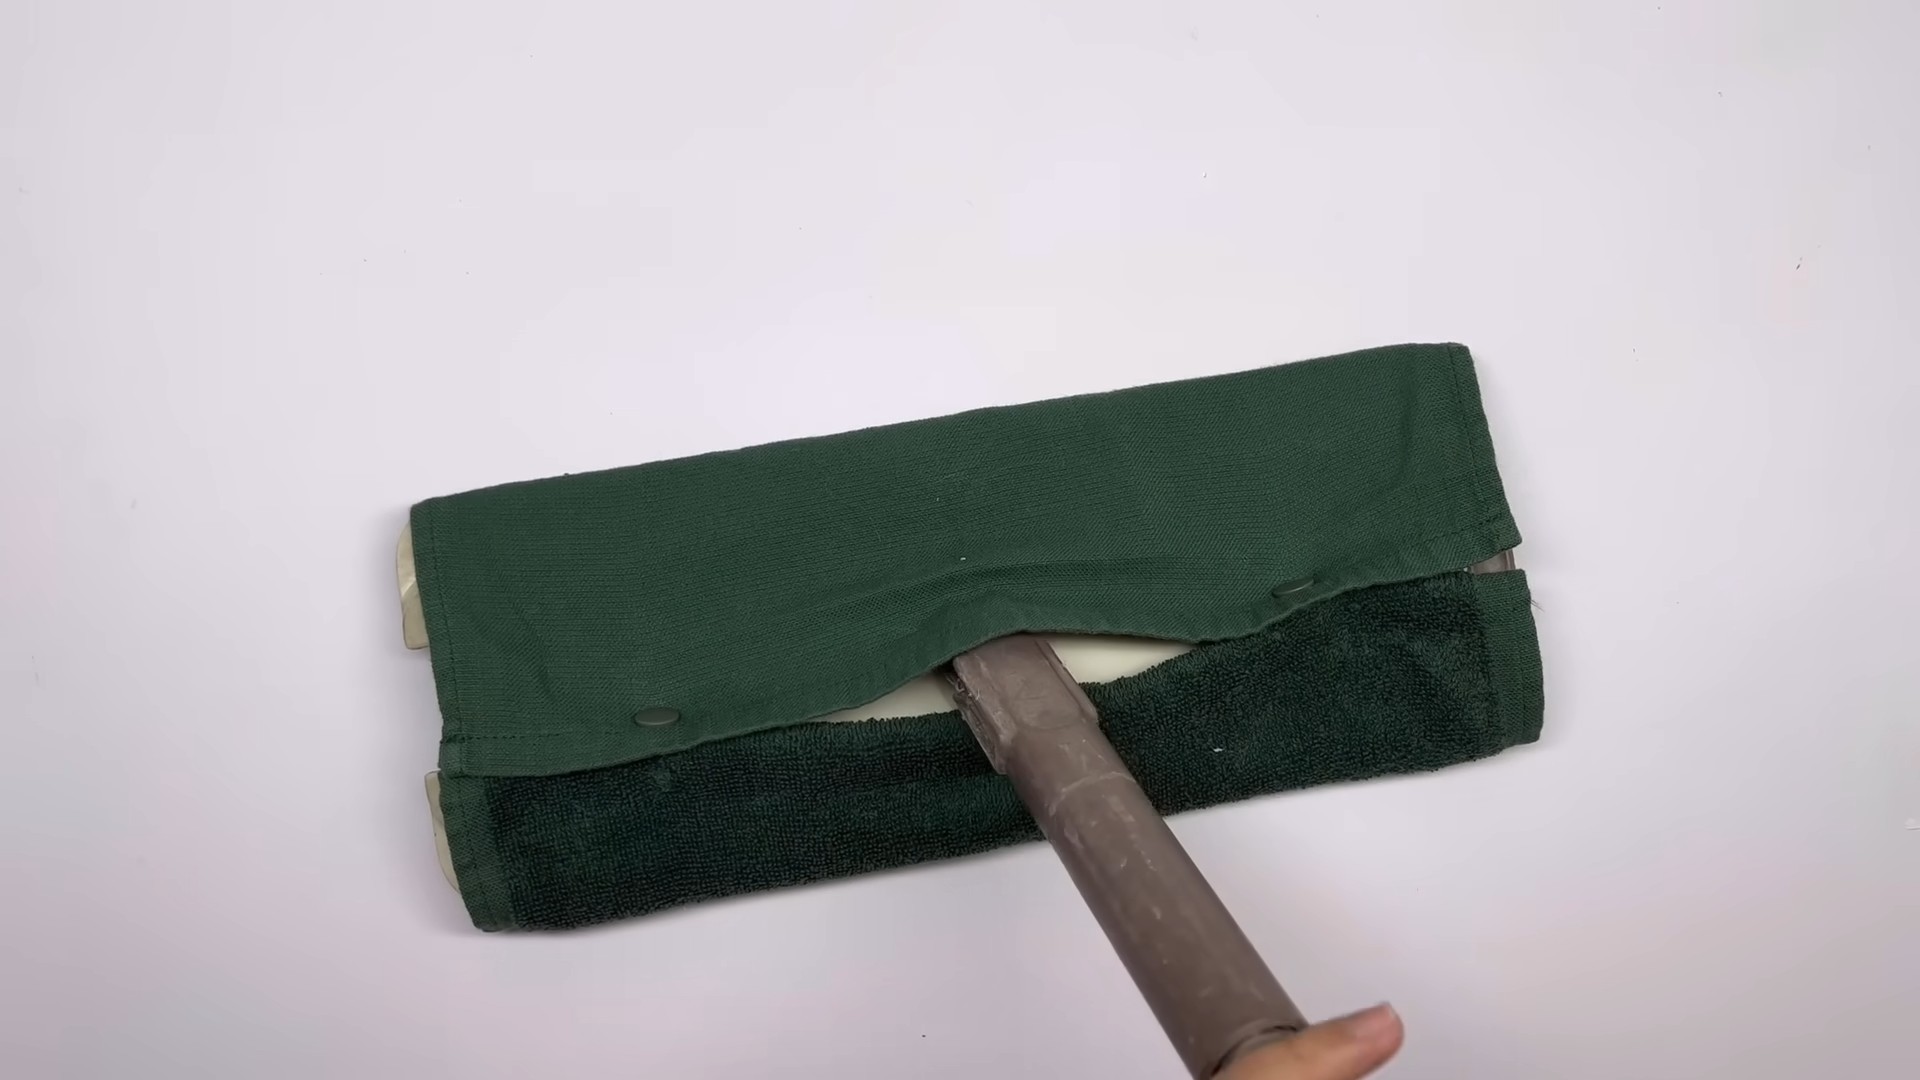
Hack #2: The Flat Mop Towel Cover
This hack is perfect for flat mops. It involves creating a custom-fitted cover for your mop head using old towels.
Step-by-Step Instructions:
1. Measure Your Mop Head: Carefully measure the length and width of your flat mop head. Add an extra inch or two to each measurement to allow for seam allowances.
2. Cut the Towel to Size: Using your measurements, cut a piece of towel fabric that is large enough to cover your mop head. You’ll need two pieces of fabric – one for the top and one for the bottom.
3. Sew the Pieces Together (Almost): Place the two pieces of towel fabric together, right sides facing in. Pin them together along the edges. Using your sewing machine or needle and thread, sew around three sides of the fabric, leaving one side open.
4. Turn the Cover Right Side Out: Turn the towel cover right side out. This will hide the seams and create a neat finish.
5. Attach Velcro Strips (Optional): If your flat mop has Velcro on the bottom, you can attach matching Velcro strips to the inside of the towel cover. This will allow you to easily attach and detach the cover for washing. Use hot glue or sew the Velcro strips in place.
6. Insert the Mop Head: Slide the mop head into the towel cover.
7. Close the Opening: Fold in the raw edges of the open side of the cover and pin them together. Sew the opening closed using your sewing machine or needle and thread.
Hack #3: The Pocket Mop Head
This method is similar to the flat mop cover, but it incorporates pockets to securely hold the mop head in place.
Step-by-Step Instructions:
1. Measure Your Mop Head: As with the flat mop cover, start by measuring the length and width of your mop head. Add extra inches for seam allowances and pocket depth.
2. Cut the Towel Fabric: Cut a large rectangle of towel fabric. The size will depend on your mop head dimensions and desired pocket size.
3. Create the Pockets: Fold over the short ends of the rectangle to create pockets. The depth of the pockets should be enough to securely hold the mop head. Pin the pockets in place.
4. Sew the Pockets: Sew along the edges of the folded-over fabric to create the pockets. Reinforce the corners for added durability.
5. Fold and Sew the Sides: Fold the fabric in half, right sides facing in, so that the pockets are on the outside. Pin the sides together. Sew along the sides, leaving the top open.
6. Turn Right Side Out: Turn the mop head cover right side out.
7. Insert the Mop Head: Slide the mop head into the pockets. The pockets should hold the mop head securely in place.
Hack #4: The Super Absorbent Layered Mop Pad
This hack focuses on maximizing absorbency by layering multiple pieces of towel fabric. It’s great for tackling spills and messes.
Step-by-Step Instructions:
1. Cut Multiple Layers: Cut several pieces of towel fabric to the same size and shape as your mop head. The number of layers will depend on how absorbent you want your mop pad to be. I usually use 3-4 layers.
2. Stack the Layers: Stack the towel layers on top of each other.
3. Sew the Layers Together: Sew around the perimeter of the stacked layers to secure them together. You can use a simple straight stitch or a more decorative stitch.
4. Attach to Mop Head (Optional): You can either use this layered pad directly on your mop head, or attach it using Velcro strips or by sewing it in place.
Tips and Tricks for Success:
* Choose the Right Towels: Thicker towels like bath towels are generally more absorbent than thinner towels like hand towels. However, any type of towel will work in a pinch.
* Wash Your Towels Regularly: To keep your DIY mop heads clean and fresh, wash them regularly in hot water with detergent.
* Don’t Be Afraid to Experiment: These are just a few ideas to get you started. Feel free to experiment with different techniques and materials to create your own custom mop heads.
* Reinforce Seams: For added durability, reinforce all seams with extra stitching. This will prevent the mop heads from falling apart during use.
* Consider Microfiber Towels: If you have old microfiber towels, they make excellent mop heads due to their superior absorbency and cleaning power.
* Use Different Colors: If you’re using multiple towels, consider using different colors to create a visually appealing mop head.
* Pre-Shrink Your Towels: Before cutting and sewing, wash and dry your towels to pre-shrink them. This will prevent the mop head from shrinking after it’s made.
* Safety First: Always use caution when using scissors, sewing machines, and hot glue guns.
Maintaining Your DIY Mop Heads:
* Wash After Each Use: To prevent the buildup of dirt
Conclusion
So, there you have it! Transforming your old towels into effective and eco-friendly mop heads is not just a clever way to repurpose textiles; it’s a game-changer for your cleaning routine. This simple DIY trick offers a multitude of benefits, from saving money on disposable mop heads to reducing your environmental footprint. But more than that, it gives you unparalleled control over the cleaning process. You choose the towel type, the absorbency, and even the scent (more on that in a bit!).
Why is this a must-try? Because it’s practical, sustainable, and surprisingly effective. Store-bought mop heads can be expensive and often lack the durability needed for tough cleaning jobs. They also contribute to landfill waste. Our DIY mop hacks with old towels provide a cost-effective and environmentally conscious alternative that performs just as well, if not better. Think about it: those old bath towels that have seen better days are often incredibly absorbent, perfect for soaking up spills and scrubbing away grime. Microfiber towels, in particular, are fantastic for trapping dust and dirt.
But the beauty of this DIY approach lies in its versatility. Feel free to experiment with different types of towels to find what works best for your floors and cleaning needs. For instance, terry cloth towels are excellent for scrubbing stubborn stains, while microfiber towels are ideal for delicate surfaces. You can even cut your towels into different shapes and sizes to create custom mop heads that fit your specific mop and cleaning style.
Looking for variations? Consider adding a few drops of your favorite essential oil to the water you use with your towel mop head. Lavender, lemon, or eucalyptus can infuse your home with a fresh, clean scent while you mop. Another variation is to pre-soak your towel mop head in a solution of vinegar and water for extra cleaning power, especially for tackling hard water stains or mildew. For heavily soiled floors, a sprinkle of baking soda can act as a gentle abrasive.
We’re confident that once you try this DIY mop head trick, you’ll never go back to store-bought alternatives. It’s a simple, effective, and sustainable way to keep your floors sparkling clean. So, gather your old towels, grab your mop, and get ready to experience the joy of a truly clean home, all while doing your part for the environment.
We encourage you to give these DIY mop hacks with old towels a try and share your experiences with us! Let us know what types of towels worked best for you, what cleaning solutions you used, and any other tips or tricks you discovered along the way. Your feedback will help us refine this guide and inspire others to embrace this eco-friendly cleaning solution. Share your photos and stories on social media using #DIYMopHacks and let’s create a community of clean, green homes!
FAQ
What types of towels work best for DIY mop heads?
The best types of towels for DIY mop heads are those that are absorbent and durable. Microfiber towels are excellent for trapping dust and dirt, making them ideal for general cleaning. Terry cloth towels are more absorbent and have a slightly rougher texture, which makes them great for scrubbing stubborn stains. Old bath towels, hand towels, and even washcloths can be repurposed, depending on the size and type of mop you have. Avoid using towels that are heavily worn or have holes, as they may not hold up well during mopping. Experiment with different types of towels to see what works best for your floors and cleaning needs. Consider the texture and absorbency of the towel when making your choice.
How do I attach the towel to my mop?
The method for attaching the towel to your mop will depend on the type of mop you have. For mops with a clamp or clip mechanism, simply fold the towel to the appropriate size and secure it in the clamp. Make sure the towel is held firmly in place to prevent it from slipping during use. For mops with a Velcro or hook-and-loop system, you can sew or glue strips of Velcro to the towel to match the mop head. Alternatively, you can use safety pins or strong rubber bands to secure the towel to the mop head, although these methods may not be as durable. If you’re using a string mop, you can cut the towel into strips and tie them to the mop head, replacing the original strings. Ensure the towel is securely attached to prevent it from coming loose while mopping.
How often should I wash my DIY mop head?
You should wash your DIY mop head after each use to prevent the buildup of dirt, bacteria, and odors. Just like any other cleaning tool, a dirty mop head can spread germs and make your floors even dirtier. After mopping, rinse the towel thoroughly with clean water to remove any remaining dirt and cleaning solution. Then, wash it in your washing machine with hot water and a mild detergent. Avoid using fabric softener, as it can reduce the absorbency of the towel. You can also add a cup of white vinegar to the wash to help disinfect and deodorize the towel. Tumble dry on low heat or hang the towel to dry completely before storing it. Regularly washing your DIY mop head will ensure that it remains clean and effective for future use.
Can I use cleaning solutions with my DIY mop head?
Yes, you can absolutely use cleaning solutions with your DIY mop head. In fact, using cleaning solutions can enhance the effectiveness of your mopping. You can use your favorite store-bought floor cleaner or create your own DIY cleaning solution using ingredients like vinegar, baking soda, and essential oils. When using cleaning solutions, be sure to follow the manufacturer’s instructions and dilute the solution properly. Avoid using harsh chemicals or abrasive cleaners, as they can damage your floors and the towel. Test the cleaning solution on a small, inconspicuous area of your floor before using it on the entire surface to ensure it doesn’t cause any discoloration or damage. Remember to rinse the mop head thoroughly after use to remove any remaining cleaning solution.
Is this DIY mop head suitable for all types of floors?
This DIY mop head is generally suitable for most types of floors, but it’s essential to consider the specific needs of your flooring material. For hardwood floors, use a microfiber towel and a gentle cleaning solution to avoid scratching or damaging the finish. Avoid using excessive water, as it can seep into the wood and cause warping. For tile and laminate floors, you can use a more absorbent towel and a stronger cleaning solution. For delicate surfaces like marble or stone, use a soft towel and a pH-neutral cleaner to prevent etching or staining. Always test the mop head and cleaning solution on a small, inconspicuous area of your floor before using it on the entire surface. Adjust the type of towel and cleaning solution based on the specific requirements of your flooring material.
How does this DIY mop head compare to store-bought mop heads?
This DIY mop head offers several advantages over store-bought mop heads. First, it’s a more cost-effective option, as you’re repurposing old towels instead of buying new mop heads. Second, it’s more environmentally friendly, as it reduces textile waste and the need for disposable mop heads. Third, it allows you to customize the mop head to your specific needs, choosing the type of towel, size, and absorbency that works best for your floors and cleaning style. Fourth, it’s easy to clean and maintain, as you can simply toss the towel in the washing machine after each use. While store-bought mop heads may offer convenience, they often lack the durability and customization options of a DIY mop head. Additionally, they contribute to landfill waste and can be more expensive in the long run.
Can I use scented oils with my DIY mop head?
Yes, you can definitely use scented oils with your DIY mop head to add a pleasant fragrance to your home while you clean. Simply add a few drops of your favorite essential oil to the water or cleaning solution you’re using with your mop head. Lavender, lemon, eucalyptus, and tea tree oil are popular choices for their refreshing and antibacterial properties. Be sure to use high-quality essential oils and dilute them properly to avoid irritating your skin or damaging your floors. You can also create your own custom scent blends by combining different essential oils. Experiment with different scents to find what you enjoy most. Using scented oils with your DIY mop head is a great way to create a clean and inviting atmosphere in your home.

Leave a Comment