
Genius home improvement ideas don’t have to break the bank or require a professional contractor! Ever feel like your home could use a little sprucing up, but the thought of a major renovation sends shivers down your spine? I totally get it! That’s why I’m so excited to share some incredibly clever and surprisingly simple DIY tricks that will transform your living space without the stress (or the hefty price tag).
From ancient civilizations using natural materials to build ingenious structures to the modern-day maker movement, the desire to improve our homes has been a constant throughout history. We’ve always sought ways to make our spaces more comfortable, functional, and beautiful. And let’s be honest, who doesn’t love the satisfaction of saying, “I made that!”?
In today’s fast-paced world, finding affordable and creative ways to personalize our homes is more important than ever. These genius home improvement ideas are perfect for renters, homeowners, and anyone looking to add a touch of personality and functionality to their space. Whether you’re dealing with a small apartment or a sprawling house, these DIY hacks will help you maximize your space, add value to your property, and create a home you truly love. Get ready to unleash your inner DIYer and transform your house into a haven!
DIY Floating Shelves: A Simple Guide to Adding Style and Storage
Okay, let’s get real. Who doesn’t love floating shelves? They’re sleek, modern, and a fantastic way to add storage and display space without bulky brackets. I’m going to walk you through building your own, even if you’re a complete beginner. Don’t worry, I’ll hold your hand (virtually, of course!) every step of the way.
Materials You’ll Need
Before we dive in, let’s gather our supplies. This is crucial, trust me. Nothing’s worse than getting halfway through a project and realizing you’re missing something!
* **Wood:** This is the heart of your shelves! I recommend using solid wood like pine, oak, or maple. The thickness will depend on how much weight you plan to put on the shelves. For lighter items, 1-inch thick wood is usually sufficient. For heavier items, go for 1.5-inch or even 2-inch thick. Decide on the length and depth of your shelves beforehand.
* **Metal Shelf Brackets (Hidden):** These are the magic behind the floating effect. Make sure they’re rated for the weight you intend to place on the shelves. I prefer heavy-duty steel brackets for peace of mind.
* **Screws:** You’ll need screws to attach the brackets to the wall and to the shelves. Choose screws that are long enough to securely anchor the brackets into wall studs. Drywall anchors are an option if you can’t hit a stud, but I always recommend finding a stud whenever possible for maximum stability.
* **Wood Glue:** For extra strength, especially if you’re using multiple pieces of wood to create a thicker shelf.
* **Wood Filler (Optional):** To fill any imperfections in the wood or cover screw holes.
* **Sandpaper:** Various grits (80, 120, 220) for smoothing the wood.
* **Wood Stain or Paint:** To finish the shelves to your liking.
* **Polyurethane or Varnish (Optional):** To protect the finish and add durability.
Tools You’ll Need
Now for the tools. Don’t be intimidated! Most of these are pretty common.
* **Drill:** Essential for pre-drilling holes and driving screws.
* **Stud Finder:** Absolutely crucial for finding wall studs. Trust me, you don’t want your shelves crashing down!
* **Level:** To ensure your shelves are perfectly straight.
* **Measuring Tape:** For accurate measurements.
* **Pencil:** For marking measurements and drilling locations.
* **Saw:** To cut the wood to the desired length. A circular saw or miter saw is ideal, but a hand saw will work in a pinch.
* **Clamps:** To hold the wood pieces together while the glue dries.
* **Safety Glasses:** Protect your eyes!
* **Dust Mask:** To avoid inhaling sawdust.
* **Sandpaper Block or Orbital Sander:** For easier sanding.
* **Paintbrushes or Rags:** For applying stain or paint.
Step-by-Step Instructions: Building Your Floating Shelves
Alright, let’s get building! I’ve broken down the process into manageable steps.
1. Prepare the Wood
1. **Cut the Wood:** Using your saw, cut the wood to the desired length and depth for your shelves. Make sure your cuts are straight and accurate. Double-check your measurements before cutting!
2. **Sand the Wood:** Start with a coarser grit sandpaper (80 or 120) to remove any rough edges or imperfections. Then, move to a finer grit (220) for a smooth finish. Sand with the grain of the wood. This step is important for a professional-looking result.
3. **Fill Imperfections (Optional):** If there are any knots, cracks, or screw holes you want to hide, apply wood filler according to the manufacturer’s instructions. Let it dry completely and then sand it smooth.
2. Prepare the Shelves for Brackets
1. **Measure and Mark:** Determine the placement of the metal shelf brackets on the back of the shelf. Use your measuring tape and pencil to mark the locations. The number of brackets you need will depend on the length of the shelf and the weight it will hold. I usually recommend placing brackets every 12-16 inches for good support.
2. **Drill Pilot Holes:** Using your drill, pre-drill pilot holes at the marked locations. The pilot holes should be slightly smaller than the screws you’ll be using to attach the brackets. This will prevent the wood from splitting.
3. **Attach the Brackets:** Attach the metal shelf brackets to the back of the shelf using the screws. Make sure the brackets are securely fastened and aligned properly.
3. Install the Shelves on the Wall
1. **Locate Wall Studs:** This is where your stud finder comes in handy! Use it to locate the wall studs where you want to install the shelves. Mark the stud locations with a pencil. If you can’t find studs, you’ll need to use drywall anchors.
2. **Measure and Mark Bracket Placement on the Wall:** Using your level and measuring tape, mark the locations for the brackets on the wall. Make sure the marks are level and aligned with the studs. This is crucial for a straight and stable shelf.
3. **Drill Pilot Holes in the Wall:** Drill pilot holes into the wall studs at the marked locations. If you’re using drywall anchors, follow the manufacturer’s instructions for drilling the holes.
4. **Attach the Brackets to the Wall:** Attach the metal shelf brackets to the wall using the screws. Make sure the brackets are securely fastened to the studs or drywall anchors. Use a level to ensure the brackets are perfectly level.
5. **Slide the Shelves onto the Brackets:** Carefully slide the shelves onto the metal shelf brackets. Make sure the shelves are fully seated on the brackets.
4. Finishing Touches
1. **Stain or Paint the Shelves:** Apply your chosen stain or paint to the shelves according to the manufacturer’s instructions. Apply multiple coats for a richer color and better protection. Let each coat dry completely before applying the next.
2. **Apply Polyurethane or Varnish (Optional):** If you want to add extra protection and durability to the finish, apply a coat of polyurethane or varnish. This will help protect the shelves from scratches, moisture, and UV damage.
3. **Let Everything Dry Completely:** Allow the stain, paint, or polyurethane to dry completely before placing anything on the shelves. This is important to prevent damage to the finish.
Tips and Tricks for Perfect Floating Shelves
* Weight Capacity is Key: Always consider the weight capacity of your brackets and the type of wood you’re using. Overloading the shelves can lead to sagging or even collapse.
* Studs are Your Best Friend: Whenever possible, anchor your shelves to wall studs. This provides the strongest and most stable support.
* Level, Level, Level: Use a level throughout the installation process to ensure your shelves are perfectly straight.
* Pre-Drilling is Essential: Always pre-drill pilot holes to prevent the wood from splitting.
* Consider the Depth: Think about what you’ll be displaying on the shelves when deciding on the depth. Deeper shelves are great for larger items, while shallower shelves are better for smaller items.
* Experiment with Finishes: Don’t be afraid to experiment with different stains, paints, and finishes to create a unique look.
* Hidden Brackets are Key: Make sure you use hidden shelf brackets to achieve the true “floating” effect.
Troubleshooting Common Problems
* Shelves are Sagging: This is usually caused by overloading the shelves or using brackets that are not strong enough. Try removing some weight from the shelves or replacing the brackets with heavier-duty ones.
* Shelves are Not Level: Double-check the bracket placement and make sure they are perfectly level. You may need to adjust the brackets slightly to achieve a level shelf.
* Screws are Stripping: This can happen if you’re using the wrong size screws or if you’re over-tightening them. Try using a different size screw or applying less pressure when tightening.
* Wood is Splitting: This is usually caused by not pre-drilling pilot holes. Always pre-drill pilot holes before driving screws into wood.
Alternative Shelf Designs
While this guide focuses on a simple, straight floating shelf, there are tons of variations you can try!
* Corner Shelves: Perfect for maximizing space in corners.
* Shelves with a Lip: Add a small lip to the front of the shelf to prevent items from sliding off.
* Live Edge Shelves: Use wood with a natural, uneven edge for a rustic look.
* Shelves with Built-in Lighting: Add LED strip lights to the underside of the shelves for a dramatic effect.
I hope this guide has
Conclusion
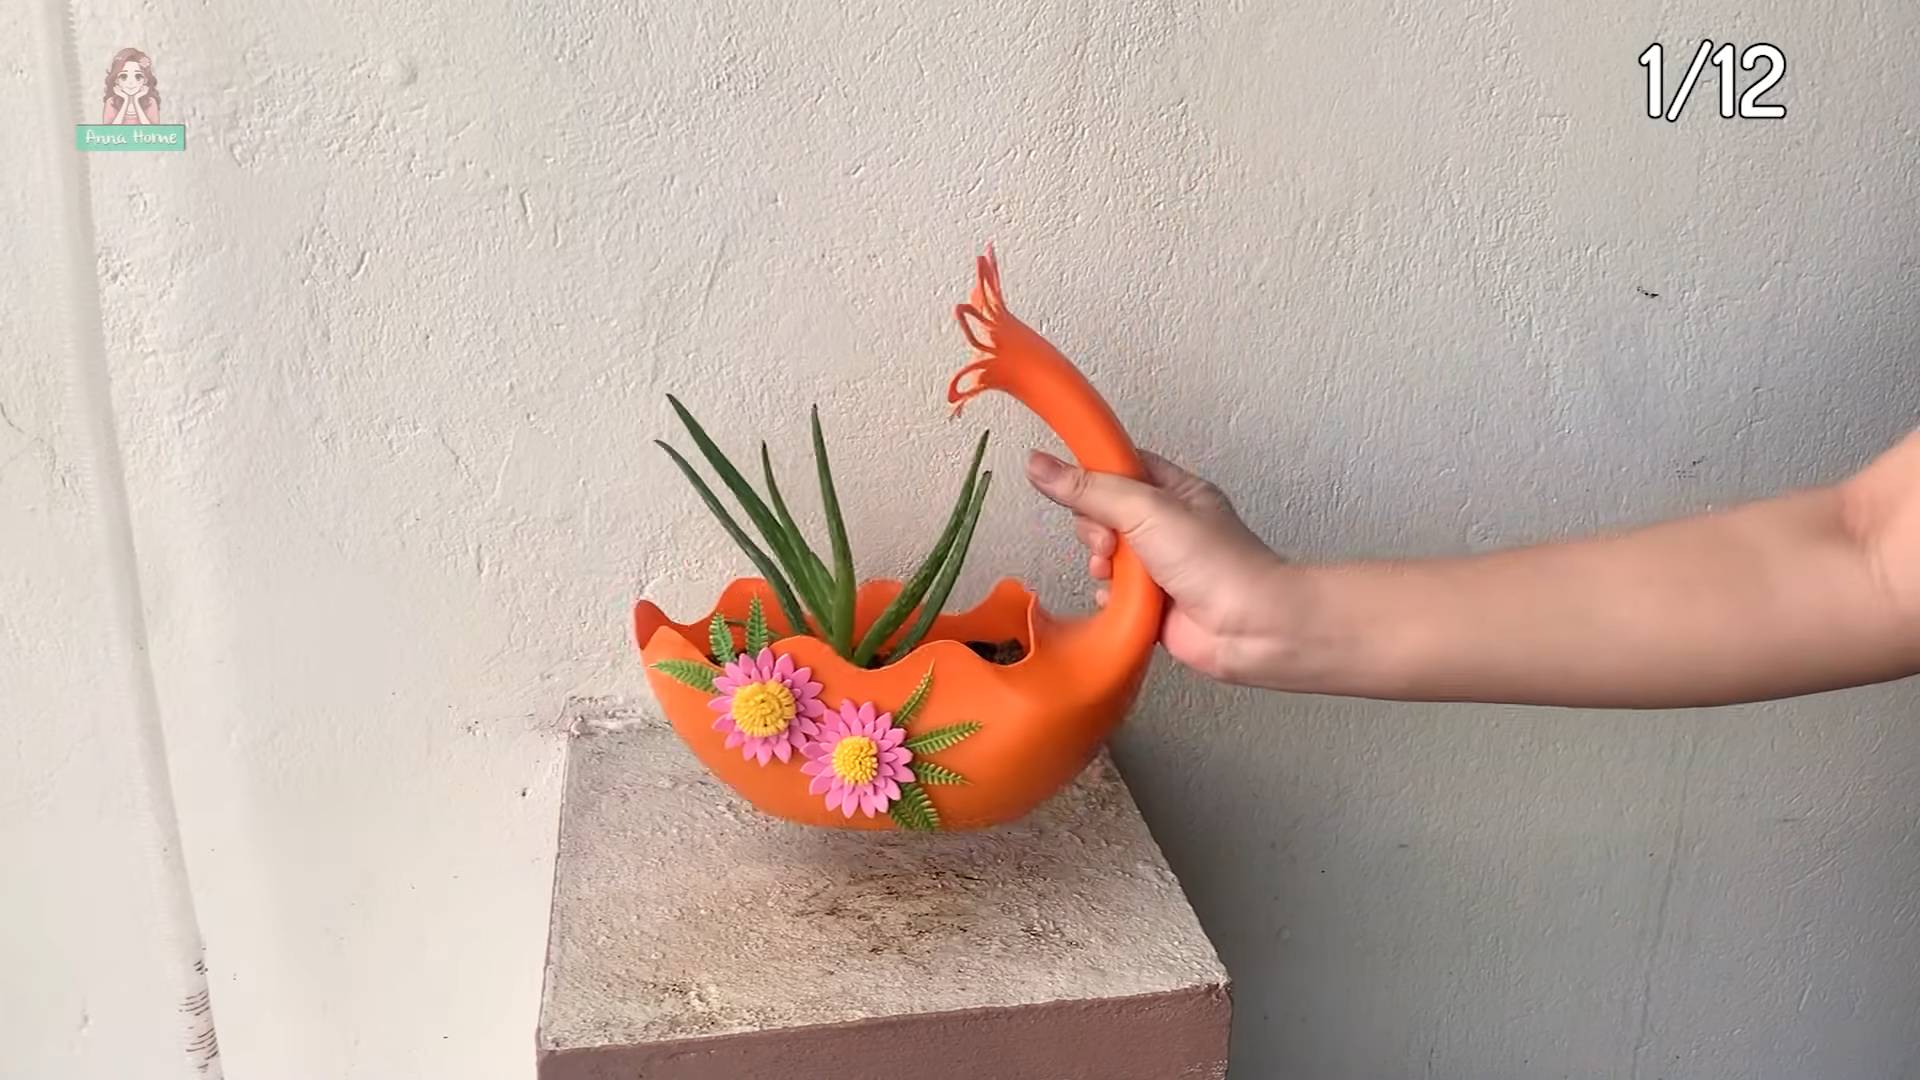
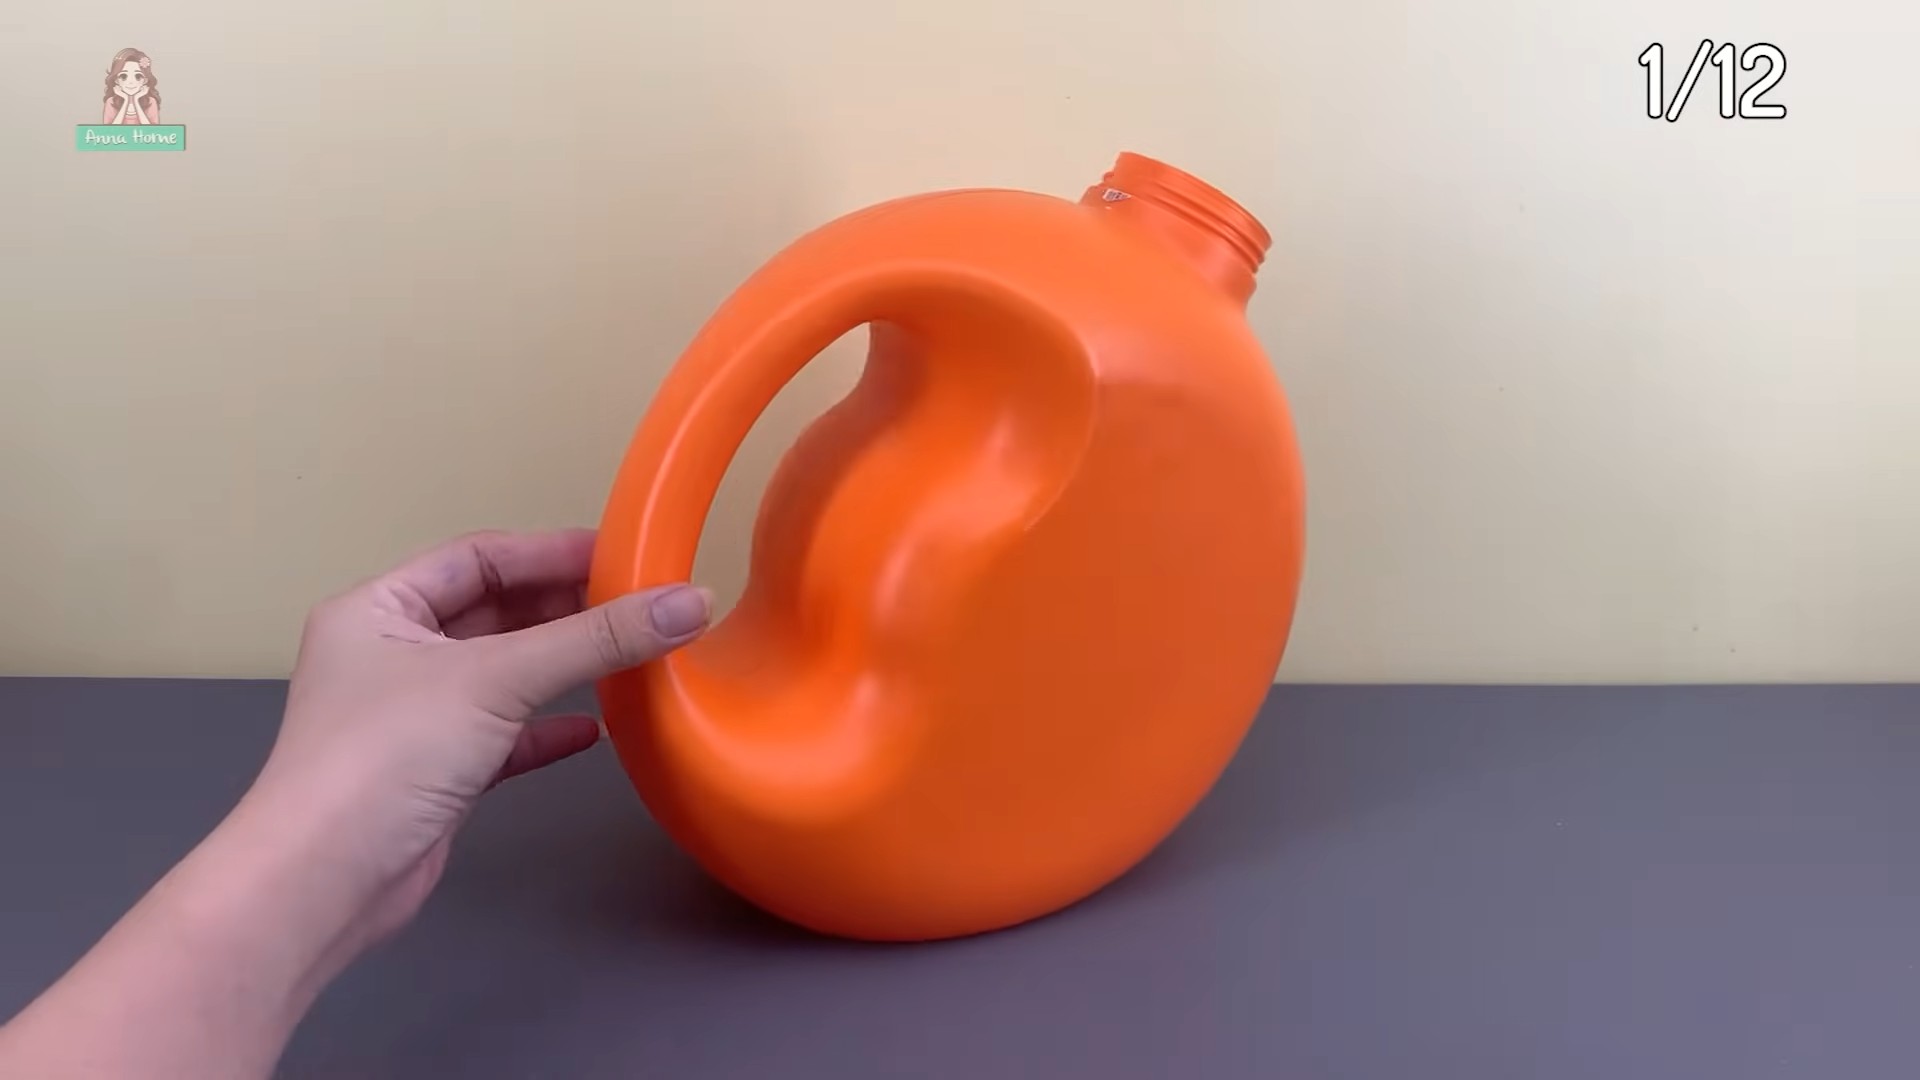
So there you have it! This simple yet incredibly effective DIY trick is more than just a clever hack; it’s a game-changer for anyone looking to elevate their home without breaking the bank. We’ve shown you how to transform ordinary materials into something extraordinary, adding a touch of personalized elegance to your living space. The beauty of this project lies not only in its affordability but also in its versatility. You’re not just following a recipe; you’re embarking on a creative journey.
Why is this a must-try? Because it empowers you to take control of your home decor, allowing you to express your unique style and personality. Forget generic, mass-produced items – with this DIY trick, you can create bespoke pieces that truly reflect your taste. Plus, the satisfaction of knowing you made something beautiful with your own two hands is simply unparalleled. It’s a fantastic way to reduce waste, repurpose materials, and contribute to a more sustainable lifestyle.
But the fun doesn’t stop here! Consider these variations to truly make this project your own:
* **Color Palette Exploration:** Experiment with different paint colors to match your existing decor. Think beyond the standard neutrals and embrace bold hues or subtle pastels.
* **Texture Play:** Incorporate textured elements like fabric scraps, dried flowers, or even small pebbles for added visual interest.
* **Size and Scale:** Adjust the dimensions of your project to suit your specific needs. Create smaller versions for accent pieces or larger ones for statement walls.
* **Embellishments:** Add embellishments like beads, sequins, or stencils to personalize your creation further.
* **Lighting Integration:** Consider incorporating LED strip lights for a soft, ambient glow. This can add a touch of drama and sophistication to your finished product.
This DIY trick is a fantastic way to explore **genius home improvement ideas** on a budget. It’s about more than just saving money; it’s about unleashing your creativity and transforming your house into a home that truly reflects who you are.
We wholeheartedly encourage you to give this DIY trick a try. Don’t be intimidated by the process – it’s much easier than it looks! Gather your materials, follow the steps, and let your imagination run wild. And most importantly, don’t forget to share your creations with us! We’d love to see how you’ve personalized this project and made it your own. Share your photos and stories on social media using [Your Hashtag Here] and inspire others to embark on their own DIY adventures. Let’s build a community of creative home improvers, one DIY project at a time! We can’t wait to see what you create!
Frequently Asked Questions (FAQ)
What kind of materials do I need for this DIY project?
The specific materials will depend on the exact DIY trick you’re attempting, but generally, you’ll need basic crafting supplies like glue, scissors, paint, and some sort of base material. This could be anything from cardboard and wood scraps to old jars and fabric remnants. The beauty of many DIY projects is that they encourage you to repurpose and recycle, so look around your home for items you can use before heading to the store. Always check the specific instructions for the project you’re undertaking to ensure you have everything you need before you start.
Is this DIY trick suitable for beginners?
Absolutely! Many DIY projects are designed with beginners in mind. Look for projects that are clearly labeled as “beginner-friendly” or “easy.” These projects typically involve simple steps and readily available materials. Don’t be afraid to start small and work your way up to more complex projects as you gain confidence and experience. Remember to read the instructions carefully and watch any accompanying videos before you begin.
How much time will this DIY project take?
The time required will vary depending on the complexity of the project. Some simple projects can be completed in an hour or two, while more intricate ones may take several days. Be sure to factor in drying time for paint or glue when estimating the total time commitment. It’s always a good idea to set aside a dedicated workspace where you can leave your project undisturbed while it dries.
Can I customize this DIY trick to match my home decor?
Yes, absolutely! Customization is one of the biggest advantages of DIY projects. Feel free to experiment with different colors, textures, and embellishments to create a piece that perfectly complements your existing decor. Consider the overall style of your home and choose materials and designs that align with that aesthetic. Don’t be afraid to get creative and add your own personal touch.
What if I make a mistake during the DIY process?
Mistakes are a natural part of the DIY process, so don’t get discouraged! Often, mistakes can be easily corrected with a little ingenuity. For example, if you accidentally spill paint, you can quickly wipe it up with a damp cloth. If you cut something too short, you can often add an extension or find a creative way to incorporate the mistake into the design. Remember, DIY is all about learning and experimenting, so embrace the imperfections and see them as opportunities for growth.
Where can I find inspiration for other genius home improvement ideas?
There are countless resources available for finding DIY inspiration. Online platforms like Pinterest, Instagram, and YouTube are treasure troves of creative ideas. Home improvement blogs and magazines are also excellent sources of inspiration. Don’t be afraid to browse through these resources and gather ideas that resonate with you. You can also visit local craft stores and home improvement centers to see what materials and supplies are available and get inspired by the displays.
How can I ensure the longevity of my DIY project?
To ensure that your DIY project lasts for years to come, it’s important to use high-quality materials and follow the instructions carefully. Protect your finished project from the elements by sealing it with a protective coating or storing it in a safe place. Regularly clean and maintain your project to prevent dust and dirt from accumulating. With proper care, your DIY creation will be a cherished part of your home for many years to come.
Is it safe to involve children in this DIY project?
Involving children in DIY projects can be a fun and educational experience, but it’s important to prioritize safety. Choose projects that are age-appropriate and involve minimal use of sharp tools or hazardous materials. Always supervise children closely and provide them with clear instructions. Make sure they understand the potential risks involved and how to avoid them. With proper precautions, DIY projects can be a great way to bond with your children and foster their creativity.
What are some eco-friendly options for this DIY project?
There are many ways to make your DIY project more eco-friendly. Use recycled or repurposed materials whenever possible. Choose paints and glues that are low in VOCs (volatile organic compounds). Avoid using single-use plastics and opt for reusable containers and tools. Consider donating any leftover materials to a local charity or school. By making conscious choices, you can minimize your environmental impact and create a beautiful and sustainable DIY project.


Leave a Comment