
Grow Malabar Spinach Home with ease! Ever dreamt of stepping into your backyard and harvesting fresh, vibrant greens for a delicious and nutritious meal? Well, dream no more! This DIY guide is your passport to cultivating your very own Malabar Spinach haven, right in the comfort of your home. Forget those bland, store-bought vegetables; imagine the satisfaction of nurturing your own food from seed to table.
Malabar Spinach, also known as Basella alba, isn’t just another leafy green; it boasts a rich history, particularly in Asian and African cuisines, where it’s been cherished for centuries for its unique flavor and health benefits. It’s a climbing vine, offering both beauty and bounty to your garden. But why should *you* bother with this particular plant? In today’s world, where access to fresh, organic produce can be challenging and expensive, learning to grow Malabar Spinach home provides a sustainable and rewarding solution.
This DIY article will equip you with simple, effective tricks and hacks to successfully cultivate this delightful vegetable, regardless of your gardening experience. We’ll cover everything from seed starting to harvesting, ensuring you enjoy a continuous supply of fresh, homegrown goodness. So, grab your gardening gloves, and let’s embark on this exciting journey together!
Growing Malabar Spinach at Home: Your Comprehensive DIY Guide
Hello garden friends! I’m thrilled to show you today how you can easily grow Malabar spinach (Basella alba) at home. This delicious and nutritious leafy green is not only super tasty but also incredibly easy to care for. So, let’s roll up our sleeves and get started!
What You Need to Grow Malabar Spinach
Before we begin, here is a list of things you will need:
- Seeds or cuttings: You can grow Malabar spinach either from seeds or take cuttings from an existing plant. I personally find cuttings easier, but both work great.
- Pots or planters: Choose pots with good drainage. The size should be at least 20 cm in diameter.
- High-quality potting soil: A well-draining, nutrient-rich soil is ideal.
- Trellis or support: Malabar spinach is a climbing plant, so you’ll need something for it to grow up. A trellis, bamboo stakes, or even a fence will work well.
- Watering can or hose: For regular watering.
- Fertilizer (optional): An organic fertilizer can promote growth.
- Sunny location: Malabar spinach loves the sun!
Growing Malabar Spinach from Seed
If you decide to grow from seed, follow these steps:
- Prepare the seeds: Malabar spinach seeds have a hard shell. To speed up germination, you can soak them in warm water for 24 hours before sowing. This helps to soften the shell.
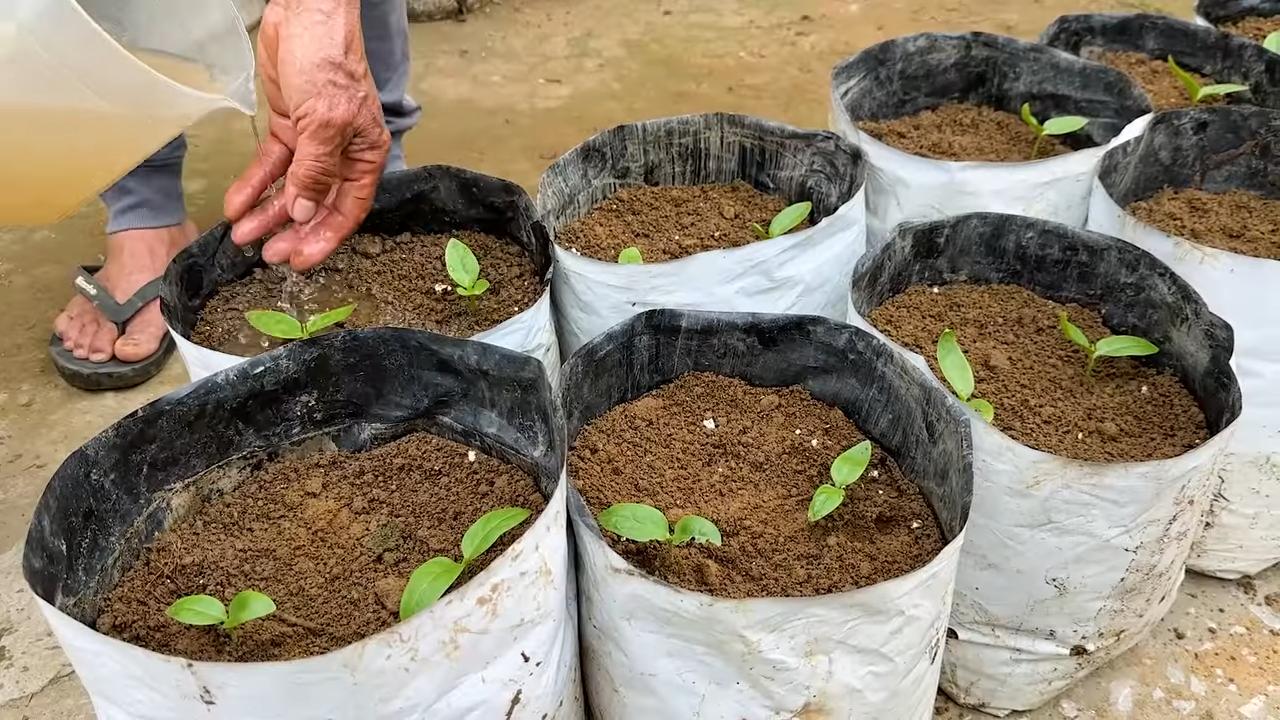
- Sowing: Fill your pots or planters with potting soil. Sow the seeds about 1 cm deep into the soil. I usually sow 2-3 seeds per pot to ensure at least one germinates.
- Watering: Water the soil gently, so it is moist but not waterlogged.
- Location: Place the pots in a warm and sunny spot. Malabar spinach needs a lot of light to grow well.
- Germination: Germination can take 1-3 weeks, depending on temperature and moisture. Be patient!
- Thinning: Once the seedlings have a few leaves, you can remove the weakest ones, leaving only the strongest seedling per pot.
Growing Malabar Spinach from Cuttings
Growing from cuttings is, in my opinion, the easiest method. Here’s how:
- Take cuttings: Find a healthy Malabar spinach plant and cut 10-15 cm long cuttings. Make sure the cuttings have at least 2-3 leaf nodes.
- Remove leaves: Remove the lower leaves from the cuttings, leaving only the top leaves. This reduces evaporation and promotes root formation.
- Rooting: You have two options for rooting the cuttings:
- In water: Place the cuttings in a glass of water. Make sure the lower leaf nodes are underwater. Change the water every few days. Roots should form after about 1-2 weeks.
- Directly in soil: Dip the lower ends of the cuttings in rooting powder (optional) and then stick them directly into moist potting soil.
- Planting: Once the cuttings have formed roots (either in water or directly in the soil), you can plant them in pots or planters with potting soil.
- Watering: Water the cuttings gently, so the soil is moist but not waterlogged.
- Location: Place the pots in a warm and sunny location.
Care of Malabar Spinach
Once your Malabar spinach is established, care is relatively simple:
- Watering: Water regularly, especially in hot weather. The soil should always be slightly moist, but avoid waterlogging. I check the soil daily and water when the top layer feels dry.
- Fertilizing: Fertilize the Malabar spinach every few weeks with an organic fertilizer. This promotes growth and leaf production. I like to use compost tea or diluted liquid fertilizer.
- Support: Guide the shoots of the Malabar spinach along the trellis. It will hold on by itself and climb.
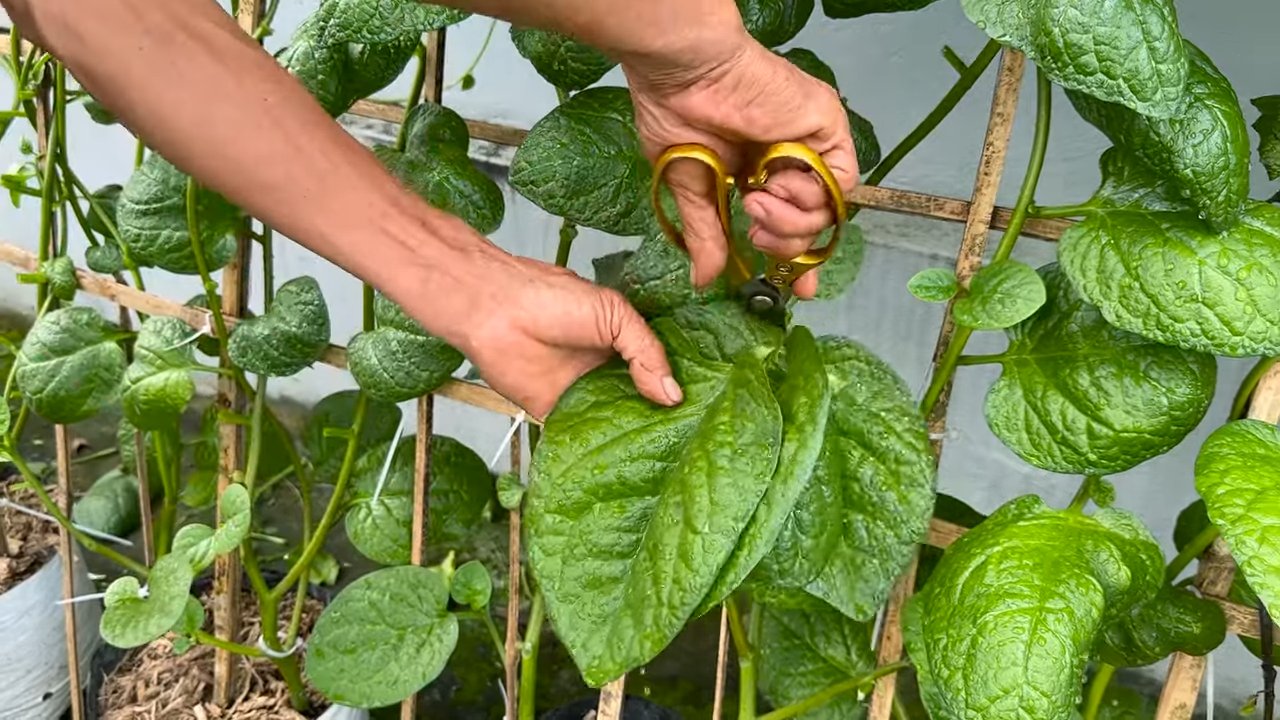
- Pruning: Regularly pinch off the tips of the shoots to encourage growth and make the plant bushier. You can, of course, eat the trimmed leaves and shoots!
- Pests and Diseases: Malabar spinach is relatively resistant to pests and diseases. Occasionally, aphids may appear. You can simply spray them off with a jet of water or treat them with a mild soap solution.
Harvesting Malabar Spinach
You can harvest Malabar spinach as soon as the leaves are large enough. This is usually about 6-8 weeks after planting.
- Harvesting method: Cut the leaves and shoots with scissors or a knife. You can either harvest individual leaves or cut whole shoots.
- Regular harvesting: The more you harvest, the more leaves the plant will produce. Harvest regularly to stimulate growth.
- Storage: Malabar spinach does not keep for very long. It is best to process it immediately after harvesting. It will keep in a plastic bag in the refrigerator for about 2-3 days.
Uses of Malabar Spinach
Malabar spinach is versatile in the kitchen. The leaves can be eaten raw in salads or cooked like spinach. They have a slightly tangy taste and are rich in vitamins and minerals.
- Salads: Young, tender leaves are excellent for salads.
- Cooked: You can cook, steam, or sauté Malabar spinach like regular spinach. It goes well with curries, soups, and stews.
- Smoothies: Add a handful of Malabar spinach to your smoothie to enrich it with nutrients.
- Soups: Malabar spinach is a great addition to soups. It adds a fresh note and makes them more nutritious.
Additional Tips for Successful Cultivation
- Soil Improvement: If your soil is not ideal, you can improve it with compost or other organic material. This ensures better drainage and nutrient supply.
- Mulching: A layer of mulch around the plants helps to retain moisture in the soil and suppress weeds.
- Sun Protection: In very hot climates, it may be advisable to protect the Malabar spinach from direct sunlight during the hottest hours of the day.
- Overwintering: Malabar spinach is not frost-hardy. In colder climates, you can either grow it as an annual plant or transplant it into a pot in the fall and overwinter it indoors.
Common Problems and Solutions
Aphids: Aphids can be controlled with a jet of water.
Yellow leaves: Yellow leaves can be a sign of nutrient deficiency or overwatering. Check the watering and fertilize the plant if necessary.
Slow growth: Slow growth can be caused by too little light, nutrient deficiency, or cold temperatures. Make sure the plant gets enough light and fertilize it regularly.
Conclusion
So, there you have it! Growing Malabar Spinach at home is not only achievable but also incredibly rewarding. We’ve walked you through the simple steps, from sourcing your seeds or cuttings to nurturing your vibrant, leafy greens. This isn’t just about adding another plant to your garden; it’s about embracing a sustainable lifestyle, reducing your reliance on store-bought produce, and enjoying the unparalleled freshness of homegrown vegetables.
Why is this DIY trick a must-try? Because it empowers you to control the quality of your food. You know exactly what goes into your Malabar Spinach – no harmful pesticides, no long-distance transportation, just pure, unadulterated goodness. Plus, the taste difference is remarkable. Homegrown Malabar Spinach boasts a more intense, earthy flavor that elevates any dish.
But the benefits extend beyond taste and health. Growing your own Malabar Spinach is a fantastic way to connect with nature, relieve stress, and beautify your surroundings. Imagine stepping into your garden and harvesting fresh greens for a delicious stir-fry, soup, or salad. It’s a truly satisfying experience.
Looking for variations? Consider growing Malabar Spinach in containers if you have limited space. A sunny balcony or patio is all you need. You can also experiment with different trellising methods to create a stunning vertical garden. For those in cooler climates, starting your seeds indoors a few weeks before the last frost can give you a head start. And don’t be afraid to try different companion plants to enhance growth and deter pests. Basil, marigolds, and nasturtiums are all excellent choices.
We’ve shared our tips and tricks, but the real magic happens when you get your hands dirty. Don’t be intimidated if you’re a beginner gardener. Malabar Spinach is relatively easy to grow, and the rewards are well worth the effort.
We wholeheartedly encourage you to give this DIY trick a try. Start small, be patient, and enjoy the process. And most importantly, share your experience with us! We’d love to hear your success stories, see your photos, and learn from your challenges. Let’s build a community of Malabar Spinach enthusiasts and inspire others to embrace the joys of homegrown food. So, grab your seeds, prepare your soil, and get ready to embark on a delicious and rewarding gardening adventure. You’ll be amazed at how easy it is to grow Malabar Spinach at home and the incredible difference it makes in your meals and your life.
Frequently Asked Questions (FAQ)
What exactly is Malabar Spinach, and why should I grow it?
Malabar Spinach (Basella alba or Basella rubra) isn’t a true spinach, but a leafy green vine that thrives in warm weather. It’s an excellent alternative to spinach, especially in hot climates where traditional spinach struggles. It’s packed with vitamins A and C, iron, and calcium, making it a nutritious addition to your diet. Growing it yourself ensures you have access to fresh, organic greens without relying on store-bought options. Plus, it’s a beautiful and productive plant that can add visual appeal to your garden.
How do I start growing Malabar Spinach? Seeds or cuttings?
You can start Malabar Spinach from either seeds or cuttings. Seeds require a bit more patience, as they can be slow to germinate. Soak the seeds in warm water for 24 hours before planting to improve germination rates. Plant them about half an inch deep in well-draining soil. Cuttings, on the other hand, offer a faster route to harvest. Simply take a 4-6 inch cutting from a healthy vine, remove the lower leaves, and place it in water until roots develop. Once the roots are an inch or two long, you can transplant the cutting into soil.
What are the ideal growing conditions for Malabar Spinach?
Malabar Spinach loves warm weather and plenty of sunshine. Aim for at least 6 hours of direct sunlight per day. The ideal temperature range is between 70°F and 90°F (21°C and 32°C). It prefers well-draining soil that is rich in organic matter. Regular watering is essential, especially during hot, dry periods. However, avoid overwatering, as this can lead to root rot. A trellis or other support structure is necessary, as Malabar Spinach is a climbing vine.
How often should I water and fertilize my Malabar Spinach?
Water your Malabar Spinach regularly, keeping the soil consistently moist but not waterlogged. Check the soil moisture level daily, especially during hot weather. Fertilize every 2-3 weeks with a balanced organic fertilizer to promote healthy growth. You can also amend the soil with compost or aged manure to provide essential nutrients. Avoid over-fertilizing, as this can lead to excessive foliage growth at the expense of flavor.
What are some common pests and diseases that affect Malabar Spinach, and how can I prevent them?
Malabar Spinach is generally resistant to pests and diseases, but it can occasionally be affected by aphids, spider mites, or fungal diseases. To prevent pest infestations, inspect your plants regularly and remove any affected leaves. You can also use insecticidal soap or neem oil to control pests. To prevent fungal diseases, ensure good air circulation around your plants and avoid overwatering. If you notice any signs of disease, remove the affected leaves immediately.
When and how should I harvest my Malabar Spinach?
You can start harvesting Malabar Spinach about 60-70 days after planting. Harvest the leaves and tender stems regularly to encourage continued growth. Simply snip off the leaves and stems with scissors or pruning shears. Avoid harvesting more than one-third of the plant at a time. The more you harvest, the more the plant will produce.
Can I grow Malabar Spinach in containers?
Yes, Malabar Spinach grows very well in containers, making it an excellent option for those with limited space. Choose a large container (at least 12 inches in diameter) with drainage holes. Use a well-draining potting mix that is rich in organic matter. Provide a trellis or other support structure for the vine to climb. Water and fertilize regularly, as container-grown plants tend to dry out and deplete nutrients more quickly than those grown in the ground.
How can I use Malabar Spinach in my cooking?
Malabar Spinach can be used in a variety of dishes, just like regular spinach. It’s delicious in stir-fries, soups, stews, salads, and omelets. It has a slightly mucilaginous texture, which can be reduced by blanching it briefly before cooking. The leaves can also be used as a thickening agent in soups and stews. Try adding it to your favorite spinach recipes for a unique and flavorful twist.
Is Malabar Spinach a perennial or an annual?
Malabar Spinach is a perennial in tropical and subtropical climates (USDA zones 9-11). In colder climates, it is typically grown as an annual. However, you can overwinter it indoors by bringing it inside before the first frost and providing it with adequate light and water.
How do I save seeds from my Malabar Spinach plant?
To save seeds from your Malabar Spinach plant, allow some of the flowers to mature and form berries. Once the berries turn black and dry, harvest them and remove the seeds. Allow the seeds to dry completely before storing them in an airtight container in a cool, dark place. These seeds can be used to grow new plants the following season.

Leave a Comment