
Hydroponic Rosemary Indoor Growing – ever dreamt of snipping fresh, fragrant rosemary right from your kitchen, even when the snow’s piling up outside? I know I have! For centuries, rosemary has been cherished not only for its culinary prowess, adding that distinctive Mediterranean flair to dishes, but also for its medicinal and aromatic properties. Think back to ancient Greece, where students wore rosemary garlands to boost memory – talk about a study hack!
But let’s face it, not everyone has a sprawling garden or the perfect climate to cultivate this sun-loving herb. That’s where the magic of hydroponics comes in! This DIY guide will unlock the secrets to successfully growing rosemary indoors, without soil, using simple and affordable methods. Forget battling pests, unpredictable weather, or limited space. I’m going to show you how to create a thriving hydroponic rosemary indoor growing setup that fits seamlessly into your home.
Why is this DIY trick a game-changer? Because fresh herbs elevate every meal, and having a constant supply at your fingertips is pure culinary bliss. Plus, the aromatic fragrance of rosemary can boost your mood and purify the air. So, ditch the dried-up supermarket herbs and get ready to embark on a rewarding journey of indoor gardening. Let’s get started and transform your space into a fragrant, flavorful oasis!
DIY Hydroponic Rosemary: Grow Your Own Herb Garden Indoors!
Hey there, fellow plant enthusiasts! I’m so excited to share my experience with growing rosemary hydroponically indoors. It’s surprisingly easy, rewarding, and gives you fresh rosemary year-round, no matter the weather outside. Forget those sad, dried-up sprigs from the grocery store! Let’s dive in and create our own little rosemary oasis.
What You’ll Need: The Essential Supplies
Before we get started, let’s gather all the necessary materials. This will make the process smooth and enjoyable. Trust me, having everything ready beforehand is a lifesaver!
* Rosemary Cutting or Seedling: You can either start from a cutting (taken from a healthy rosemary plant) or purchase a small rosemary seedling from your local nursery. I personally prefer cuttings because they’re free and fun to propagate!
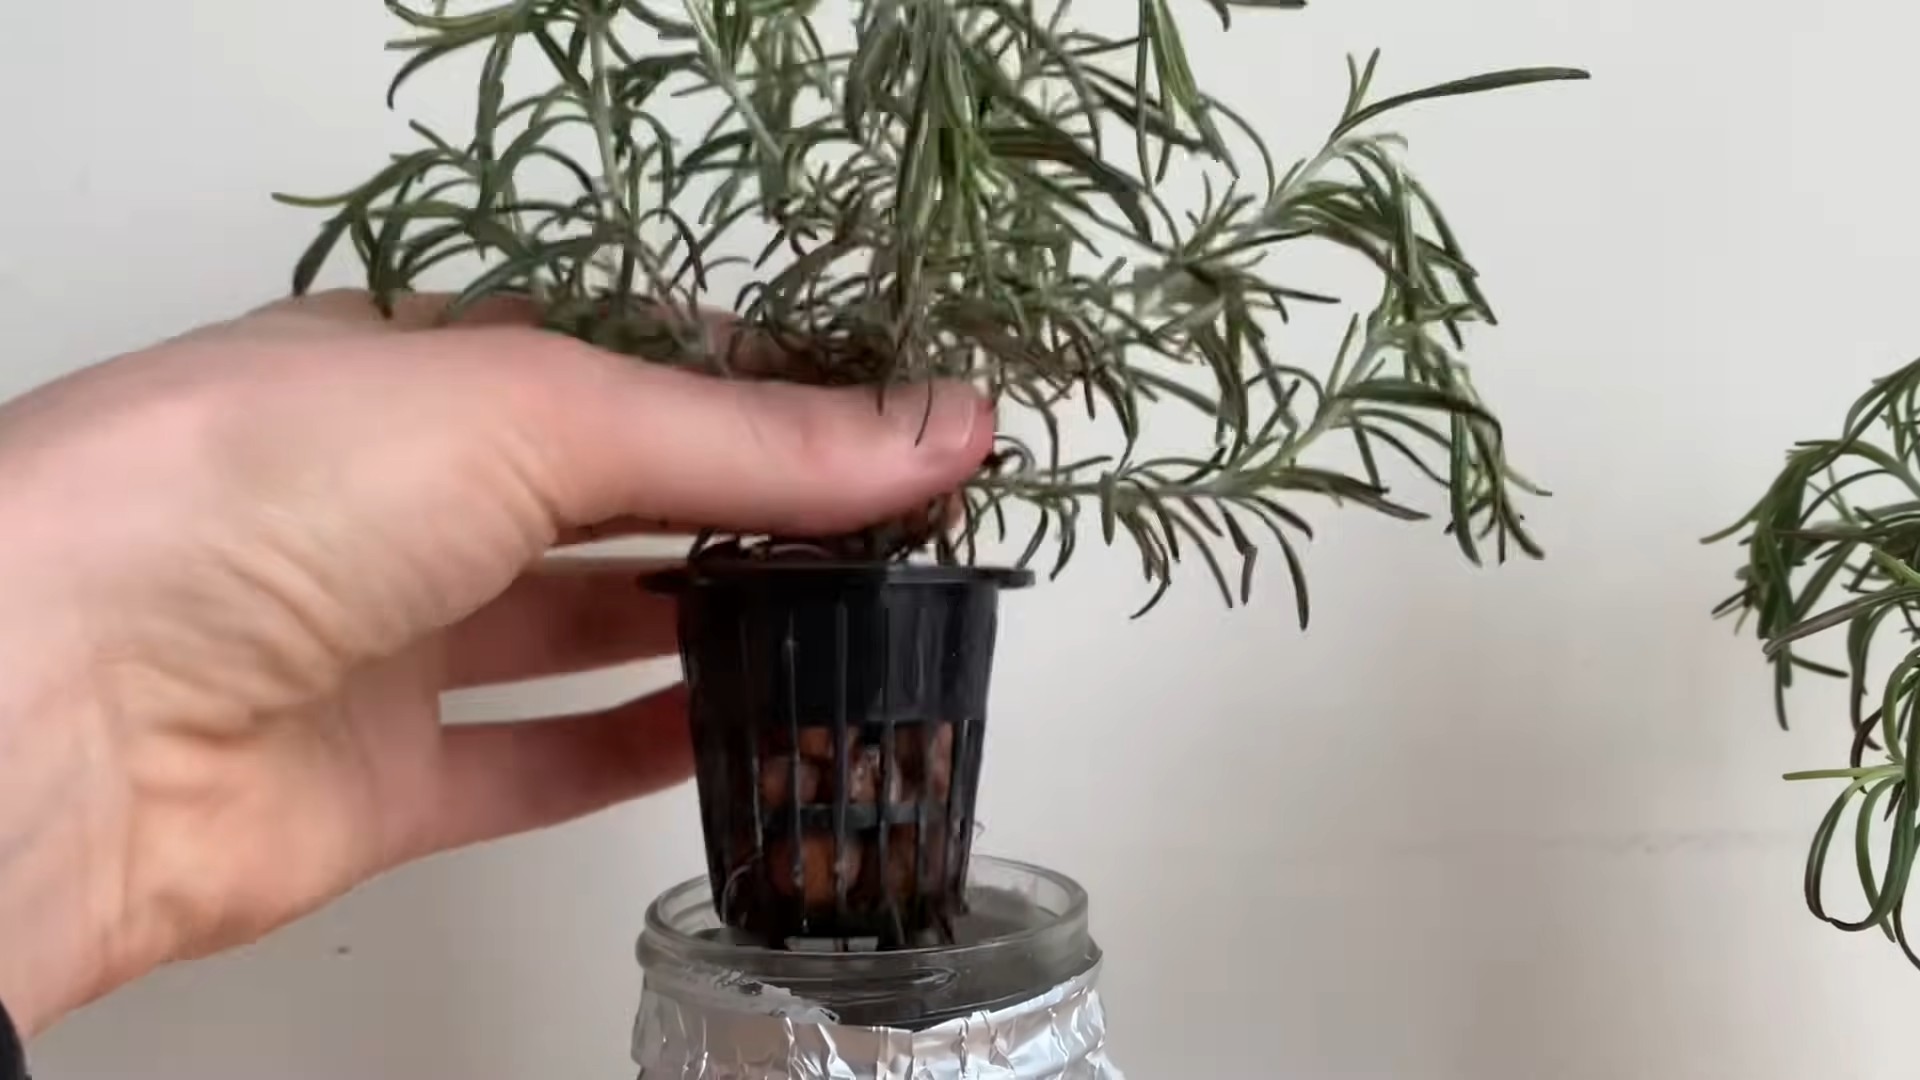
* Net Pots: These are small, plastic pots with holes that allow the roots to access the nutrient solution. I recommend 2-3 inch net pots.
* Hydroponic Growing Medium: This provides support for the roots and helps retain moisture. I’ve had great success with coco coir, rockwool cubes, and clay pebbles (also known as LECA). Choose whichever you prefer!
* Hydroponic Nutrient Solution: This is the food for your rosemary! You’ll need a balanced nutrient solution specifically formulated for herbs or leafy greens. Make sure to follow the instructions on the label carefully.
* Reservoir: This will hold the nutrient solution. A plastic container, bucket, or even a repurposed storage bin will work perfectly. The size depends on how many rosemary plants you’re growing.
* Air Pump and Air Stone: These are essential for oxygenating the nutrient solution. Rosemary roots need oxygen to thrive!
* pH Meter or pH Test Kit: Maintaining the correct pH level is crucial for nutrient absorption. A pH meter is more accurate, but a test kit will also work.
* Grow Lights (Optional but Recommended): If you don’t have a sunny windowsill, grow lights will provide the necessary light for your rosemary to flourish. LED grow lights are energy-efficient and work great.
* Timer (for Grow Lights): To automate the lighting schedule.
* Measuring Cups and Spoons: For accurately measuring the nutrient solution.
* Water: Use filtered or distilled water for the best results. Tap water can contain chlorine and other chemicals that can harm your plants.
* Scissors or Pruning Shears: For taking cuttings and trimming your rosemary.
* Rooting Hormone (Optional): This can help speed up the rooting process for cuttings.
Taking Rosemary Cuttings (If Starting from Cuttings)
If you’re starting from cuttings, this is the first crucial step. Don’t worry, it’s easier than it sounds!
1. Choose a Healthy Rosemary Plant: Select a healthy, mature rosemary plant to take your cuttings from. Look for stems that are green and vigorous.
2. Take the Cuttings: Using clean scissors or pruning shears, cut 4-6 inch stems from the tips of the rosemary plant. Make the cut at a 45-degree angle just below a leaf node (the point where leaves grow from the stem).
3. Remove Lower Leaves: Remove the leaves from the bottom 1-2 inches of the cutting. This will prevent them from rotting when submerged in water or the growing medium.
4. Apply Rooting Hormone (Optional): Dip the cut end of the cutting into rooting hormone powder or liquid. This will encourage root development.
5. Rooting the Cuttings: There are a couple of ways to root your rosemary cuttings:
* Water Propagation: Place the cuttings in a glass of water, ensuring that the bottom 1-2 inches are submerged. Change the water every 2-3 days. Place the glass in a bright, indirect light location. Roots should start to appear in 2-4 weeks.
* Directly in Growing Medium: Moisten your chosen growing medium (coco coir, rockwool, etc.). Insert the cuttings into the medium, ensuring that the bottom 1-2 inches are buried. Keep the medium consistently moist but not waterlogged. Place the cuttings in a bright, indirect light location.
Setting Up Your Hydroponic System
Now for the fun part – setting up your hydroponic system! I’ll walk you through the steps.
1. Prepare the Reservoir: Clean your reservoir thoroughly with soap and water. Rinse it well to remove any soap residue.
2. Prepare the Nutrient Solution: Fill the reservoir with water. Add the hydroponic nutrient solution according to the instructions on the label. It’s crucial to follow the instructions carefully, as too much or too little nutrient solution can harm your plants.
3. Check and Adjust the pH: Use your pH meter or pH test kit to check the pH of the nutrient solution. Rosemary prefers a pH between 5.5 and 6.5. If the pH is too high, add a pH-down solution. If it’s too low, add a pH-up solution. Always add pH adjusters in small increments and recheck the pH after each addition.
4. Place the Air Stone: Place the air stone at the bottom of the reservoir. Connect the air stone to the air pump with the tubing. Plug in the air pump. You should see bubbles rising from the air stone, indicating that the nutrient solution is being oxygenated.
5. Prepare the Net Pots: Fill the net pots with your chosen growing medium (coco coir, rockwool, clay pebbles). If you’re using rockwool, soak it in water for a few hours before using it.
6. Plant the Rosemary:
* From Cuttings: Once the cuttings have developed roots (at least 1-2 inches long), carefully transplant them into the net pots filled with the growing medium. Gently spread the roots around the medium.
* From Seedlings: Gently remove the rosemary seedling from its original container. Loosen the roots slightly and place the seedling in the net pot filled with the growing medium.
7. Place the Net Pots in the Reservoir: Place the net pots into the holes in the lid of the reservoir (if your reservoir has a lid with pre-made holes) or suspend them above the nutrient solution so that the bottom of the net pot is just touching the solution. The roots will eventually grow down into the solution.
8. Position the Grow Lights (If Using): If you’re using grow lights, position them 12-18 inches above the rosemary plants. Set the timer to provide 14-16 hours of light per day.
Caring for Your Hydroponic Rosemary
Now that your hydroponic system is set up, it’s time to care for your rosemary plants. Here are some tips to keep them happy and healthy:
1. Monitor the Nutrient Solution: Check the nutrient solution level regularly and add more as needed. Replace the entire nutrient solution every 2-3 weeks to prevent nutrient imbalances.
2. Check and Adjust the pH: Continue to monitor the pH of the nutrient solution and adjust it as needed to maintain a pH between 5.5 and 6.5.
3. Provide Adequate Light: Rosemary needs plenty of light to thrive. If you’re using grow lights, ensure they’re providing enough light. If you’re using natural light, place your rosemary plants in a sunny windowsill.
4. Maintain Proper Air Circulation: Good air circulation helps prevent fungal diseases. You can use a small fan to circulate the air around your plants.
5. Prune Regularly: Pruning your rosemary plants encourages bushier growth and prevents them from becoming leggy. Trim the tips of the stems regularly. You can use the trimmings for cooking!
6. Watch for Pests and Diseases: Inspect your rosemary plants regularly for pests and diseases. If you notice any problems, address them promptly. Insecticidal soap or neem oil can be used to control pests.
7. Harvesting: You can start harvesting rosemary once the plants are established and have grown to a reasonable size. Simply snip off the stems you need with scissors or pruning shears.
Troubleshooting Common Problems
Even with the best care, you might encounter some problems along the way. Here are some common issues and how to address them:
* Yellowing Leaves: This can be caused by nutrient deficiencies, overwatering, or underwatering. Check the nutrient solution level and pH. Ensure that the growing medium is not too wet or too dry.
* Leggy Growth: This is usually caused by insufficient light. Provide more light by moving your plants to a sunnier location or using grow lights.
* Root Rot: This is caused by overwatering or poor drainage. Ensure that the growing medium is well-draining and that the roots are not sitting in water. Make sure the air pump is working properly to oxygenate the water.
*

Conclusion
So, there you have it! Mastering the art of hydroponic rosemary indoor growing is not only achievable but also incredibly rewarding. We’ve walked you through the process, highlighting the simplicity and efficiency of this method compared to traditional soil-based gardening. Forget battling soil-borne pests, inconsistent watering, and the general mess that often accompanies indoor herb cultivation. Hydroponics offers a clean, controlled environment where your rosemary can thrive, providing you with a constant supply of fresh, aromatic sprigs right at your fingertips.
The benefits extend beyond mere convenience. Hydroponically grown rosemary often exhibits faster growth rates and more robust flavor profiles due to the readily available nutrients and optimized growing conditions. Imagine the joy of snipping fresh rosemary to enhance your culinary creations, knowing it was nurtured with your own hands, free from harmful pesticides and herbicides.
But the beauty of hydroponics lies in its adaptability. Feel free to experiment with different nutrient solutions to find the perfect balance for your rosemary. Some growers swear by adding a touch of Epsom salts to boost magnesium levels, while others prefer specialized hydroponic nutrient blends formulated specifically for herbs. You can also explore different hydroponic systems. While we focused on a simple Kratky method, you might find deep water culture (DWC) or nutrient film technique (NFT) systems better suited to your space and preferences as you gain experience.
Consider these variations to personalize your hydroponic rosemary journey:
* Rosemary Varieties: While common rosemary is a great starting point, explore other varieties like creeping rosemary for a cascading effect or Tuscan Blue for its upright growth habit and intense flavor.
* Lighting Adjustments: Observe your rosemary’s growth and adjust the lighting accordingly. If the leaves appear pale or leggy, increase the light intensity or duration.
* Companion Planting (Sort Of): While you can’t directly plant other herbs in the same hydroponic reservoir, consider placing compatible herbs nearby to potentially deter pests. For example, basil is often cited as a good companion plant for rosemary.
* Propagation: Once your hydroponic rosemary plant is established, you can easily propagate new plants from cuttings, expanding your herb garden without additional cost.
Don’t be intimidated by the initial setup. The learning curve is gentle, and the rewards are substantial. The satisfaction of harvesting your own fresh rosemary, grown entirely indoors using hydroponics, is truly unparalleled. It’s a sustainable, efficient, and incredibly fulfilling way to bring the flavors and aromas of the Mediterranean into your home.
We wholeheartedly encourage you to give this DIY trick a try. Start small, be patient, and don’t be afraid to experiment. The world of hydroponic rosemary indoor growing awaits! And most importantly, we want to hear about your experiences! Share your successes, your challenges, and your unique variations in the comments below. Let’s build a community of hydroponic rosemary enthusiasts and learn from each other. Happy growing!
Frequently Asked Questions (FAQ)
What exactly is hydroponics, and why is it good for growing rosemary indoors?
Hydroponics is a method of growing plants without soil, using mineral nutrient solutions in water. It’s excellent for indoor rosemary cultivation because it eliminates soil-borne diseases and pests, provides precise control over nutrient delivery, and often results in faster growth and higher yields compared to traditional soil-based methods. The controlled environment also makes it easier to manage factors like lighting and temperature, crucial for rosemary’s well-being.
What kind of rosemary is best for hydroponics?
Common rosemary (Salvia rosmarinus) is generally the easiest and most readily available variety to start with. However, other varieties like Tuscan Blue, creeping rosemary, or upright rosemary can also be grown hydroponically. Consider the growth habit and flavor profile of each variety when making your selection. Experimenting with different types can be a fun way to discover your favorite.
What kind of lighting do I need for hydroponic rosemary indoors?
Rosemary needs plenty of light, ideally 6-8 hours per day. If you don’t have a sunny windowsill, you’ll need to supplement with artificial lighting. LED grow lights are a popular and energy-efficient choice. Look for full-spectrum LEDs that provide a balanced range of light wavelengths. The distance between the light and the plant will depend on the intensity of the light; generally, start with the light a few inches above the plant and adjust as needed. Watch for signs of light stress, such as bleached or burned leaves.
What kind of nutrients do I need for hydroponic rosemary?
Rosemary requires a balanced nutrient solution containing macronutrients (nitrogen, phosphorus, potassium) and micronutrients (iron, manganese, zinc, etc.). You can purchase pre-mixed hydroponic nutrient solutions specifically formulated for herbs, or you can mix your own using individual nutrient salts. Follow the manufacturer’s instructions carefully to avoid over- or under-feeding. A general-purpose hydroponic nutrient solution will work, but a solution specifically designed for herbs will provide optimal results.
How often should I change the nutrient solution in my hydroponic system?
The frequency of nutrient solution changes depends on the size of your reservoir and the growth rate of your rosemary. As a general rule, change the solution every 1-2 weeks. Regularly monitor the pH and EC (electrical conductivity) of the solution. A significant change in either value indicates that the nutrients are becoming depleted or unbalanced. Top off the reservoir with fresh water as needed to maintain the water level.
What is the ideal pH level for hydroponic rosemary?
The ideal pH range for hydroponic rosemary is between 5.5 and 6.5. Use a pH meter or test kit to monitor the pH of the nutrient solution and adjust it as needed using pH up or pH down solutions. Maintaining the correct pH is crucial for nutrient absorption.
How do I prevent algae growth in my hydroponic system?
Algae growth can be a common problem in hydroponic systems. To prevent algae, keep the nutrient solution out of direct sunlight. Use opaque containers to block light from reaching the solution. You can also add a small amount of hydrogen peroxide to the solution to inhibit algae growth. Regularly clean the reservoir and components of your system to remove any algae that does form.
How do I prune my hydroponic rosemary plant?
Pruning is essential for maintaining the shape and health of your hydroponic rosemary plant. Regularly trim the tips of the stems to encourage bushier growth. Remove any dead or yellowing leaves. You can also harvest sprigs of rosemary as needed for culinary use. Pruning not only improves the plant’s appearance but also promotes air circulation and prevents fungal diseases.
Can I move my hydroponically grown rosemary to soil later?
While it’s possible to transplant hydroponically grown rosemary to soil, it’s not always successful. The plant will need to adjust to the different growing medium and nutrient availability. If you choose to transplant, gradually acclimate the plant to soil conditions by slowly introducing soil into the hydroponic system over a period of several weeks. Keep the soil moist and provide plenty of light.
What are some common problems I might encounter when growing hydroponic rosemary, and how do I fix them?
Some common problems include nutrient deficiencies (yellowing leaves), root rot (caused by overwatering or poor aeration), and pest infestations (although less common in hydroponics). Address nutrient deficiencies by adjusting the nutrient solution. Prevent root rot by ensuring proper aeration and avoiding overwatering. If you encounter pests, use insecticidal soap or neem oil to control them. Regularly inspect your plants for signs of problems and address them promptly to prevent them from escalating.


Leave a Comment