
Grow Kale at Home, even if you think you don’t have a green thumb! I know, I know, the idea of cultivating your own leafy greens might seem daunting, reserved for seasoned gardeners with sprawling backyards. But trust me, growing kale at home is surprisingly simple and incredibly rewarding. Imagine stepping outside your door and harvesting fresh, vibrant kale for your morning smoothie or a delicious salad – it’s a game-changer!
Kale, a nutritional powerhouse, has been cultivated for over 2,000 years, with roots tracing back to the eastern Mediterranean. It was a staple food in Roman times and throughout the Middle Ages in Europe. Today, it’s experiencing a well-deserved resurgence in popularity, thanks to its impressive health benefits and versatility in the kitchen. But why rely on expensive grocery store kale when you can easily grow your own, organic supply?
In this article, I’m going to share some of my favorite DIY tricks and hacks for successfully growing kale at home, regardless of your space or experience level. We’ll cover everything from choosing the right variety and preparing your soil to pest control and harvesting techniques. Whether you have a sprawling garden, a sunny balcony, or just a windowsill, I’ll show you how to grow kale at home and enjoy fresh, healthy greens all season long. Get ready to unleash your inner gardener!
Growing Kale at Home: A Beginner’s Guide
Hey there, fellow garden enthusiasts! I’m so excited to share my experience with growing kale at home. It’s surprisingly easy, incredibly rewarding, and gives you access to fresh, nutritious greens right in your backyard (or even on your balcony!). This guide will walk you through everything you need to know, from choosing the right variety to harvesting your bounty. Let’s get started!
Choosing Your Kale Variety
First things first, let’s talk kale varieties. There are tons to choose from, each with its own unique flavor and texture. Here are a few of my favorites:
* **Curly Kale (Scotch Kale):** This is the classic kale you probably picture. It has tightly curled, frilly leaves and a slightly bitter taste that mellows when cooked.
* **Lacinato Kale (Dinosaur Kale, Tuscan Kale):** Also known as cavolo nero, this kale has long, dark green, almost black leaves with a slightly bumpy texture. It has a milder, sweeter flavor than curly kale and holds up well in cooking.
* **Red Russian Kale:** This variety has flat, fringed leaves with purple stems. It’s slightly sweeter and more tender than curly kale, making it great for salads.
* **Redbor Kale:** This is a beautiful ornamental kale with deeply ruffled, purple leaves. It’s just as edible as other varieties and adds a pop of color to your garden.
I recommend trying a few different varieties to see which ones you like best!
Getting Started: Seeds vs. Seedlings
You have two main options for starting your kale: from seeds or from seedlings (small plants).
* **Seeds:** Starting from seeds is more economical and gives you a wider selection of varieties. However, it requires a bit more patience and attention.
* **Seedlings:** Buying seedlings is a quicker and easier way to get started. You’ll find them at most garden centers in the spring and fall.
I’ve done both, and honestly, I prefer starting from seeds. It’s just so satisfying to watch them sprout and grow!
Planting Kale: A Step-by-Step Guide
Whether you’re starting from seeds or seedlings, the planting process is pretty similar. Here’s what you need to do:
1. **Choose the Right Location:** Kale needs at least 6 hours of sunlight per day. It can tolerate some shade, especially in hot climates, but more sun means better growth. Also, make sure the soil is well-draining. Kale doesn’t like to sit in soggy soil.
2. **Prepare the Soil:** Kale thrives in rich, fertile soil. Before planting, amend your soil with compost or well-rotted manure. This will provide essential nutrients and improve drainage. I usually dig in a generous amount – about 2-3 inches – of compost.
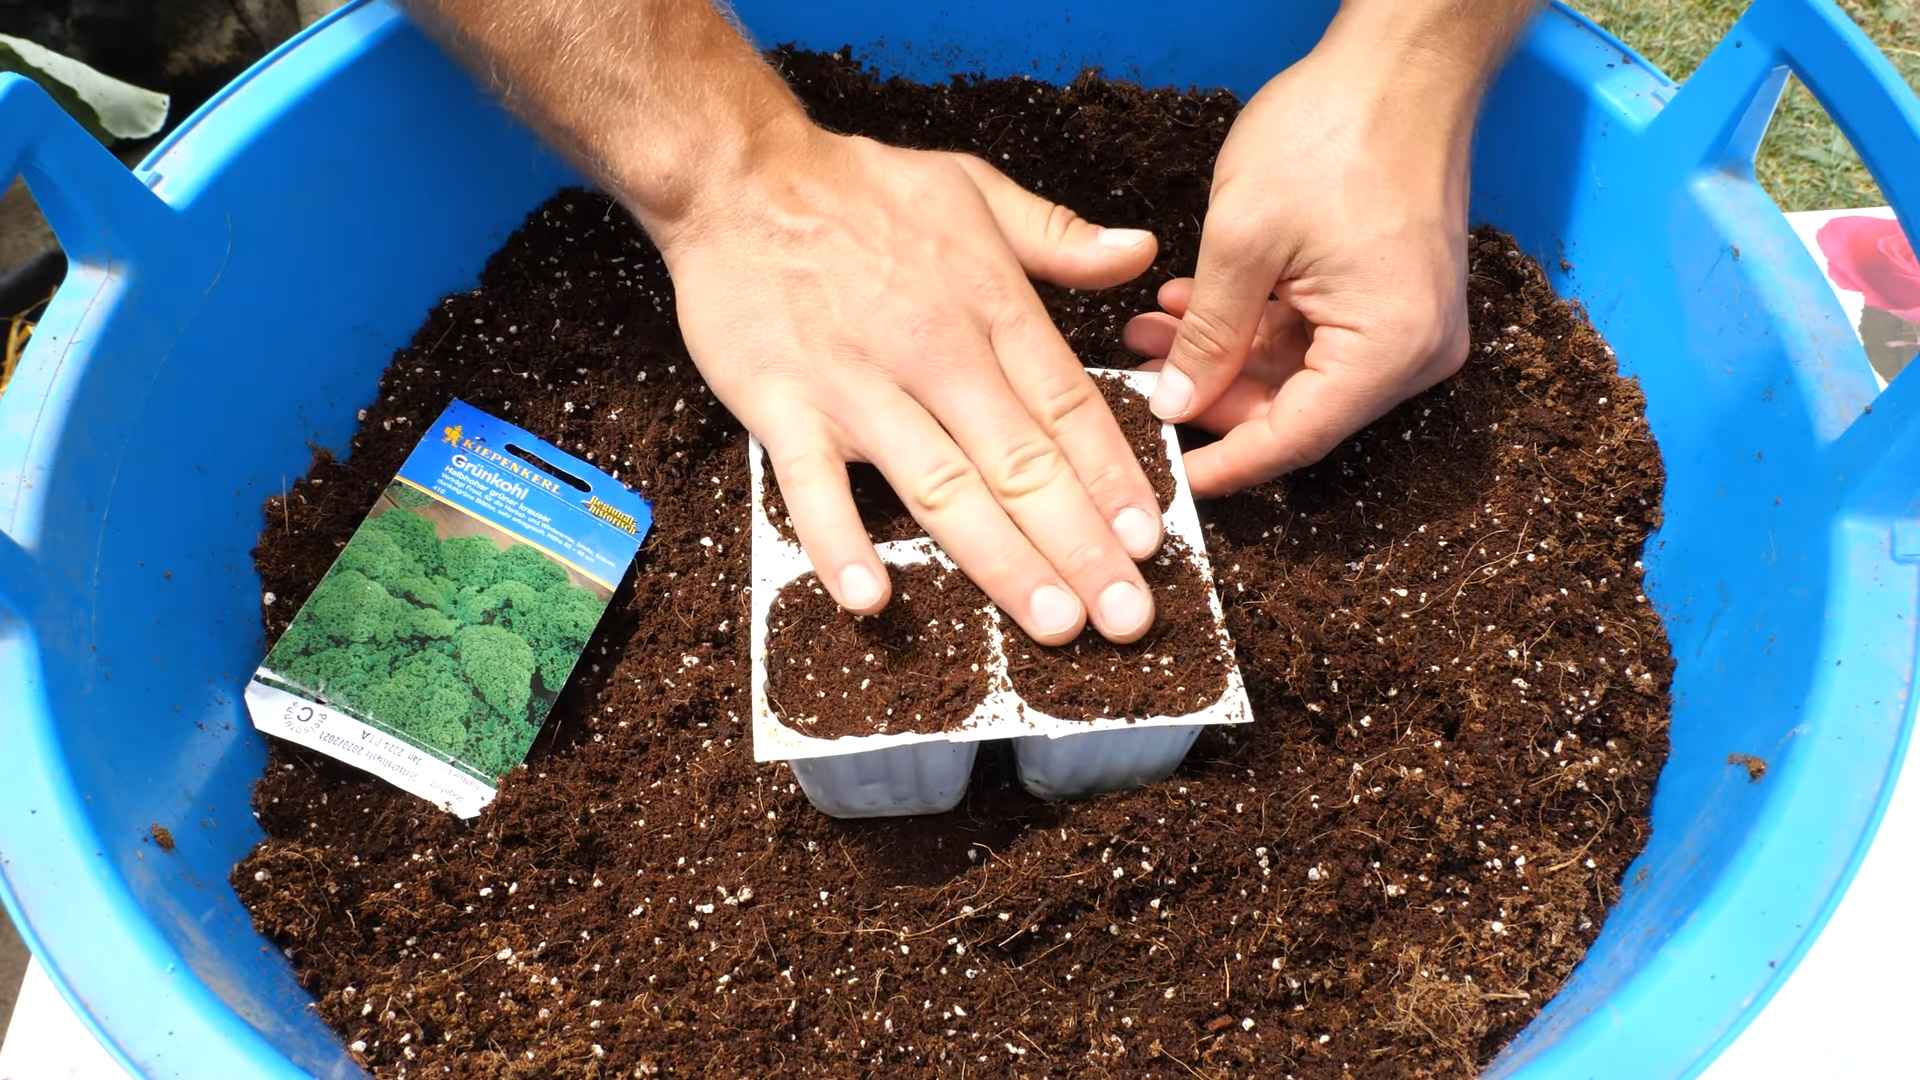
3. **Starting from Seeds (Indoors):** If you’re starting from seeds indoors, sow them about 6-8 weeks before the last expected frost. Use seed-starting trays or small pots filled with seed-starting mix. Plant the seeds about ¼ inch deep and keep the soil moist. They should germinate in about 5-10 days. Once the seedlings have a few sets of true leaves, you can transplant them outdoors.
4. **Starting from Seeds (Directly in the Garden):** You can also sow kale seeds directly in the garden. Sow them about ½ inch deep and 1-2 inches apart. Once the seedlings emerge, thin them to about 12-18 inches apart.
5. **Transplanting Seedlings:** If you’re using seedlings, gently remove them from their containers and plant them in the garden at the same depth they were growing in the containers. Space them about 12-18 inches apart.
6. **Water Thoroughly:** After planting, water the kale thoroughly. This will help the roots settle in and get established.
7. **Mulch:** Apply a layer of mulch around the kale plants. This will help retain moisture, suppress weeds, and regulate soil temperature. I like to use straw or shredded leaves.
Caring for Your Kale Plants
Once your kale plants are in the ground, it’s important to provide them with the right care to ensure healthy growth.
1. **Watering:** Kale needs consistent moisture, especially during dry periods. Water deeply whenever the top inch of soil feels dry. Avoid overwatering, as this can lead to root rot.
2. **Fertilizing:** Kale is a heavy feeder, so it benefits from regular fertilization. You can use a balanced organic fertilizer or side-dress with compost every few weeks. I like to use fish emulsion, which is a great source of nitrogen.
3. **Weeding:** Keep the area around your kale plants free of weeds. Weeds compete with kale for nutrients and water.
4. **Pest Control:** Kale can be susceptible to a few pests, such as aphids, cabbage worms, and flea beetles.
* **Aphids:** These tiny insects suck the sap from kale leaves. You can control them by spraying the plants with a strong stream of water or by using insecticidal soap.
* **Cabbage Worms:** These green caterpillars can devour kale leaves. You can handpick them off the plants or use Bacillus thuringiensis (Bt), a natural insecticide.
* **Flea Beetles:** These tiny beetles chew small holes in kale leaves. You can control them by covering the plants with row covers or by using insecticidal soap.
5. **Bolting:** In hot weather, kale may bolt, which means it starts to produce flowers and seeds. This can make the leaves taste bitter. To prevent bolting, provide shade during the hottest part of the day and water regularly. If your kale does bolt, you can still eat the leaves, but they may not be as tasty.
Harvesting Your Kale
The best part about growing kale is, of course, harvesting it! You can start harvesting kale leaves as soon as they’re big enough to eat, usually about 6-8 inches long.
1. **Harvesting Technique:** To harvest kale, simply cut or pull off the outer leaves, leaving the inner leaves to continue growing. This is called “cut-and-come-again” harvesting.
2. **Harvesting Time:** You can harvest kale throughout the growing season, even in the winter in mild climates. The leaves actually taste sweeter after a frost.
3. **Storage:** Freshly harvested kale can be stored in the refrigerator for up to a week. Wrap it in a damp paper towel and place it in a plastic bag.
Enjoying Your Homegrown Kale
Now that you’ve harvested your kale, it’s time to enjoy it! There are so many ways to use kale in your cooking.
* **Salads:** Young, tender kale leaves are great in salads. Massage them with olive oil and lemon juice to soften them.
* **Smoothies:** Kale is a nutritional powerhouse in smoothies. Add it to your favorite smoothie recipe for a boost of vitamins and minerals.
* **Soups and Stews:** Kale adds a hearty flavor and texture to soups and stews.
* **Sautéed:** Sautéed kale is a quick and easy side dish. Simply sauté it with olive oil, garlic, and a pinch of salt.
* **Kale Chips:** Kale chips are a healthy and delicious snack. Toss kale leaves with olive oil and salt, then bake them in the oven until crispy.
Troubleshooting Common Kale Problems
Even with the best care, you might encounter a few problems while growing kale. Here are some common issues and how to fix them:
* **Yellowing Leaves:** This could be a sign of nutrient deficiency, overwatering, or disease. Check the soil drainage and fertilize if necessary.
* **Holes in Leaves:** This is usually caused by pests like cabbage worms or flea beetles. Inspect the plants regularly and take action to control pests.
* **Stunted Growth:** This could be due to poor soil, lack of sunlight, or pests. Amend the soil, provide more sunlight, and control pests.
Hey there, fellow garden enthusiasts! I’m so excited to share my experience with growing kale at home. It’s surprisingly easy, incredibly rewarding, and gives you access to fresh, nutritious greens right in your backyard (or even on your balcony!). This guide will walk you through everything you need to know, from choosing the right variety to harvesting your bounty. Let’s get started!
Choosing Your Kale Variety
First things first, let’s talk kale varieties. There are tons to choose from, each with its own unique flavor and texture. Here are a few of my favorites:
* **Curly Kale (Scotch Kale):** This is the classic kale you probably picture. It has tightly curled, frilly leaves and a slightly bitter taste that mellows when cooked.
* **Lacinato Kale (Dinosaur Kale, Tuscan Kale):** Also known as cavolo nero, this kale has long, dark green, almost black leaves with a slightly bumpy texture. It has a milder, sweeter flavor than curly kale and holds up well in cooking.
* **Red Russian Kale:** This variety has flat, fringed leaves with purple stems. It’s slightly sweeter and more tender than curly kale, making it great for salads.
* **Redbor Kale:** This is a beautiful ornamental kale with deeply ruffled, purple leaves. It’s just as edible as other varieties and adds a pop of color to your garden.
I recommend trying a few different varieties to see which ones you like best!
Getting Started: Seeds vs. Seedlings
You have two main options for starting your kale: from seeds or from seedlings (small plants).
* **Seeds:** Starting from seeds is more economical and gives you a wider selection of varieties. However, it requires a bit more patience and attention.
* **Seedlings:** Buying seedlings is a quicker and easier way to get started. You’ll find them at most garden centers in the spring and fall.
I’ve done both, and honestly, I prefer starting from seeds. It’s just so satisfying to watch them sprout and grow!
Planting Kale: A Step-by-Step Guide
Whether you’re starting from seeds or seedlings, the planting process is pretty similar. Here’s what you need to do:
1. **Choose the Right Location:** Kale needs at least 6 hours of sunlight per day. It can tolerate some shade, especially in hot climates, but more sun means better growth. Also, make sure the soil is well-draining. Kale doesn’t like to sit in soggy soil.
2. **Prepare the Soil:** Kale thrives in rich, fertile soil. Before planting, amend your soil with compost or well-rotted manure. This will provide essential nutrients and improve drainage. I usually dig in a generous amount – about 2-3 inches – of compost.
3. **Starting from Seeds (Indoors):** If you’re starting from seeds indoors, sow them about 6-8 weeks before the last expected frost. Use seed-starting trays or small pots filled with seed-starting mix. Plant the seeds about ¼ inch deep and keep the soil moist. They should germinate in about 5-10 days. Once the seedlings have a few sets of true leaves, you can transplant them outdoors.
4. **Starting from Seeds (Directly in the Garden):** You can also sow kale seeds directly in the garden. Sow them about ½ inch deep and 1-2 inches apart. Once the seedlings emerge, thin them to about 12-18 inches apart.
5. **Transplanting Seedlings:** If you’re using seedlings, gently remove them from their containers and plant them in the garden at the same depth they were growing in the containers. Space them about 12-18 inches apart.
6. **Water Thoroughly:** After planting, water the kale thoroughly. This will help the roots settle in and get established.
7. **Mulch:** Apply a layer of mulch around the kale plants. This will help retain moisture, suppress weeds, and regulate soil temperature. I like to use straw or shredded leaves.
Caring for Your Kale Plants
Once your kale plants are in the ground, it’s important to provide them with the right care to ensure healthy growth.
1. **Watering:** Kale needs consistent moisture, especially during dry periods. Water deeply whenever the top inch of soil feels dry. Avoid overwatering, as this can lead to root rot.
2. **Fertilizing:** Kale is a heavy feeder, so it benefits from regular fertilization. You can use a balanced organic fertilizer or side-dress with compost every few weeks. I like to use fish emulsion, which is a great source of nitrogen.
3. **Weeding:** Keep the area around your kale plants free of weeds. Weeds compete with kale for nutrients and water.
4. **Pest Control:** Kale can be susceptible to a few pests, such as aphids, cabbage worms, and flea beetles.
* **Aphids:** These tiny insects suck the sap from kale leaves. You can control them by spraying the plants with a strong stream of water or by using insecticidal soap.
* **Cabbage Worms:** These green caterpillars can devour kale leaves. You can handpick them off the plants or use Bacillus thuringiensis (Bt), a natural insecticide.
* **Flea Beetles:** These tiny beetles chew small holes in kale leaves. You can control them by covering the plants with row covers or by using insecticidal soap.
5. **Bolting:** In hot weather, kale may bolt, which means it starts to produce flowers and seeds. This can make the leaves taste bitter. To prevent bolting, provide shade during the hottest part of the day and water regularly. If your kale does bolt, you can still eat the leaves, but they may not be as tasty.
Harvesting Your Kale
The best part about growing kale is, of course, harvesting it! You can start harvesting kale leaves as soon as they’re big enough to eat, usually about 6-8 inches long.
1. **Harvesting Technique:** To harvest kale, simply cut or pull off the outer leaves, leaving the inner leaves to continue growing. This is called “cut-and-come-again” harvesting.
2. **Harvesting Time:** You can harvest kale throughout the growing season, even in the winter in mild climates. The leaves actually taste sweeter after a frost.
3. **Storage:** Freshly harvested kale can be stored in the refrigerator for up to a week. Wrap it in a damp paper towel and place it in a plastic bag.
Enjoying Your Homegrown Kale
Now that you’ve harvested your kale, it’s time to enjoy it! There are so many ways to use kale in your cooking.
* **Salads:** Young, tender kale leaves are great in salads. Massage them with olive oil and lemon juice to soften them.
* **Smoothies:** Kale is a nutritional powerhouse in smoothies. Add it to your favorite smoothie recipe for a boost of vitamins and minerals.
* **Soups and Stews:** Kale adds a hearty flavor and texture to soups and stews.
* **Sautéed:** Sautéed kale is a quick and easy side dish. Simply sauté it with olive oil, garlic, and a pinch of salt.
* **Kale Chips:** Kale chips are a healthy and delicious snack. Toss kale leaves with olive oil and salt, then bake them in the oven until crispy.
Troubleshooting Common Kale Problems
Even with the best care, you might encounter a few problems while growing kale. Here are some common issues and how to fix them:
* **Yellowing Leaves:** This could be a sign of nutrient deficiency, overwatering, or disease. Check the soil drainage and fertilize if necessary.
* **Holes in Leaves:** This is usually caused by pests like cabbage worms or flea beetles. Inspect the plants regularly and take action to control pests.
* **Stunted Growth:** This could be due to poor soil, lack of sunlight, or pests. Amend the soil, provide more sunlight, and control pests.
Extending Your Kale Season
Want to enjoy fresh kale for as long as possible? Here are a few tips for extending your kale season:
* **Succession Planting:** Plant kale seeds or seedlings every few weeks to ensure a continuous harvest.
* **Cold Frames:** Use cold frames to protect kale plants from frost and extend the growing season into the winter.
* **Row Covers:** Cover kale plants with row covers to protect them from pests and frost.
Final Thoughts
Growing kale at home is a fun and rewarding experience. With a little bit of care and attention, you can enjoy fresh, nutritious greens all season long. So, get out there and start planting! I promise you won’t regret it. Happy gardening!
Conclusion
So, there you have it! Growing kale at home is not only achievable, but it’s also a rewarding experience that brings fresh, nutritious greens right to your kitchen. We’ve walked through the simple steps, from selecting the right kale variety to harvesting your bountiful crop. But why should you take the plunge and try this DIY gardening adventure?
Firstly, consider the unparalleled freshness. Store-bought kale, while convenient, can’t compare to the vibrant flavor and crisp texture of kale picked straight from your own garden. You control the entire process, ensuring that your kale is free from harmful pesticides and herbicides. This means you’re providing yourself and your family with the healthiest possible option.
Secondly, growing your own kale is incredibly cost-effective. A single packet of kale seeds can yield a substantial amount of produce, far exceeding the cost of buying kale from the grocery store. Over time, you’ll save money while enjoying a constant supply of this superfood.
Thirdly, gardening is therapeutic. The act of nurturing plants, watching them grow, and harvesting your own food is incredibly satisfying and stress-relieving. It’s a fantastic way to connect with nature and enjoy the outdoors.
But the benefits don’t stop there. Growing kale at home allows you to experiment with different varieties. Try Lacinato kale (also known as dinosaur kale) for its unique texture and nutty flavor, or Red Russian kale for its beautiful purple stems and mild taste. You can even grow ornamental kale for its vibrant colors and interesting shapes, adding a touch of beauty to your garden.
Consider these variations to enhance your kale-growing experience:
* Succession Planting: Plant new kale seeds every few weeks to ensure a continuous harvest throughout the growing season.
* Companion Planting: Plant kale alongside other vegetables like carrots, onions, and garlic to deter pests and improve growth.
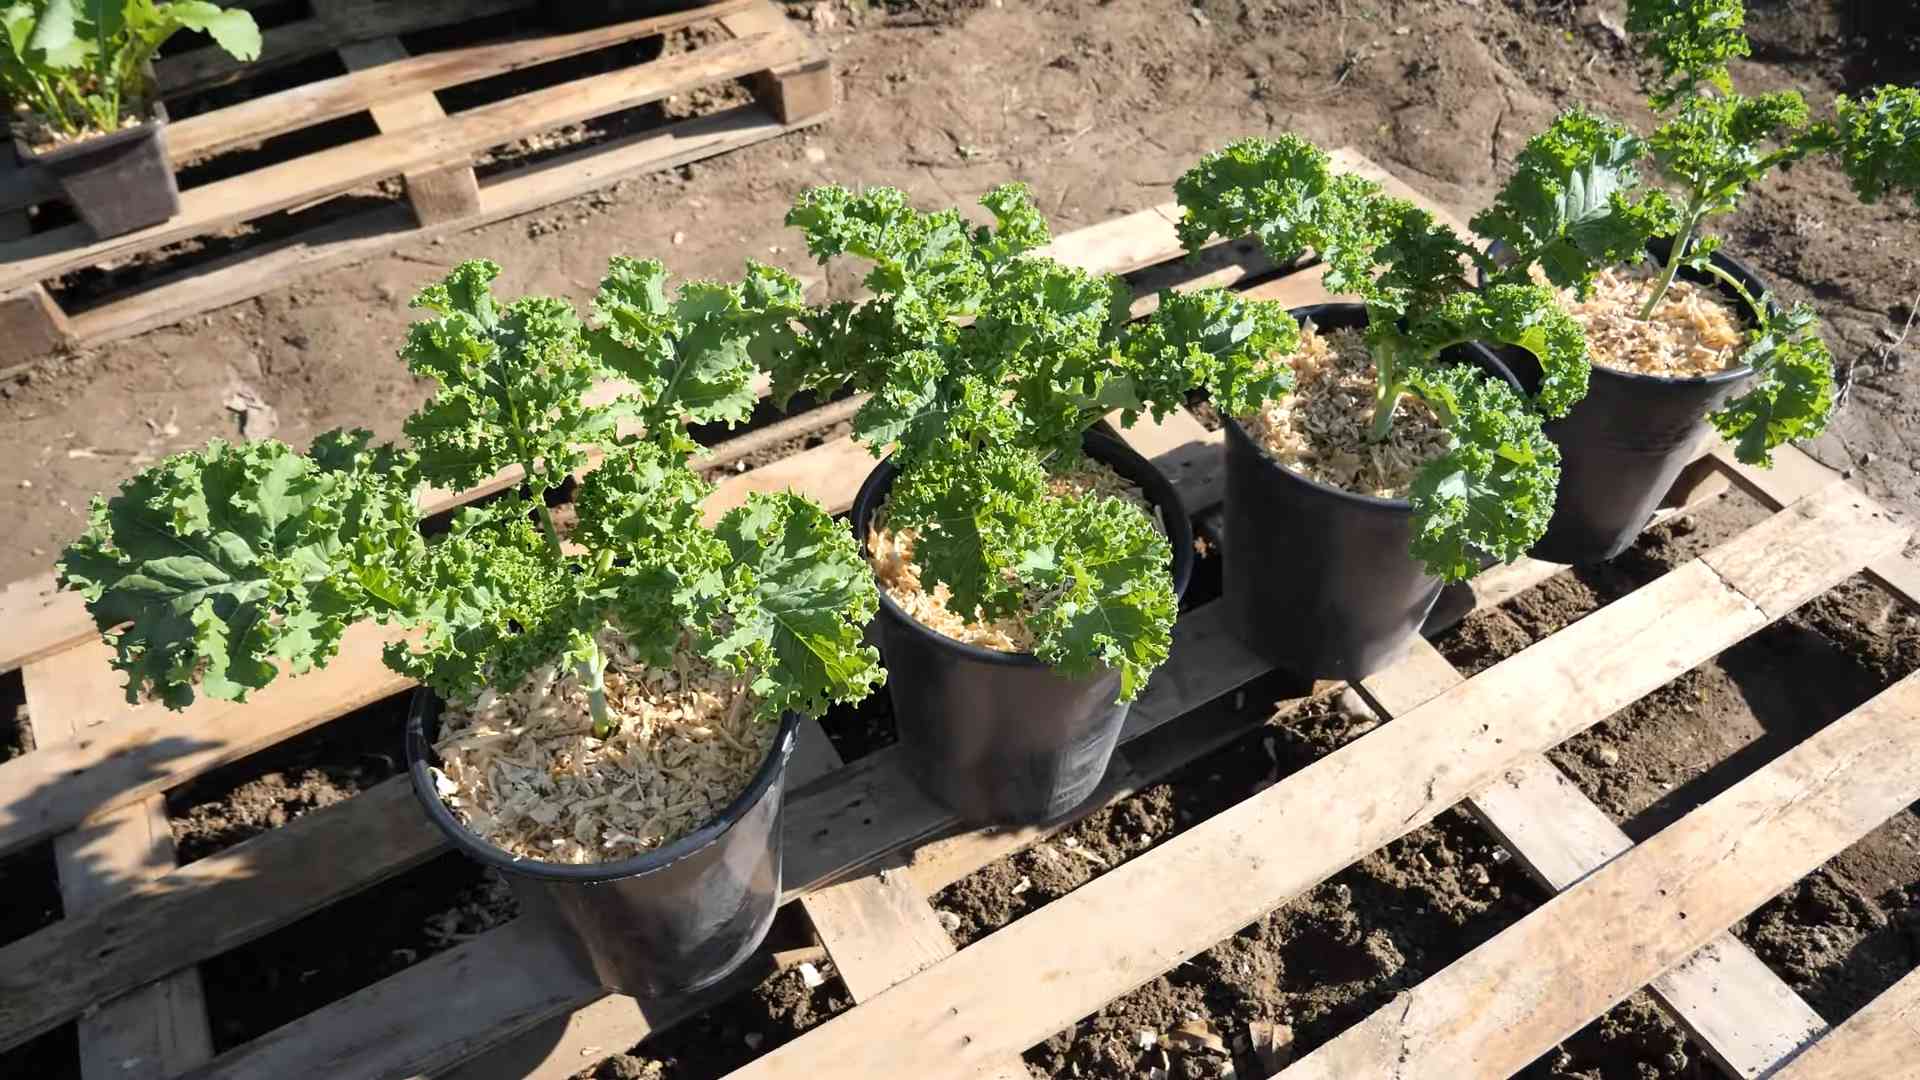
* Container Gardening: If you have limited space, grow kale in containers on your balcony or patio.
* Winter Growing: With proper protection, you can even grow kale throughout the winter in many climates. Use a cold frame or row covers to shield your plants from frost and snow.
Ultimately, the best way to discover the joys of growing kale at home is to simply give it a try. Don’t be afraid to experiment, learn from your mistakes, and adapt your approach as needed. The rewards are well worth the effort.
We encourage you to embark on this exciting gardening journey and share your experiences with us. Post photos of your kale plants, share your tips and tricks, and let us know what you’ve learned along the way. Together, we can create a community of passionate kale growers and inspire others to embrace the joys of homegrown food. So, grab your seeds, get your hands dirty, and start growing your own delicious and nutritious kale today! You’ll be amazed at how easy and rewarding it can be.
Frequently Asked Questions (FAQ)
What is the best time of year to plant kale?
The best time to plant kale depends on your climate. In cooler climates, you can plant kale in early spring for a summer harvest, or in late summer for a fall and winter harvest. In warmer climates, it’s best to plant kale in the fall or winter to avoid the heat of the summer. Kale thrives in cooler temperatures and can tolerate frost, making it a great option for extending your growing season. Check your local frost dates to determine the best planting time for your region. Generally, you want to plant kale 4-6 weeks before the first expected frost in the fall, or as soon as the ground can be worked in the spring.
How much sunlight does kale need?
Kale needs at least 6 hours of sunlight per day to thrive. While it can tolerate some shade, especially in hotter climates, insufficient sunlight can lead to leggy growth and reduced yields. Choose a planting location that receives full sun for the majority of the day. If you’re growing kale indoors, use grow lights to supplement natural sunlight. Rotate your plants regularly to ensure even light exposure.
What kind of soil is best for growing kale?
Kale prefers well-drained soil that is rich in organic matter. The ideal soil pH is between 6.0 and 7.5. Before planting, amend your soil with compost, aged manure, or other organic materials to improve its fertility and drainage. If your soil is heavy clay, consider adding sand or perlite to improve drainage. A soil test can help you determine the pH and nutrient levels of your soil and guide you in making necessary amendments.
How often should I water kale?
Kale needs consistent moisture to thrive, especially during hot weather. Water deeply and regularly, aiming to keep the soil consistently moist but not waterlogged. Check the soil moisture regularly by sticking your finger into the soil. If the top inch feels dry, it’s time to water. Avoid overhead watering, as this can lead to fungal diseases. Instead, water at the base of the plants. Mulching around your kale plants can help retain moisture and suppress weeds.
What are some common pests and diseases that affect kale?
Kale can be susceptible to various pests and diseases, including aphids, cabbage worms, flea beetles, and fungal diseases like powdery mildew. Regularly inspect your plants for signs of infestation or disease. Handpick pests off your plants or use insecticidal soap or neem oil to control them. To prevent fungal diseases, ensure good air circulation around your plants and avoid overhead watering. Crop rotation can also help reduce the risk of soilborne diseases.
How do I harvest kale?
You can begin harvesting kale leaves once they are large enough to eat, typically when they are about 4-6 inches long. Harvest the outer leaves first, leaving the inner leaves to continue growing. This allows you to harvest kale continuously throughout the growing season. Simply snap or cut the leaves off at the base of the stem. Avoid harvesting more than one-third of the plant at a time to ensure continued growth.
Can I grow kale in containers?
Yes, kale can be successfully grown in containers. Choose a container that is at least 12 inches deep and wide to provide enough space for the roots to grow. Use a well-draining potting mix and ensure that the container has drainage holes. Water regularly and fertilize every few weeks with a balanced fertilizer. Place the container in a sunny location that receives at least 6 hours of sunlight per day.
How do I store harvested kale?
To store harvested kale, wash the leaves thoroughly and dry them completely. Wrap the kale in a paper towel and store it in a plastic bag in the refrigerator. Kale can typically be stored for up to a week using this method. You can also freeze kale for longer storage. To freeze kale, blanch the leaves in boiling water for 2-3 minutes, then plunge them into ice water to stop the cooking process. Drain the kale and squeeze out any excess water. Place the kale in freezer bags or containers and store it in the freezer for up to 6 months.

Leave a Comment