
Boost Tomato Yield Hack: Are you dreaming of juicy, sun-ripened tomatoes bursting with flavor, but your garden is giving you more green leaves than red fruit? I understand the frustration! There’s nothing quite as disappointing as putting in the effort and not seeing the results you hoped for. But don’t worry, I’m here to share a simple, yet incredibly effective, DIY trick that will have you harvesting baskets full of delicious tomatoes in no time.
For centuries, gardeners have sought the secret to abundant tomato harvests. From ancient Incan terraces where tomatoes were first cultivated to modern-day backyard gardens, the quest for the perfect tomato has been a constant. While advanced techniques exist, sometimes the simplest solutions are the most powerful. This particular boost tomato yield hack is rooted in understanding the plant’s natural growth habits and providing it with exactly what it needs to thrive.
Why is this DIY trick so essential? Because let’s face it, store-bought tomatoes just don’t compare to the taste of homegrown goodness. Plus, knowing you nurtured those plants from tiny seedlings to bountiful producers is incredibly rewarding. This hack will help you overcome common challenges like blossom drop, poor fruit set, and overall low yields, ensuring you get the most out of your tomato plants. Get ready to unlock the full potential of your tomato garden and enjoy a summer filled with delicious, homegrown tomatoes!

Boost Your Tomato Yield: The DIY Epsom Salt Secret!
Hey fellow gardeners! Are you dreaming of a bumper crop of juicy, red tomatoes this year? I know I always am! I’ve experimented with tons of different techniques over the years, and I’ve found one that consistently delivers amazing results: Epsom salt. Yes, that stuff you use for soothing sore muscles can also work wonders in your tomato patch. This isn’t just some old wives’ tale; there’s real science behind it! Epsom salt provides magnesium and sulfur, two essential nutrients that tomatoes need to thrive. Magnesium helps with chlorophyll production (that’s what makes plants green and allows them to photosynthesize), and sulfur aids in nutrient uptake. So, let’s dive into how you can use Epsom salt to boost your tomato yield!
Understanding Epsom Salt and Tomatoes
Before we get started, let’s quickly understand why Epsom salt is so beneficial for tomatoes. Tomatoes are heavy feeders, meaning they require a lot of nutrients from the soil. Often, the soil can become depleted of magnesium and sulfur, especially if you’re growing tomatoes in the same spot year after year. This deficiency can lead to stunted growth, yellowing leaves (especially between the veins), and reduced fruit production. Epsom salt helps to correct these deficiencies, leading to healthier, more productive plants.
When and How to Apply Epsom Salt
Timing is key when it comes to applying Epsom salt. You don’t want to overdo it, as too much of anything can be harmful. Here’s my recommended schedule:
* At Planting: This is the first and most crucial application. It gives your tomato plants a strong start.
* At First Bloom: Once your plants start to flower, they need extra magnesium to support fruit development.
* Every 2-3 Weeks During Fruiting: Continue applying Epsom salt throughout the growing season to keep your plants healthy and productive.
The Epsom Salt Application Guide: Step-by-Step
Here’s the detailed guide on how to apply Epsom salt to your tomato plants. I’ve broken it down into easy-to-follow steps.
Section 1: At Planting Time
This initial application is vital for setting the stage for a successful growing season.
1. Prepare Your Planting Hole: Dig a hole that’s large enough to accommodate the root ball of your tomato plant. I usually aim for a hole that’s about twice the size of the pot the tomato plant is currently in.
2. Add Epsom Salt to the Hole: Sprinkle about 1-2 tablespoons of Epsom salt into the bottom of the planting hole. Don’t just dump it all in one spot; try to spread it evenly across the bottom.
3. Cover with Soil: Add a layer of soil over the Epsom salt. This prevents the roots from directly contacting the salt, which could potentially burn them. A couple of inches of soil should be sufficient.
4. Plant Your Tomato Plant: Carefully remove the tomato plant from its pot and place it in the prepared hole. Make sure the top of the root ball is level with the surrounding soil.
5. Fill the Hole: Fill the remaining space around the root ball with soil. Gently pat the soil down to remove any air pockets.
6. Water Thoroughly: Water the newly planted tomato plant thoroughly. This helps to settle the soil and dissolve the Epsom salt, allowing it to reach the roots.
Section 2: Foliar Spray at First Bloom
A foliar spray is a great way to quickly deliver magnesium directly to the leaves of your tomato plants.
1. Prepare the Epsom Salt Solution: Mix 1 tablespoon of Epsom salt per gallon of water in a spray bottle or garden sprayer. Make sure the Epsom salt is completely dissolved before proceeding.
2. Spray the Tomato Plants: Once your tomato plants start to bloom, spray the leaves thoroughly with the Epsom salt solution. Be sure to spray both the tops and bottoms of the leaves.
3. Spray in the Morning or Evening: Avoid spraying during the hottest part of the day, as this can cause the leaves to burn. The best time to spray is in the early morning or late evening when the sun is less intense.
4. Repeat Every 2-3 Weeks: Continue spraying your tomato plants with the Epsom salt solution every 2-3 weeks throughout the growing season.
Section 3: Soil Drench During Fruiting
A soil drench is another effective way to deliver Epsom salt to your tomato plants, especially during the fruiting stage.
1. Prepare the Epsom Salt Solution: Mix 2 tablespoons of Epsom salt per gallon of water in a watering can or bucket. Again, make sure the Epsom salt is completely dissolved.
2. Water the Base of the Plants: Pour the Epsom salt solution around the base of each tomato plant, being careful not to get it on the leaves.
3. Water Thoroughly: After applying the Epsom salt solution, water the plants thoroughly with plain water. This helps to distribute the Epsom salt throughout the soil.
4. Repeat Every 2-3 Weeks: Continue applying the Epsom salt solution as a soil drench every 2-3 weeks throughout the growing season.
Tips and Tricks for Success
Here are a few extra tips to help you get the most out of your Epsom salt applications:
* Test Your Soil: Before you start adding Epsom salt, it’s a good idea to test your soil to see if it’s actually deficient in magnesium and sulfur. You can purchase a soil testing kit at most garden centers or send a sample to a professional soil testing lab.
* Don’t Overdo It: While Epsom salt can be beneficial, too much can be harmful. Stick to the recommended dosages and application schedule. Over-application can lead to nutrient imbalances and other problems.
* Use Warm Water: Epsom salt dissolves more easily in warm water than in cold water.
* Combine with Other Fertilizers: Epsom salt is not a complete fertilizer, so you’ll still need to provide your tomato plants with other essential nutrients. Use a balanced fertilizer that’s specifically formulated for tomatoes.
* Observe Your Plants: Pay close attention to your tomato plants and look for signs of nutrient deficiencies, such as yellowing leaves or stunted growth. Adjust your Epsom salt applications accordingly.
* Consider Your Water Source: If you have hard water, it may already contain magnesium. In this case, you might need to use less Epsom salt.
* Organic Gardening: Epsom salt is generally considered safe for organic gardening, but it’s always a good idea to check with your local organic certification organization to be sure.
Troubleshooting Common Problems
Even with the best intentions, things can sometimes go wrong. Here are a few common problems you might encounter and how to address them:
* Leaf Burn: If you notice that the leaves of your tomato plants are starting to burn after applying Epsom salt, it’s likely that you’ve used too much. Reduce the dosage or frequency of applications.
* No Improvement: If you’re not seeing any improvement in your tomato plants after applying Epsom salt, it’s possible that they have a different nutrient deficiency or another problem. Test your soil and consult with a gardening expert.
* Yellowing Leaves: While Epsom salt can help with yellowing leaves caused by magnesium deficiency, it’s important to rule out other causes, such as nitrogen deficiency or disease.
Why This Works: The Science Behind It
I know, I know, it sounds almost too good to be true, right? But there’s a solid scientific basis for why Epsom salt works so well for tomatoes. As I mentioned earlier, Epsom salt provides magnesium and sulfur, two essential nutrients that are often lacking in garden soil.
* Magnesium: Magnesium is a key component of chlorophyll, the pigment that gives plants their green color and allows them to photosynthesize. Without enough magnesium, plants can’t produce enough energy, leading to stunted growth and reduced fruit production.
* Sulfur: Sulfur is involved in a variety of plant processes, including protein synthesis and enzyme activation. It also helps plants to absorb other nutrients, such as nitrogen and phosphorus.
By providing these essential nutrients, Epsom salt helps tomato plants to grow stronger, healthier, and more productive.
My Personal Experience
I’ve been using Epsom salt on my tomato plants for years, and I’ve consistently seen a significant improvement in their growth and yield. My plants are greener, healthier, and produce more tomatoes than ever before. I’ve also noticed that my tomatoes are more flavorful and less prone to blossom end rot, a common problem caused by calcium deficiency.
One year, I decided to do a little experiment. I applied Epsom salt to half of my tomato plants and left the other half untreated. The results were dramatic. The plants that received Epsom salt were noticeably larger and more productive. They also had fewer problems with pests and diseases.
I’m convinced that Epsom salt is a valuable tool for any tomato gardener. It’s inexpensive, easy to use, and can make a big difference in your harvest.
Beyond Tomatoes: Other Uses for Epsom Salt in the Garden
While Epsom salt is particularly beneficial for tomatoes

Conclusion
So, there you have it! This simple, yet incredibly effective, DIY trick to boost tomato yield is a game-changer for any gardener, regardless of experience level. We’ve explored the science behind why this method works, highlighting how it encourages stronger root development and ultimately leads to a more abundant harvest. Forget expensive fertilizers and complicated techniques; this is a straightforward, cost-effective solution that delivers real results.
Why is this a must-try? Because it’s about more than just getting more tomatoes. It’s about maximizing the potential of your plants, fostering a healthier garden ecosystem, and enjoying the satisfaction of harvesting the fruits (or vegetables!) of your labor. Imagine baskets overflowing with juicy, ripe tomatoes, perfect for salads, sauces, and everything in between. This DIY trick makes that dream a reality.
But don’t just take our word for it! We encourage you to experiment and adapt this technique to your specific garden conditions. Consider these variations:
* Different rooting hormones: While honey is a readily available and effective option, you could also try willow water or commercial rooting powders. Observe which works best for your tomato variety.
* Soil amendments: Incorporate compost, aged manure, or other organic matter into the soil where you transplant your rooted cuttings. This will provide essential nutrients and improve soil drainage.
* Timing is key: Experiment with taking cuttings at different stages of the tomato plant’s growth cycle. Some gardeners find that cuttings taken from suckers (the shoots that grow between the main stem and branches) are particularly successful.
* Hydroponic adaptation: While this article focuses on soil-based gardening, the principle of rooting tomato cuttings can also be applied to hydroponic systems. Research appropriate nutrient solutions and support structures for hydroponic tomato propagation.
The beauty of gardening lies in its constant learning and experimentation. This DIY trick to boost tomato yield is just the starting point. We’re confident that once you see the positive impact on your tomato plants, you’ll be hooked!
We are incredibly eager to hear about your experiences with this method. Did you notice a significant increase in your tomato harvest? Did you try any of the suggested variations? Share your photos, tips, and stories in the comments section below. Let’s create a community of gardeners who are passionate about maximizing their tomato yields and sharing their knowledge with others. Let’s all work together to boost tomato yield! Your insights could inspire and help fellow gardeners achieve even greater success. Happy gardening!
Frequently Asked Questions (FAQ)
What exactly is this “DIY trick” you’re referring to?
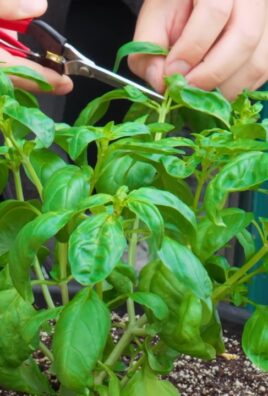
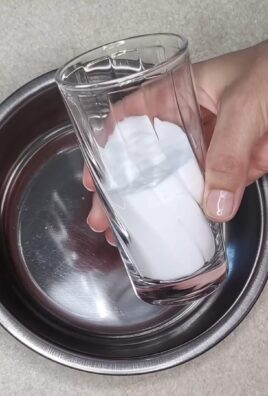
This DIY trick involves taking cuttings from your existing tomato plants, encouraging them to develop roots, and then transplanting these rooted cuttings to create new, independent tomato plants. This effectively multiplies your tomato yield without requiring you to purchase additional seeds or seedlings. The key element is using a natural rooting hormone, such as honey, to stimulate root growth in the cuttings.
Why does using honey help the tomato cuttings grow roots?
Honey possesses natural antibacterial and antifungal properties, which help protect the cuttings from infection while they are developing roots. More importantly, honey contains enzymes that stimulate root growth. It provides a gentle, natural boost to the rooting process, increasing the chances of success compared to simply placing the cuttings in water.
When is the best time to take tomato cuttings?
The ideal time to take tomato cuttings is typically in the late spring or early summer, when the tomato plants are actively growing. Choose healthy, vigorous stems that are free from disease or pests. Avoid taking cuttings from plants that are already stressed or showing signs of nutrient deficiency. Many gardeners find success taking cuttings from suckers, which are the small shoots that grow between the main stem and the branches. These suckers are essentially miniature tomato plants waiting to be developed.
How long does it take for the tomato cuttings to grow roots?
The time it takes for tomato cuttings to develop roots can vary depending on several factors, including the tomato variety, the temperature, and the humidity. Generally, you can expect to see roots forming within 7 to 14 days. Keep the cuttings consistently moist and provide them with indirect sunlight. Once the roots are about an inch long, they are ready to be transplanted into soil.
What kind of soil should I use for transplanting the rooted tomato cuttings?
Use a well-draining potting mix that is rich in organic matter. You can also amend your garden soil with compost or aged manure to improve its fertility and drainage. Avoid using heavy clay soil, as it can become waterlogged and hinder root growth. Ensure the soil is slightly acidic to neutral (pH 6.0-7.0) for optimal tomato growth.
How often should I water the newly transplanted tomato cuttings?
Water the newly transplanted tomato cuttings regularly to keep the soil consistently moist, but not waterlogged. Check the soil moisture level daily and water when the top inch of soil feels dry to the touch. Avoid overwatering, as this can lead to root rot. As the plants mature, you can gradually reduce the frequency of watering, allowing the soil to dry out slightly between waterings.
What kind of sunlight do the rooted tomato cuttings need?
Newly rooted tomato cuttings need bright, indirect sunlight. Avoid placing them in direct sunlight, as this can scorch the delicate leaves. Once the plants are established and actively growing, they can tolerate more direct sunlight. Aim for at least 6-8 hours of sunlight per day for optimal tomato production.
Can I use this trick to propagate any type of tomato plant?
Yes, this DIY trick can be used to propagate most types of tomato plants, including determinate (bush) varieties and indeterminate (vining) varieties. However, some varieties may be easier
So, there you have it! This simple, yet incredibly effective, DIY trick to boost tomato yield is a game-changer for any gardener, regardless of experience level. We’ve explored the science behind why this method works, highlighting how it encourages stronger root development and ultimately leads to a more abundant harvest. Forget expensive fertilizers and complicated techniques; this is a straightforward, cost-effective solution that delivers real results.
Why is this a must-try? Because it’s about more than just getting more tomatoes. It’s about maximizing the potential of your plants, fostering a healthier garden ecosystem, and enjoying the satisfaction of harvesting the fruits (or vegetables!) of your labor. Imagine baskets overflowing with juicy, ripe tomatoes, perfect for salads, sauces, and everything in between. This DIY trick makes that dream a reality.
But don’t just take our word for it! We encourage you to experiment and adapt this technique to your specific garden conditions. Consider these variations:
* Different rooting hormones: While honey is a readily available and effective option, you could also try willow water or commercial rooting powders. Observe which works best for your tomato variety.
* Soil amendments: Incorporate compost, aged manure, or other organic matter into the soil where you transplant your rooted cuttings. This will provide essential nutrients and improve soil drainage.
* Timing is key: Experiment with taking cuttings at different stages of the tomato plant’s growth cycle. Some gardeners find that cuttings taken from suckers (the shoots that grow between the main stem and branches) are particularly successful.
* Hydroponic adaptation: While this article focuses on soil-based gardening, the principle of rooting tomato cuttings can also be applied to hydroponic systems. Research appropriate nutrient solutions and support structures for hydroponic tomato propagation.
The beauty of gardening lies in its constant learning and experimentation. This DIY trick to boost tomato yield is just the starting point. We’re confident that once you see the positive impact on your tomato plants, you’ll be hooked!
We are incredibly eager to hear about your experiences with this method. Did you notice a significant increase in your tomato harvest? Did you try any of the suggested variations? Share your photos, tips, and stories in the comments section below. Let’s create a community of gardeners who are passionate about maximizing their tomato yields and sharing their knowledge with others. Let’s all work together to boost tomato yield! Your insights could inspire and help fellow gardeners achieve even greater success. Happy gardening!
Frequently Asked Questions (FAQ)
What exactly is this “DIY trick” you’re referring to?
This DIY trick involves taking cuttings from your existing tomato plants, encouraging them to develop roots, and then transplanting these rooted cuttings to create new, independent tomato plants. This effectively multiplies your tomato yield without requiring you to purchase additional seeds or seedlings. The key element is using a natural rooting hormone, such as honey, to stimulate root growth in the cuttings.
Why does using honey help the tomato cuttings grow roots?
Honey possesses natural antibacterial and antifungal properties, which help protect the cuttings from infection while they are developing roots. More importantly, honey contains enzymes that stimulate root growth. It provides a gentle, natural boost to the rooting process, increasing the chances of success compared to simply placing the cuttings in water.
When is the best time to take tomato cuttings?
The ideal time to take tomato cuttings is typically in the late spring or early summer, when the tomato plants are actively growing. Choose healthy, vigorous stems that are free from disease or pests. Avoid taking cuttings from plants that are already stressed or showing signs of nutrient deficiency. Many gardeners find success taking cuttings from suckers, which are the small shoots that grow between the main stem and the branches. These suckers are essentially miniature tomato plants waiting to be developed.
How long does it take for the tomato cuttings to grow roots?
The time it takes for tomato cuttings to develop roots can vary depending on several factors, including the tomato variety, the temperature, and the humidity. Generally, you can expect to see roots forming within 7 to 14 days. Keep the cuttings consistently moist and provide them with indirect sunlight. Once the roots are about an inch long, they are ready to be transplanted into soil.
What kind of soil should I use for transplanting the rooted tomato cuttings?
Use a well-draining potting mix that is rich in organic matter. You can also amend your garden soil with compost or aged manure to improve its fertility and drainage. Avoid using heavy clay soil, as it can become waterlogged and hinder root growth. Ensure the soil is slightly acidic to neutral (pH 6.0-7.0) for optimal tomato growth.
How often should I water the newly transplanted tomato cuttings?
Water the newly transplanted tomato cuttings regularly to keep the soil consistently moist, but not waterlogged. Check the soil moisture level daily and water when the top inch of soil feels dry to the touch. Avoid overwatering, as this can lead to root rot. As the plants mature, you can gradually reduce the frequency of watering, allowing the soil to dry out slightly between waterings.
What kind of sunlight do the rooted tomato cuttings need?
Newly rooted tomato cuttings need bright, indirect sunlight. Avoid placing them in direct sunlight, as this can scorch the delicate leaves. Once the plants are established and actively growing, they can tolerate more direct sunlight. Aim for at least 6-8 hours of sunlight per day for optimal tomato production.
Can I use this trick to propagate any type of tomato plant?
Yes, this DIY trick can be used to propagate most types of tomato plants, including determinate (bush) varieties and indeterminate (vining) varieties. However, some varieties may be easier to propagate than others. Experiment with different varieties to see which ones respond best to this method. Heirloom varieties, in particular, are often well-suited for propagation through cuttings.
What if my tomato cuttings don’t develop roots?
If your tomato cuttings don’t develop roots, there could be several reasons why. Make sure the cuttings are kept consistently moist, but not waterlogged. Ensure they are receiving adequate indirect sunlight. Check for any signs of disease or pests. You may also want to try using a different rooting hormone or taking cuttings from a different part of the plant. Sometimes, it simply takes a few tries to get it right. Don’t give up!
Is this method better than starting tomatoes from seed?
Both starting tomatoes from seed and propagating them from cuttings have their own advantages and disadvantages. Starting from seed allows you to choose from a wider variety of tomato types and can be more cost-effective in the long run. However, propagating from cuttings allows you to quickly multiply your existing plants and ensures that the new plants will be genetically identical to the parent plant. This can be particularly useful if you have a tomato plant that produces exceptionally delicious or disease-resistant fruit. Ultimately, the best method depends on your individual needs and preferences. This DIY trick to boost tomato yield is a great way to get more of the tomatoes you already love.
Leave a Comment