
Potatoes in plastic bags – sounds a little unconventional, right? But trust me, this simple DIY trick can revolutionize your home gardening game! Imagine harvesting a bounty of delicious, homegrown potatoes right from your patio or balcony, without needing a sprawling garden. For centuries, humans have cultivated potatoes, from their origins in the Andes Mountains to becoming a staple food worldwide. Now, you can join this rich agricultural history, even with limited space.
I know what you’re thinking: “Why plastic bags?” Well, this method is perfect for urban dwellers, apartment residents, or anyone with limited garden space. It’s incredibly easy, cost-effective, and allows you to control the growing environment, leading to healthier and more abundant potato yields. Plus, it’s a fantastic way to recycle those extra plastic bags you have lying around!
This DIY article will guide you through every step of growing potatoes in plastic bags, from choosing the right variety to harvesting your delicious crop. Say goodbye to store-bought potatoes and hello to fresh, flavorful, homegrown goodness. Let’s get started and unlock the secrets to successful potato gardening, one plastic bag at a time!

Grow Your Own Potatoes in a Bag: A Beginner’s Guide
Hey there, fellow gardening enthusiasts! Ever dreamed of harvesting your own potatoes right from your backyard, even if you don’t have a traditional garden plot? Well, you’re in luck! Growing potatoes in bags is a super easy and rewarding DIY project, perfect for beginners and seasoned gardeners alike. I’m going to walk you through every step, so you can enjoy fresh, homegrown potatoes in no time.
What You’ll Need
Before we dive in, let’s gather our supplies. This is a pretty low-cost project, which is always a win!
* Large Grow Bags or Heavy-Duty Plastic Bags: I recommend bags that are at least 20 gallons in size. The bigger, the better, as it gives the potatoes plenty of room to grow. You can find these at most garden centers or online. Heavy-duty garbage bags can work in a pinch, but grow bags are more durable and often have drainage holes.
* Seed Potatoes: These aren’t just any potatoes from the grocery store! Seed potatoes are specifically grown for planting and are certified disease-free. You can find them at your local garden center or online. Choose a variety you like to eat!
* Potting Mix: A good quality potting mix is essential. It should be well-draining and provide the nutrients your potatoes need. Avoid using garden soil, as it can become compacted in the bag.
* Compost (Optional): Adding compost to your potting mix will give your potatoes an extra boost of nutrients.
* Water: Of course, we need water to keep our potatoes happy and hydrated.
* Sunlight: Potatoes need at least 6-8 hours of sunlight per day.
* Scissors or a Knife: For cutting the seed potatoes (if needed) and creating drainage holes.
Preparing Your Seed Potatoes
This step is crucial for getting your potatoes off to a good start.
* Chitting (Optional but Recommended): Chitting is the process of encouraging your seed potatoes to sprout before planting. This gives them a head start and can result in an earlier harvest. To chit your potatoes, place them in a cool, bright location (but not direct sunlight) for a few weeks. You’ll see small sprouts, called “eyes,” start to emerge.
* Cutting (If Necessary): If your seed potatoes are large (bigger than an egg), you can cut them into smaller pieces. Each piece should have at least 2-3 “eyes.” Let the cut pieces dry for a day or two before planting to prevent rotting. This allows the cut surfaces to callous over.
Planting Your Potatoes
Now for the fun part! Let’s get those potatoes in the ground (or, in this case, the bag!).
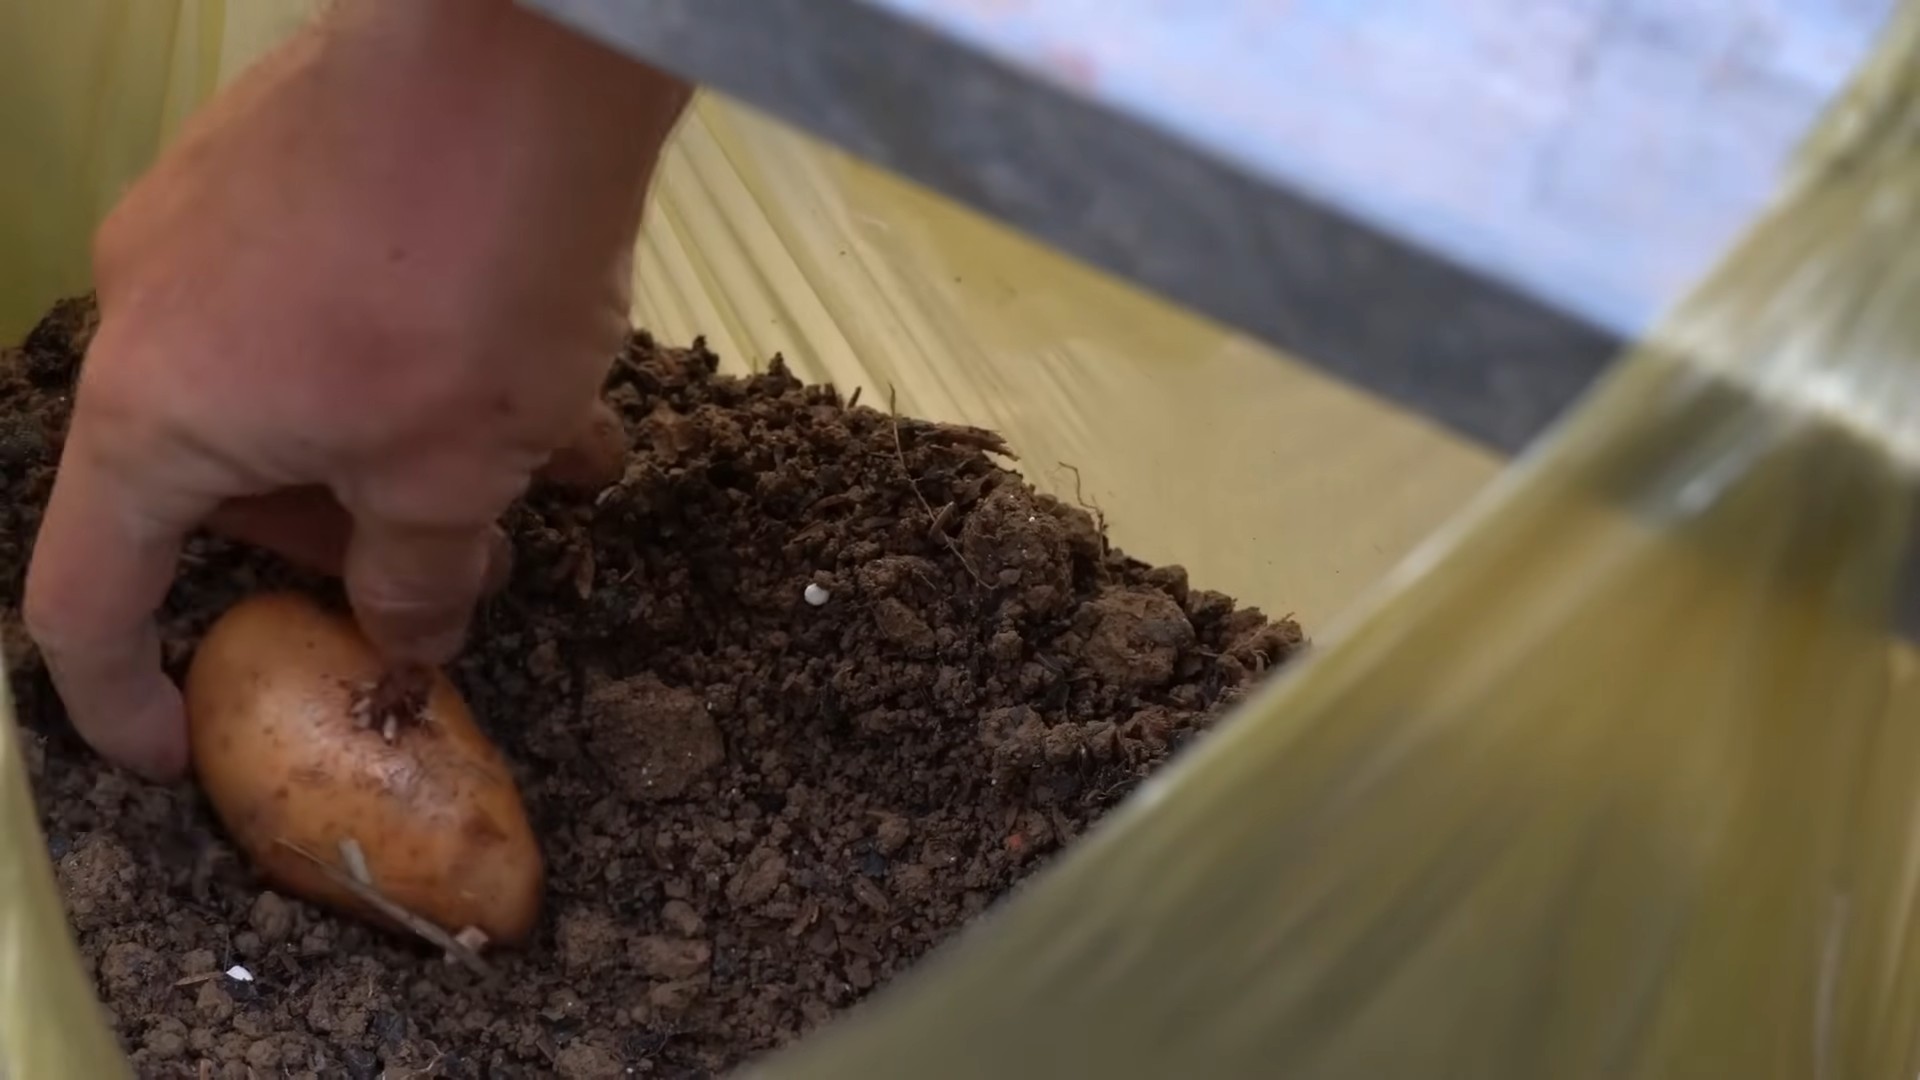
1. Prepare the Bag: If your grow bag doesn’t have drainage holes, create a few at the bottom. This is essential to prevent waterlogging, which can rot your potatoes.
2. Add Soil: Fill the bag with about 4-6 inches of potting mix. Mix in some compost if you’re using it.
3. Plant the Seed Potatoes: Place the seed potatoes on top of the soil, with the “eyes” facing up. Space them about 8-12 inches apart if you’re planting multiple potatoes in one bag.
4. Cover with Soil: Cover the seed potatoes with another 4-6 inches of potting mix.
5. Water Thoroughly: Water the soil until it’s moist but not soggy.
“Hilling” Your Potatoes
This is a key technique for maximizing your potato harvest.
1. Wait for Sprouts: Once the potato plants start to emerge from the soil (usually in a week or two), wait until they’re about 6-8 inches tall.
2. Add More Soil: Add more potting mix to the bag, covering the stems of the plants, leaving only the top few leaves exposed. This encourages the plants to produce more potatoes along the buried stems.
3. Repeat: Continue this process of “hilling” every few weeks as the plants grow, until the bag is almost full.
Caring for Your Potato Plants
Consistent care is essential for a bountiful harvest.
* Watering: Keep the soil consistently moist, but not waterlogged. Check the soil moisture regularly and water when the top inch or two feels dry.
* Fertilizing: Potatoes are heavy feeders, so they need regular fertilization. Use a balanced fertilizer (e.g., 10-10-10) every few weeks, following the instructions on the package. You can also use a liquid seaweed fertilizer for an extra boost.
* Sunlight: Make sure your potato plants are getting at least 6-8 hours of sunlight per day.
* Pest Control: Keep an eye out for pests like aphids, potato beetles, and flea beetles. If you spot any, treat them with an appropriate insecticide or organic pest control method. I personally prefer using neem oil for most pests.
* Disease Prevention: Potatoes can be susceptible to diseases like blight. To prevent disease, ensure good air circulation around the plants and avoid overhead watering. If you notice any signs of disease, treat them promptly with a fungicide.
Harvesting Your Potatoes
The moment we’ve all been waiting for!
1. When to Harvest: You can harvest “new potatoes” (small, tender potatoes) a few weeks after the plants flower. For mature potatoes, wait until the foliage starts to turn yellow and die back. This usually takes about 80-100 days from planting.
2. How to Harvest: The easiest way to harvest potatoes from a bag is to simply tip the bag over and sift through the soil. You can also reach into the bag and carefully dig around the plants to find the potatoes.
3. Curing (Optional): If you plan to store your potatoes for a long time, you’ll need to cure them. To cure potatoes, spread them out in a cool, dry, and dark place for about a week. This allows the skins to harden, which helps prevent rotting.
Troubleshooting
Even with the best planning, things can sometimes go wrong. Here are a few common issues and how to address them:
* Potato Plants Not Growing: Make sure your seed potatoes were viable and that the plants are getting enough sunlight and water. Check the soil pH to ensure it’s within the optimal range (6.0-6.5).
* Yellowing Leaves: Yellowing leaves can be a sign of overwatering, underwatering, nutrient deficiency, or disease. Check the soil moisture and fertilize if necessary. If you suspect disease, treat with a fungicide.
* Small Potatoes: Small potatoes can be caused by overcrowding, insufficient watering, or nutrient deficiency. Make sure you’re providing enough water and fertilizer, and consider planting fewer potatoes in each bag.
* Rotting Potatoes: Rotting potatoes are usually caused by overwatering or poor drainage. Make sure your bag has adequate drainage holes and avoid overwatering.
Choosing the Right Potato Variety
The type of potato you choose to grow will impact the flavor, texture, and storage capabilities of your harvest. Here are a few popular choices:
* Yukon Gold: These are all-purpose potatoes with a creamy texture and buttery flavor. They are great for boiling, baking, and mashing.
* Red Potatoes: These have a waxy texture and hold their shape well when cooked. They are excellent for boiling, roasting, and potato salads.
* Russet Potatoes: These are starchy potatoes that are ideal for baking and frying. They have a fluffy texture when cooked.
* Fingerling Potatoes: These are small, elongated potatoes with a unique flavor and texture. They are great for roasting and salads.
Maximizing Your Yield
Want to get the most potatoes possible from your bag? Here are a few tips:
* Use High-Quality Seed Potatoes: Starting with healthy, disease-free seed potatoes is essential for a good harvest.
* Provide Adequate Sunlight: Potatoes need at least 6-8 hours of sunlight per day.
* Water Regularly: Keep the soil consistently moist, but not waterlogged.
* Fertilize Regularly: Potatoes are heavy feeders, so they need regular fertilization.
* Hill Your Potatoes: This encourages the plants to produce more potatoes along the buried stems.
* Choose the Right Variety: Some potato varieties are more productive than others.
Dealing with Pests and Diseases
Even in a contained environment like a grow bag, pests and diseases can still be a problem. Here’s how to handle them:
* Aphids: These small, sap-sucking insects can weaken your plants. Spray them with a strong stream of water or treat them with insecticidal soap or neem oil.
* Potato Beetles: These beetles can defoliate your potato plants. Handpick them off the plants or treat them with an
Conclusion
So, there you have it! Transforming humble potatoes in plastic bags into a culinary masterpiece is not just a clever trick; it’s a game-changer for weeknight dinners, holiday feasts, and everything in between. We’ve explored how this simple method unlocks a level of fluffy, flavorful perfection that rivals even the most elaborate cooking techniques. Forget boiling, baking, or frying – this method delivers consistently amazing results with minimal effort.
Why is this DIY trick a must-try? Because it’s efficient, it’s effective, and it’s incredibly forgiving. You don’t need to be a seasoned chef to achieve restaurant-quality potatoes. The plastic bag creates a steamy environment that cooks the potatoes evenly, resulting in a texture that’s both creamy and light. Plus, cleanup is a breeze! No more scrubbing pots or dealing with messy oil splatters.
But the beauty of this method lies not only in its simplicity but also in its versatility. Feel free to experiment with different potato varieties. Russets will give you that classic fluffy texture, while Yukon Golds offer a slightly creamier, more buttery flavor. Red potatoes, with their waxy texture, can also be used, though they might require a slightly longer cooking time.
Consider adding aromatics to the bag for an extra layer of flavor. A few sprigs of rosemary, thyme, or garlic cloves can infuse the potatoes with a subtle, herbaceous note. A drizzle of olive oil or a pat of butter before sealing the bag will also enhance the richness and flavor. For a spicy kick, add a pinch of red pepper flakes or a dash of your favorite hot sauce.
And don’t limit yourself to plain potatoes! This method works beautifully for mashed potatoes, potato salad, or even as a base for potato skins. Once the potatoes are cooked, simply mash them with your favorite ingredients, toss them with dressing, or load them up with toppings. The possibilities are endless!
We are confident that once you try this method, you’ll never cook potatoes the same way again. It’s a simple, reliable, and delicious way to elevate your potato game. So, grab a bag of potatoes, a plastic bag, and get ready to experience potato perfection.
We encourage you to try this DIY potato cooking trick and share your experience with us! Let us know what variations you tried, what flavors you added, and how your potatoes turned out. We can’t wait to hear your success stories and learn from your culinary adventures. Share your photos and tips in the comments below! Happy cooking!
Frequently Asked Questions
What type of plastic bag should I use?
It’s crucial to use a food-grade, heat-resistant plastic bag. Ziploc freezer bags are a popular and readily available option. Avoid using thin grocery bags or bags that are not specifically designed for food storage, as they may melt or leach chemicals into your potatoes. Look for bags that are labeled as safe for microwave use, as this indicates they can withstand higher temperatures. Ensure the bag is properly sealed, leaving a small vent for steam to escape. This prevents the bag from bursting during cooking.
How long do I cook the potatoes for?
Cooking time depends on the size and type of potatoes you’re using. As a general guideline, small to medium-sized potatoes will take approximately 12-15 minutes in the microwave. Larger potatoes may require 18-20 minutes. To check for doneness, pierce the potatoes with a fork. If the fork slides in easily, they’re ready. If they’re still firm, continue cooking in 2-minute intervals until they reach the desired tenderness. Remember that microwave wattages vary, so you may need to adjust the cooking time accordingly.
Can I use this method to cook sweet potatoes?
Yes, you can absolutely use this method to cook sweet potatoes! Sweet potatoes tend to cook a bit faster than regular potatoes, so start with a shorter cooking time (around 8-10 minutes for medium-sized sweet potatoes) and check for doneness. Sweet potatoes cooked in a plastic bag will have a wonderfully soft and creamy texture. Consider adding a sprinkle of cinnamon or nutmeg to the bag for a warm, comforting flavor.
What if the plastic bag melts?
If you notice the plastic bag starting to melt, immediately stop the cooking process. This usually indicates that the bag is not heat-resistant or that the microwave is set too high. Discard the potatoes and the melted bag. Ensure you are using a food-grade, heat-resistant plastic bag specifically designed for microwave use in future attempts. Also, check your microwave’s power settings and reduce the power level if necessary.
Can I add seasonings or herbs to the bag?
Absolutely! Adding seasonings and herbs to the bag is a great way to infuse your potatoes with flavor. Consider adding salt, pepper, garlic powder, onion powder, paprika, or your favorite spice blend. Fresh herbs like rosemary, thyme, or oregano also work well. Simply toss the potatoes with the seasonings or herbs before sealing the bag. A drizzle of olive oil or a pat of butter will also enhance the flavor and texture.
Can I use this method to cook potatoes in the oven?
While this method is primarily designed for microwave cooking, you can adapt it for oven use with some precautions. Use an oven-safe bag specifically designed for cooking. Do not use regular plastic bags in the oven, as they will melt and release harmful chemicals. Preheat your oven to 350°F (175°C). Place the potatoes in the oven-safe bag, seal it tightly, and bake for approximately 45-60 minutes, or until the potatoes are tender.
How do I prevent the potatoes from sticking to the bag?
To prevent the potatoes from sticking to the bag, you can add a small amount of oil or butter to the bag before cooking. A tablespoon of olive oil or a pat of butter will create a barrier between the potatoes and the plastic, preventing them from sticking. You can also lightly grease the inside of the bag with cooking spray before adding the potatoes.
Can I reuse the plastic bag?
It is not recommended to reuse the plastic bag after cooking potatoes. The bag may have absorbed flavors and oils from the potatoes, and it may also be difficult to clean thoroughly. Reusing the bag could also increase the risk of bacterial contamination. It’s best to discard the bag after each use.
What are some variations I can try?
The possibilities are endless! For cheesy potatoes, add shredded cheddar cheese or parmesan cheese to the bag during the last few minutes of cooking. For garlic parmesan potatoes, toss the cooked potatoes with melted butter, minced garlic, and grated parmesan cheese. For loaded baked potatoes, top the cooked potatoes with sour cream, bacon bits, chives, and cheese. You can also use this method to cook potatoes for potato salad, mashed potatoes, or potato skins.
Is this method safe?
Yes, this method is generally safe as long as you follow the guidelines outlined above. Use a food-grade, heat-resistant plastic bag, ensure the bag is properly sealed, and monitor the cooking process closely. Avoid overheating the bag or using bags that are not specifically designed for food storage. If you have any concerns about the safety of this method, consult with a food safety expert.

Leave a Comment