
Grow Bok Choy Indoors? Absolutely! Imagine fresh, crisp bok choy, bursting with flavor, ready to harvest right from your windowsill. Forget those limp, overpriced greens at the grocery store. This isn’t just a dream; it’s an achievable reality with a few simple DIY tricks. For centuries, cultivating vegetables at home has been a cornerstone of self-sufficiency and a connection to nature. From ancient Roman rooftop gardens to the modern-day victory gardens, the desire to nurture our own food has always been strong.
But let’s face it, not everyone has acres of land or even a sunny backyard. That’s where the magic of indoor gardening comes in! I’m here to show you how easy and rewarding it can be to grow bok choy indoors, even if you’re a complete beginner. This DIY guide will walk you through every step, from selecting the right container to providing the perfect lighting. Why spend money on produce when you can have a constant supply of fresh, organic bok choy at your fingertips? Plus, it’s incredibly satisfying to watch your little seedlings sprout and flourish. Let’s get started and bring a little bit of the garden inside!
Growing Bok Choy Indoors: A Beginner’s Guide
Hey there, fellow plant enthusiasts! Ever thought about growing your own fresh, crisp bok choy right in your kitchen? It’s easier than you might think, and I’m here to guide you through the whole process. Forget those wilted, overpriced veggies at the store – we’re going to have a thriving bok choy garden indoors!
Choosing the Right Bok Choy Variety
First things first, let’s talk about bok choy varieties. While most bok choy will grow indoors, some are better suited for container gardening than others. Here are a few of my favorites:
* Dwarf Bok Choy: As the name suggests, these are compact and perfect for smaller pots. They mature quickly, which is a bonus when you’re eager to harvest.
* Baby Bok Choy: Similar to dwarf varieties, baby bok choy stays small and tender. They’re great for salads and stir-fries.
* Joi Choi: This variety is a bit larger but still manageable indoors. It has thick, juicy stalks and dark green leaves.
Essential Supplies You’ll Need
Before we dive into the planting process, let’s gather our supplies. Here’s what you’ll need to get started:
* Bok Choy Seeds: Choose a variety that suits your space and preferences. You can find these at most garden centers or online.
* Containers: Select pots that are at least 6 inches deep and wide. Good drainage is crucial, so make sure your pots have drainage holes.
* Potting Mix: Use a high-quality potting mix that’s well-draining and rich in nutrients. Avoid using garden soil, as it can compact and hinder growth.
* Grow Lights (Optional but Recommended): Bok choy needs plenty of light, especially indoors. If you don’t have a sunny windowsill, grow lights are a must.
* Watering Can or Spray Bottle: For gentle watering.
* Fertilizer: A balanced liquid fertilizer will help your bok choy thrive.
* Seed Starting Tray (Optional): If you prefer to start your seeds indoors before transplanting.
Step-by-Step Planting Guide
Alright, let’s get our hands dirty! Here’s how to plant bok choy indoors:
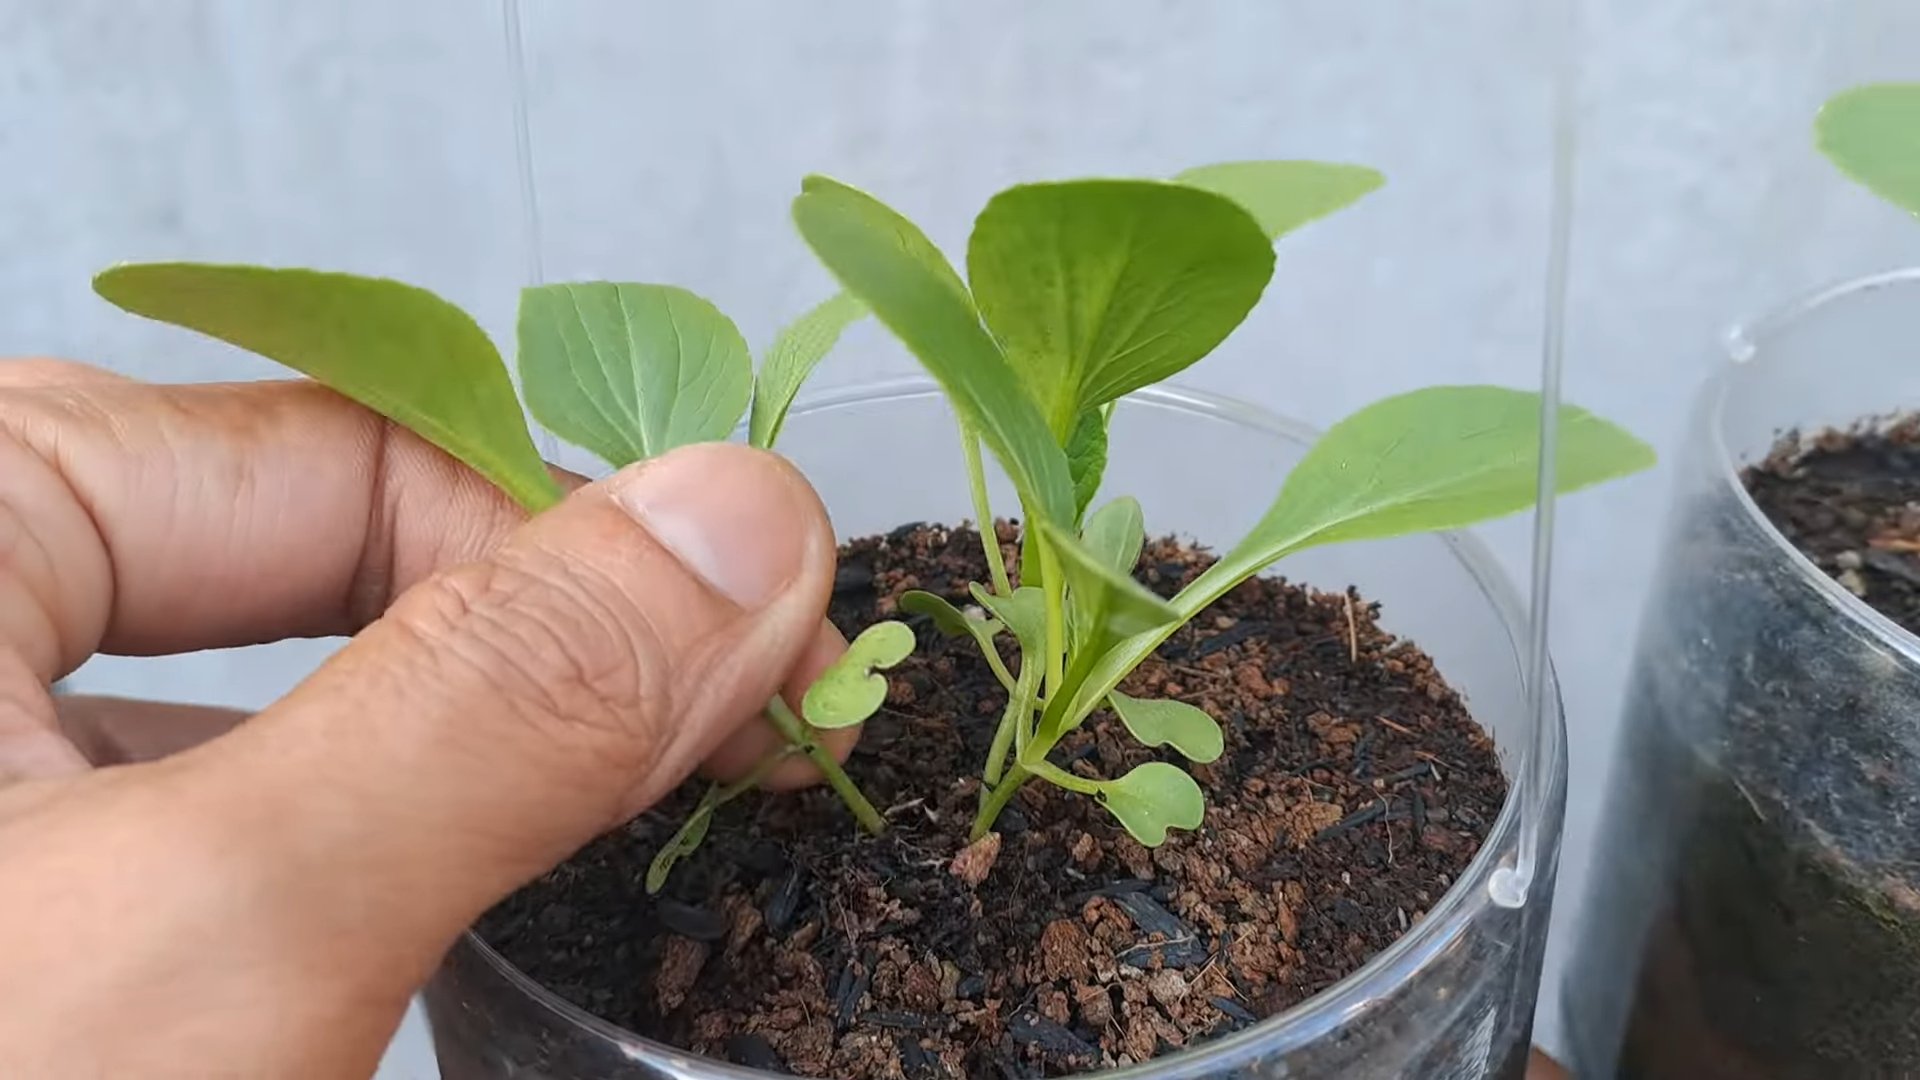
1. Starting Seeds (Optional): If you’re using a seed starting tray, fill each cell with potting mix. Sow 2-3 seeds per cell, about ¼ inch deep. Gently water the soil and keep it moist. Place the tray in a warm, well-lit area or under grow lights. Once the seedlings have a few true leaves, you can transplant them into larger pots.
2. Direct Sowing: If you’re skipping the seed starting tray, fill your chosen container with potting mix, leaving about an inch of space at the top. Sow the bok choy seeds directly into the pot, spacing them about 1-2 inches apart. Again, plant them about ¼ inch deep.
3. Watering: After sowing the seeds, gently water the soil until it’s evenly moist. Avoid overwatering, as this can lead to rot.
4. Light and Temperature: Place your pots in a location that receives at least 6 hours of sunlight per day. If you’re using grow lights, position them a few inches above the plants and keep them on for 12-14 hours a day. Bok choy prefers temperatures between 55°F and 75°F (13°C and 24°C).
5. Thinning (If Necessary): Once the seedlings emerge and have a few true leaves, thin them out so that only the strongest plant remains in each spot (if you sowed multiple seeds in one spot). This will give the plants enough room to grow.
Caring for Your Indoor Bok Choy
Now that your bok choy is planted, it’s time to provide the care it needs to flourish.
1. Watering: Bok choy needs consistent moisture, but it doesn’t like to be waterlogged. Water the plants when the top inch of soil feels dry to the touch. Avoid getting water on the leaves, as this can promote fungal diseases.
2. Fertilizing: Feed your bok choy with a balanced liquid fertilizer every 2-3 weeks. Follow the instructions on the fertilizer package for proper dilution.
3. Pest Control: Keep an eye out for common pests like aphids and cabbage worms. If you spot any pests, you can try washing them off with a strong stream of water or using an insecticidal soap.
4. Air Circulation: Good air circulation is essential for preventing fungal diseases. Make sure your plants have enough space between them, and consider using a small fan to circulate the air.
5. Temperature Regulation: While bok choy can tolerate cooler temperatures, it’s important to protect it from frost. If you live in a cold climate, bring your plants indoors during the winter months.
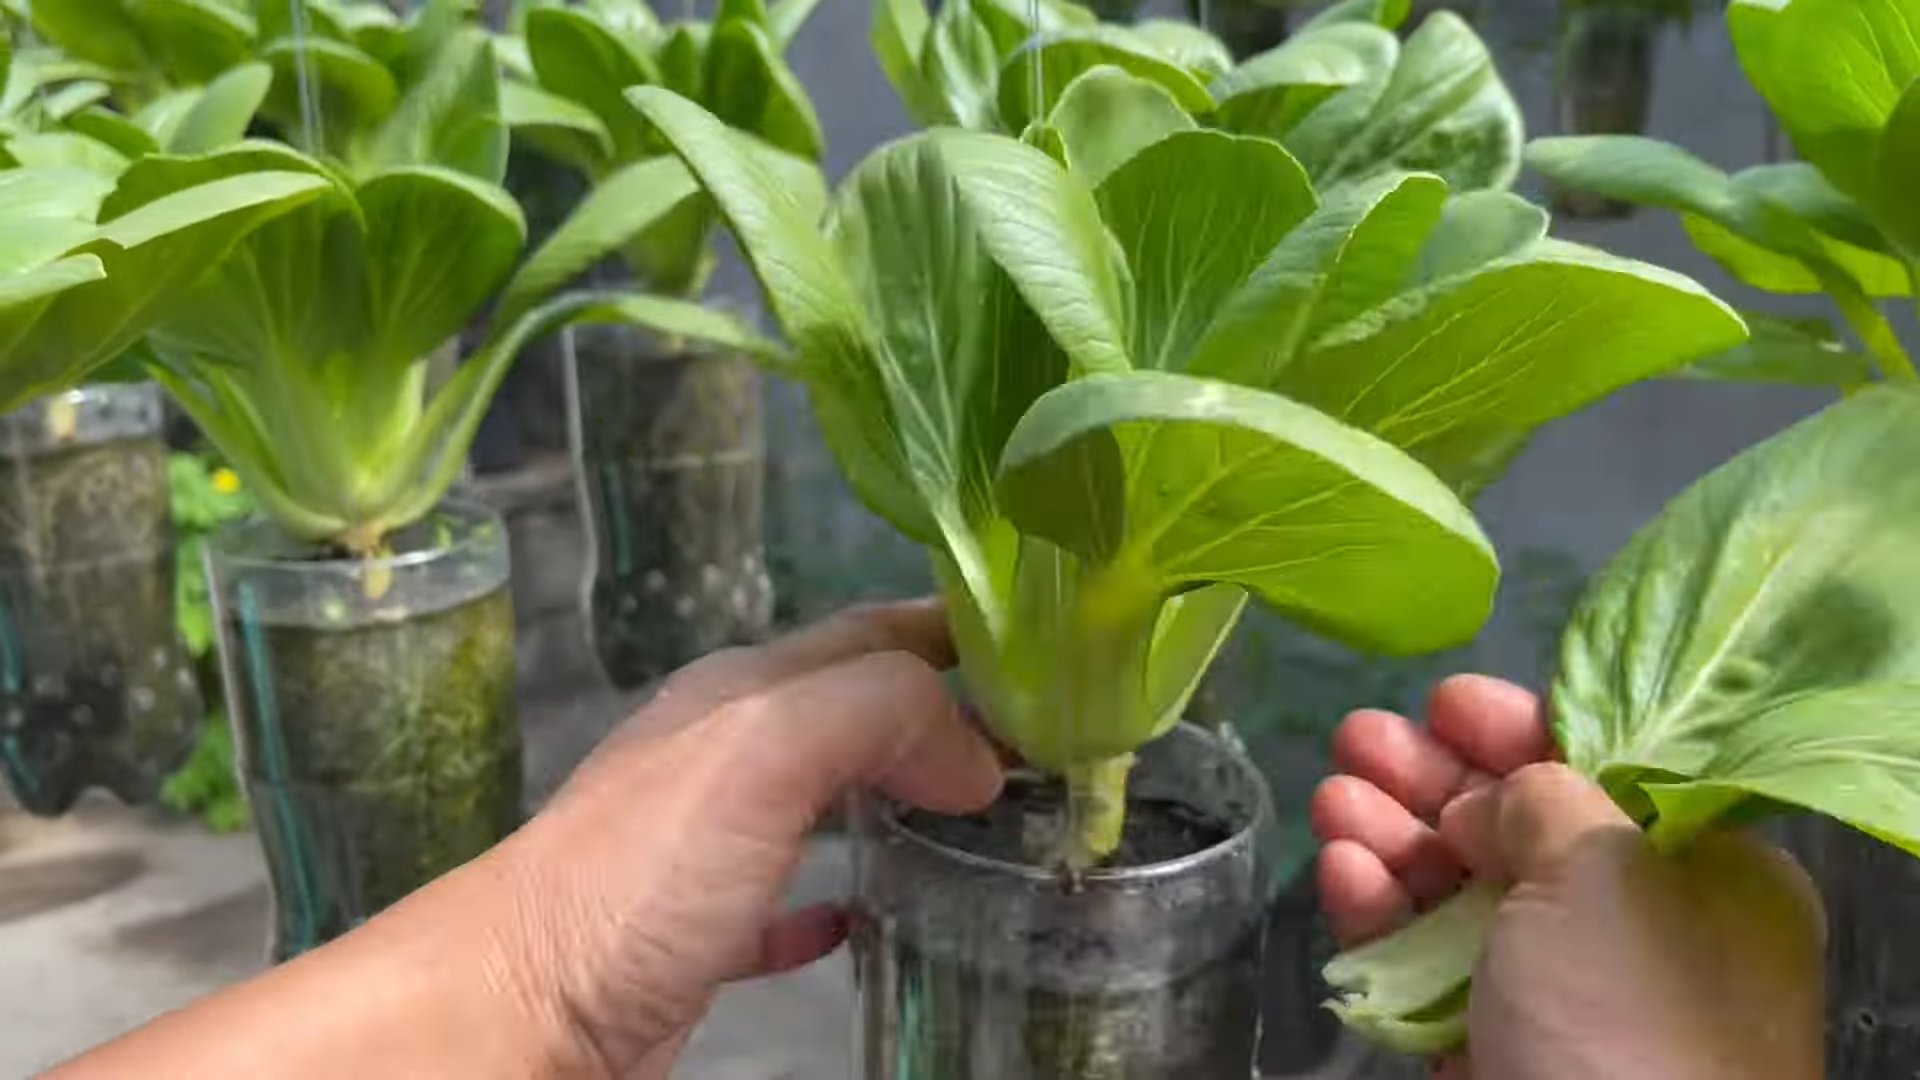
Harvesting Your Bok Choy
The best part of growing your own bok choy is, of course, the harvest!
1. When to Harvest: You can start harvesting baby bok choy when the leaves are about 4-6 inches long. For larger varieties, wait until the heads are fully formed.
2. How to Harvest: You can harvest the entire head of bok choy by cutting it off at the base with a sharp knife. Alternatively, you can harvest individual leaves as needed, starting with the outer leaves.
3. Enjoying Your Harvest: Freshly harvested bok choy is delicious in salads, stir-fries, soups, and more. Store any leftover bok choy in the refrigerator for up to a week.
Troubleshooting Common Issues
Even with the best care, you might encounter some challenges along the way. Here are a few common issues and how to address them:
* Yellowing Leaves: This could be a sign of overwatering, underwatering, or nutrient deficiency. Adjust your watering schedule and fertilize your plants if needed.
* Leggy Growth: This indicates that your plants aren’t getting enough light. Move them to a sunnier location or provide supplemental lighting.
* Pest Infestations: As mentioned earlier, keep an eye out for pests and take action promptly.
* Bolting: Bolting occurs when bok choy flowers prematurely, usually due to stress from heat or lack of water. To prevent bolting, keep your plants well-watered and provide shade during hot weather.
Tips for Success
Here are a few extra tips to help you succeed with your indoor bok choy garden:
* Choose the Right Pot Size: Make sure your pots are large enough to accommodate the mature size of your bok choy variety.
* Use Well-Draining Soil: Avoid using heavy, compacted soil, as this can lead to root rot.
* Provide Adequate Light: Bok choy needs plenty of light to thrive. If you don’t have a sunny windowsill, invest in grow lights.
* Water Regularly: Keep the soil consistently moist, but avoid overwatering.
* Fertilize Regularly: Feed your plants with a balanced liquid fertilizer every 2-3 weeks.
* Monitor for Pests and Diseases: Keep an eye out for any signs of pests or diseases and take action promptly.
* Rotate Your Crops: If you’re growing bok choy in the same pots year after year, consider rotating your crops to prevent soilborne diseases.
Experiment and Have Fun!
Growing bok choy indoors is a rewarding experience. Don’t be afraid to experiment with different varieties and techniques to find what works best for you. And most importantly, have fun! With a little patience and care, you’ll be enjoying fresh, homegrown bok choy in no time. Happy gardening!
Conclusion
So, there you have it! Growing bok choy indoors is not only achievable, but it’s also a surprisingly rewarding experience. Forget those limp, overpriced heads of bok choy at the grocery store. Imagine stepping into your kitchen and harvesting crisp, vibrant leaves whenever you need them. This DIY approach puts you in complete control of your produce, ensuring freshness and quality that you simply can’t replicate with store-bought options.
Why is this a must-try? Because it’s about more than just saving money (although that’s a definite perk!). It’s about connecting with your food, understanding its growth cycle, and enjoying the satisfaction of nurturing something from seed to table. Plus, it’s a fantastic way to add a touch of green to your living space, especially during those long winter months when fresh produce feels scarce.
But the beauty of this method lies in its adaptability. Feel free to experiment with different varieties of bok choy. Baby bok choy, with its tender leaves and mild flavor, is a great option for salads. Or, try Shanghai bok choy, known for its spoon-shaped leaves and slightly sweeter taste. You can also play around with different lighting setups. While a grow light is ideal, a sunny windowsill can also work, especially if you supplement it with a reflective surface to maximize light exposure.
Consider also the container you use. While we’ve discussed standard pots, you could also explore using self-watering containers or even repurposing items like plastic tubs or buckets. Just ensure proper drainage to prevent root rot. And don’t forget about companion planting! Herbs like basil or chives can be grown alongside your bok choy, potentially deterring pests and enhancing the flavor of your harvest.
The key to successful indoor bok choy cultivation is consistent care and attention. Regularly check the soil moisture, provide adequate light, and monitor for any signs of pests or diseases. With a little effort, you’ll be rewarded with a continuous supply of fresh, delicious bok choy.
We wholeheartedly encourage you to give this DIY trick a try. It’s a simple, cost-effective, and incredibly satisfying way to enjoy fresh produce year-round. And most importantly, don’t be afraid to experiment and find what works best for you and your growing environment.
Once you’ve harvested your first batch of homegrown bok choy, we’d love to hear about your experience! Share your tips, tricks, and photos in the comments below. Let’s build a community of indoor bok choy enthusiasts and inspire others to embrace the joys of homegrown goodness. This method of growing bok choy indoors is a game changer!
Frequently Asked Questions (FAQ)
What are the best varieties of bok choy to grow indoors?
While most bok choy varieties can be grown indoors, some are better suited than others due to their size and growth habits. Baby bok choy is a popular choice because it matures quickly and stays relatively small, making it ideal for container gardening. Shanghai bok choy is another excellent option, known for its mild flavor and compact size. Dwarf varieties, specifically bred for container gardening, are also readily available and can be a great choice for smaller spaces. Ultimately, the best variety depends on your personal preference and the space you have available. Experimenting with different varieties is a great way to discover your favorite!
How much light does bok choy need when grown indoors?
Bok choy thrives in bright light, requiring at least 6 hours of direct sunlight per day. However, since indoor environments often lack sufficient natural light, supplementing with artificial lighting is usually necessary. Grow lights are the most effective option, providing the full spectrum of light that bok choy needs to flourish. Fluorescent lights or LED grow lights are both good choices. Position the lights a few inches above the plants and adjust as they grow. If you’re using a sunny windowsill, rotate the plants regularly to ensure even light exposure. Signs of insufficient light include leggy growth (long, thin stems) and pale leaves.
What type of soil is best for growing bok choy indoors?
Bok choy prefers well-draining, nutrient-rich soil. A good potting mix specifically formulated for vegetables is ideal. You can also create your own mix by combining equal parts of potting soil, compost, and perlite or vermiculite. Compost provides essential nutrients, while perlite or vermiculite improves drainage and aeration. Avoid using garden soil, as it can be too heavy and may contain pests or diseases. Before planting, amend the soil with a slow-release fertilizer to provide a steady supply of nutrients throughout the growing season.
How often should I water my indoor bok choy plants?
Water bok choy regularly, keeping the soil consistently moist but not waterlogged. Check the soil moisture by sticking your finger about an inch deep. If it feels dry, it’s time to water. Water deeply, allowing excess water to drain out of the bottom of the pot. Avoid overhead watering, as this can promote fungal diseases. During warmer months, you may need to water more frequently. Overwatering can lead to root rot, so it’s crucial to ensure proper drainage.
What are some common pests and diseases that affect indoor bok choy, and how can I prevent them?
Common pests that can affect indoor bok choy include aphids, spider mites, and whiteflies. Regularly inspect your plants for signs of infestation, such as small insects on the leaves or webbing. To prevent pests, keep your growing area clean and well-ventilated. You can also use insecticidal soap or neem oil to control infestations. Fungal diseases, such as powdery mildew, can also be a problem, especially in humid environments. Ensure good air circulation and avoid overhead watering to prevent fungal growth. If you notice signs of disease, remove affected leaves and treat with a fungicide.
How long does it take for bok choy to mature when grown indoors?
The time it takes for bok choy to mature indoors depends on the variety and growing conditions. Baby bok choy typically matures in about 30-40 days, while larger varieties may take 45-60 days. You can start harvesting leaves as soon as they are large enough to eat. Regularly harvesting outer leaves will encourage continued growth.
Can I grow bok choy indoors year-round?
Yes, you can grow bok choy indoors year-round, provided you provide adequate light, water, and nutrients. Indoor environments offer a controlled setting, allowing you to maintain optimal growing conditions regardless of the season.
How do I harvest bok choy grown indoors?
You can harvest bok choy by either cutting the entire head at the base or by harvesting individual outer leaves as needed. Harvesting individual leaves allows the plant to continue producing, providing a continuous supply of fresh greens. Use a sharp knife or scissors to avoid damaging the plant.
Is it necessary to fertilize bok choy grown indoors?
Yes, fertilizing is essential for healthy bok choy growth indoors. Use a balanced liquid fertilizer or a slow-release fertilizer specifically formulated for vegetables. Follow the instructions on the fertilizer label for application rates and frequency. Fertilize regularly, especially during the active growing season.
What are some creative ways to use homegrown bok choy?
Homegrown bok choy is incredibly versatile and can be used in a variety of dishes. Add it to stir-fries, soups, salads, or steamed dishes. It can also be grilled or sautéed as a side dish. The tender leaves and crisp stalks offer a delightful flavor and texture to any meal. Experiment with different recipes and enjoy the fresh, homegrown taste of your bok choy!
Leave a Comment