
Grow Microgreens Indoors and unlock a world of fresh, flavorful, and nutrient-packed goodness right in your own home! Have you ever dreamed of having a constant supply of vibrant greens, even when the weather outside is frightful? Well, dream no more! This DIY guide will empower you to cultivate these tiny powerhouses with ease, transforming your kitchen counter into a miniature, edible garden.
The practice of growing microgreens dates back centuries, with evidence suggesting their use in fine dining as early as the 1980s in California. But their appeal isn’t just about culinary trends; these little sprouts are packed with vitamins and minerals, often exceeding the nutritional value of their mature counterparts. Plus, they add a burst of color and texture to any dish.
In today’s fast-paced world, access to fresh, healthy food can sometimes be a challenge. That’s where this DIY trick comes in. Learning how to grow microgreens indoors is a game-changer. It’s a simple, affordable, and sustainable way to boost your diet, reduce your reliance on store-bought produce, and connect with nature, even in the heart of the city. I’m excited to share my favorite tips and tricks to help you get started on your microgreen journey. Let’s get growing!
Grow Your Own Microgreens Indoors: A Beginner’s Guide
Hey there, fellow plant enthusiasts! Ever wanted to have fresh, nutrient-packed greens right at your fingertips, no matter the season? Well, you’re in the right place! I’m going to walk you through the super easy and rewarding process of growing microgreens indoors. Trust me, even if you think you have a “brown thumb,” you can totally nail this.
What are Microgreens, Anyway?
Microgreens are basically baby versions of vegetables and herbs, harvested just a week or two after germination. They’re packed with flavor and nutrients, often even more so than their mature counterparts. Plus, they’re incredibly versatile – you can toss them in salads, add them to sandwiches, use them as a garnish, or even blend them into smoothies.
Why Grow Microgreens Indoors?
Growing microgreens indoors is fantastic for a bunch of reasons:
* Year-Round Availability: Forget relying on seasonal produce! You can have fresh microgreens whenever you want.
* Space-Saving: You don’t need a huge garden. Microgreens thrive in small containers, making them perfect for apartments or homes with limited outdoor space.
* Fast Results: Unlike growing full-sized vegetables, microgreens are ready to harvest in just a week or two. Instant gratification!
* Nutrient-Rich: As I mentioned, microgreens are nutritional powerhouses. They’re loaded with vitamins, minerals, and antioxidants.
* Cost-Effective: Once you have your initial setup, growing microgreens is relatively inexpensive.
* Fun and Educational: It’s a great project for kids (and adults!) to learn about plant growth and where their food comes from.
Getting Started: What You’ll Need
Okay, let’s gather our supplies. The good news is that you probably already have some of these items at home!
* Seeds: This is the most important part! Choose seeds specifically labeled for microgreens. Some popular options include:
* Radish
* Broccoli
* Sunflower
* Pea shoots
* Mustard
* Arugula
* Kale
* Cress
* Beet
* Choose organic seeds whenever possible.
* Growing Trays: You’ll need two trays: one with drainage holes and one without. The tray without holes will act as a water reservoir. You can find these at most garden centers or online. I often reuse plastic takeout containers, just make sure they are clean and have drainage holes added.
* Growing Medium: You have a few options here:
* Seed Starting Mix: This is a lightweight, sterile mix that’s perfect for germination.
* Coco Coir: Made from coconut husks, coco coir is a sustainable and well-draining option.
* Hemp Mats: These are biodegradable mats that provide a clean and easy growing surface.
* I prefer seed starting mix because it’s readily available and works well for most microgreens.
* Spray Bottle: You’ll use this to mist your microgreens regularly.
* Water: Filtered water is best, but tap water that’s been left out overnight to dechlorinate will also work.
* Light Source: Microgreens need light to grow. A sunny windowsill can work, but a grow light will provide more consistent results, especially during the darker months. I use a simple LED shop light.
* Optional:
* Humidity Dome: This helps to create a humid environment that promotes germination. You can use a clear plastic lid or even a plastic bag.
* Heat Mat: This can speed up germination, especially in cooler climates.
Step-by-Step Guide to Growing Microgreens
Alright, let’s get our hands dirty! Here’s a detailed guide to growing your own microgreens:
Phase 1: Sowing the Seeds
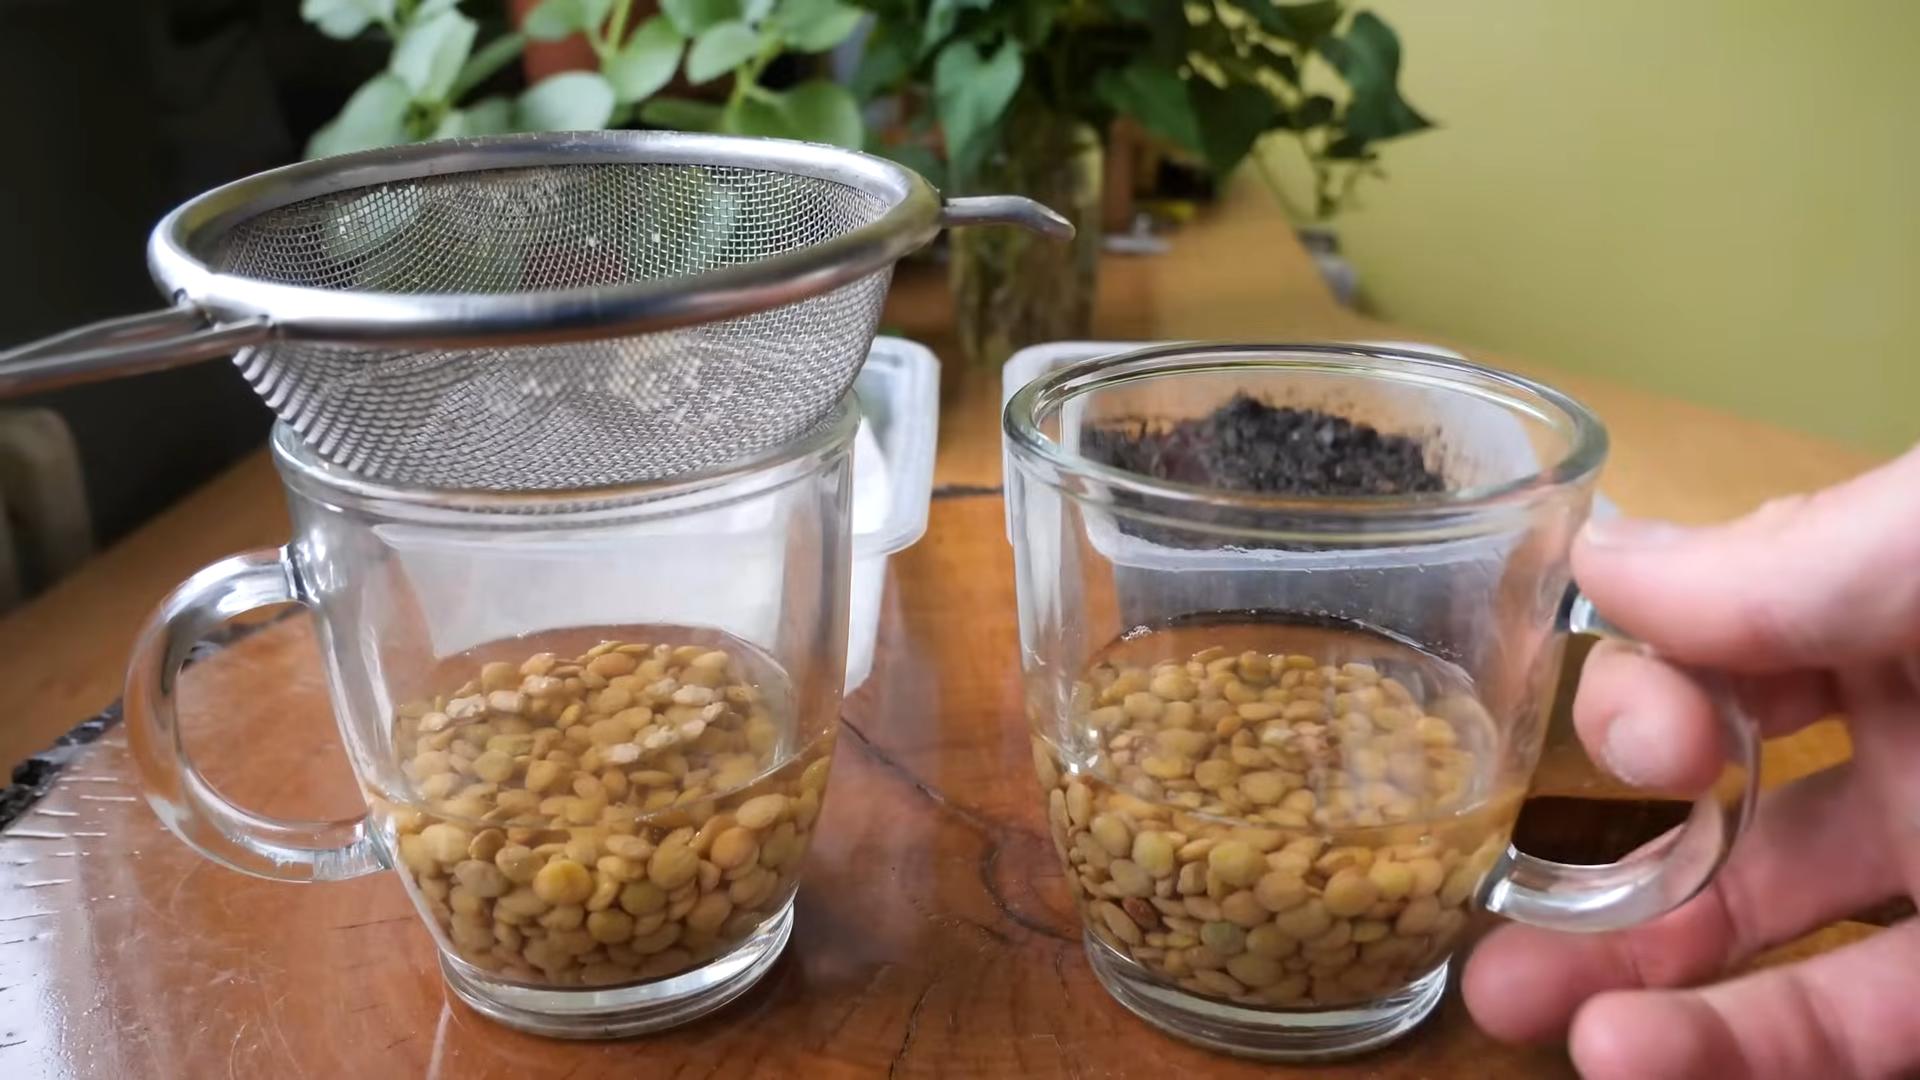
1. Prepare the Growing Tray: If you’re using seed starting mix or coco coir, moisten it thoroughly with water. It should be damp but not soggy. Fill the tray with drainage holes about 1-2 inches deep with the moistened growing medium. Gently level the surface.
2. Sow the Seeds: Sprinkle the seeds evenly over the surface of the growing medium. Don’t overcrowd them! You want them to be close enough together to form a dense mat, but not so close that they’re competing for resources. Refer to the seed packet for specific seeding density recommendations. For smaller seeds like radish or broccoli, I aim for about 10-15 seeds per square inch. For larger seeds like sunflower or pea shoots, I use fewer seeds.
3. Gently Press the Seeds: Lightly press the seeds into the growing medium. You can use your fingers or a flat object like a spatula. This helps ensure good contact between the seeds and the soil.
4. Mist with Water: Gently mist the seeds with water using your spray bottle. You want to moisten the seeds without dislodging them.
5. Cover the Tray: Cover the tray with a humidity dome or a plastic bag. This will help to create a humid environment that promotes germination. If you’re using a plastic bag, make sure to poke a few holes in it for ventilation.
6. Weighting (Optional but Recommended): Place a light weight on top of the covered tray. This helps to ensure even germination and encourages the microgreens to grow strong stems. You can use another tray filled with a few books or a brick wrapped in plastic. I often use a small cutting board.
Phase 2: Germination and Blackout Period
1. Place in a Dark Location: Place the covered tray in a dark, warm location. This is known as the “blackout period.” The darkness encourages the seeds to germinate and sprout. A closet, cabinet, or even under the sink will work.
2. Maintain Moisture: Check the tray daily to make sure the growing medium is still moist. If it’s starting to dry out, gently mist it with water.
3. Monitor Germination: Depending on the type of seed, germination typically takes 2-5 days. You’ll know the seeds have germinated when you see small sprouts emerging.
Phase 3: Introducing Light and Green Growth
1. Remove the Weight and Cover: Once the seeds have germinated, remove the weight and cover.
2. Introduce Light: Place the tray under a grow light or in a sunny windowsill. If you’re using a grow light, position it a few inches above the microgreens.
3. Water from the Bottom: This is where the second tray comes in handy. Fill the tray without drainage holes with about an inch of water. Place the tray with the microgreens inside the water-filled tray. The growing medium will absorb the water from the bottom, which helps to prevent damping off (a fungal disease that can kill young seedlings). Allow the microgreens to soak up the water for about 15-20 minutes, then remove the tray and drain any excess water.
4. Rotate the Tray: If you’re using a windowsill, rotate the tray daily to ensure that the microgreens receive even light. This will prevent them from leaning towards the light source.
5. Maintain Moisture: Continue to water the microgreens from the bottom as needed. The frequency will depend on the temperature and humidity of your environment. Check the growing medium daily and water when it starts to feel dry.
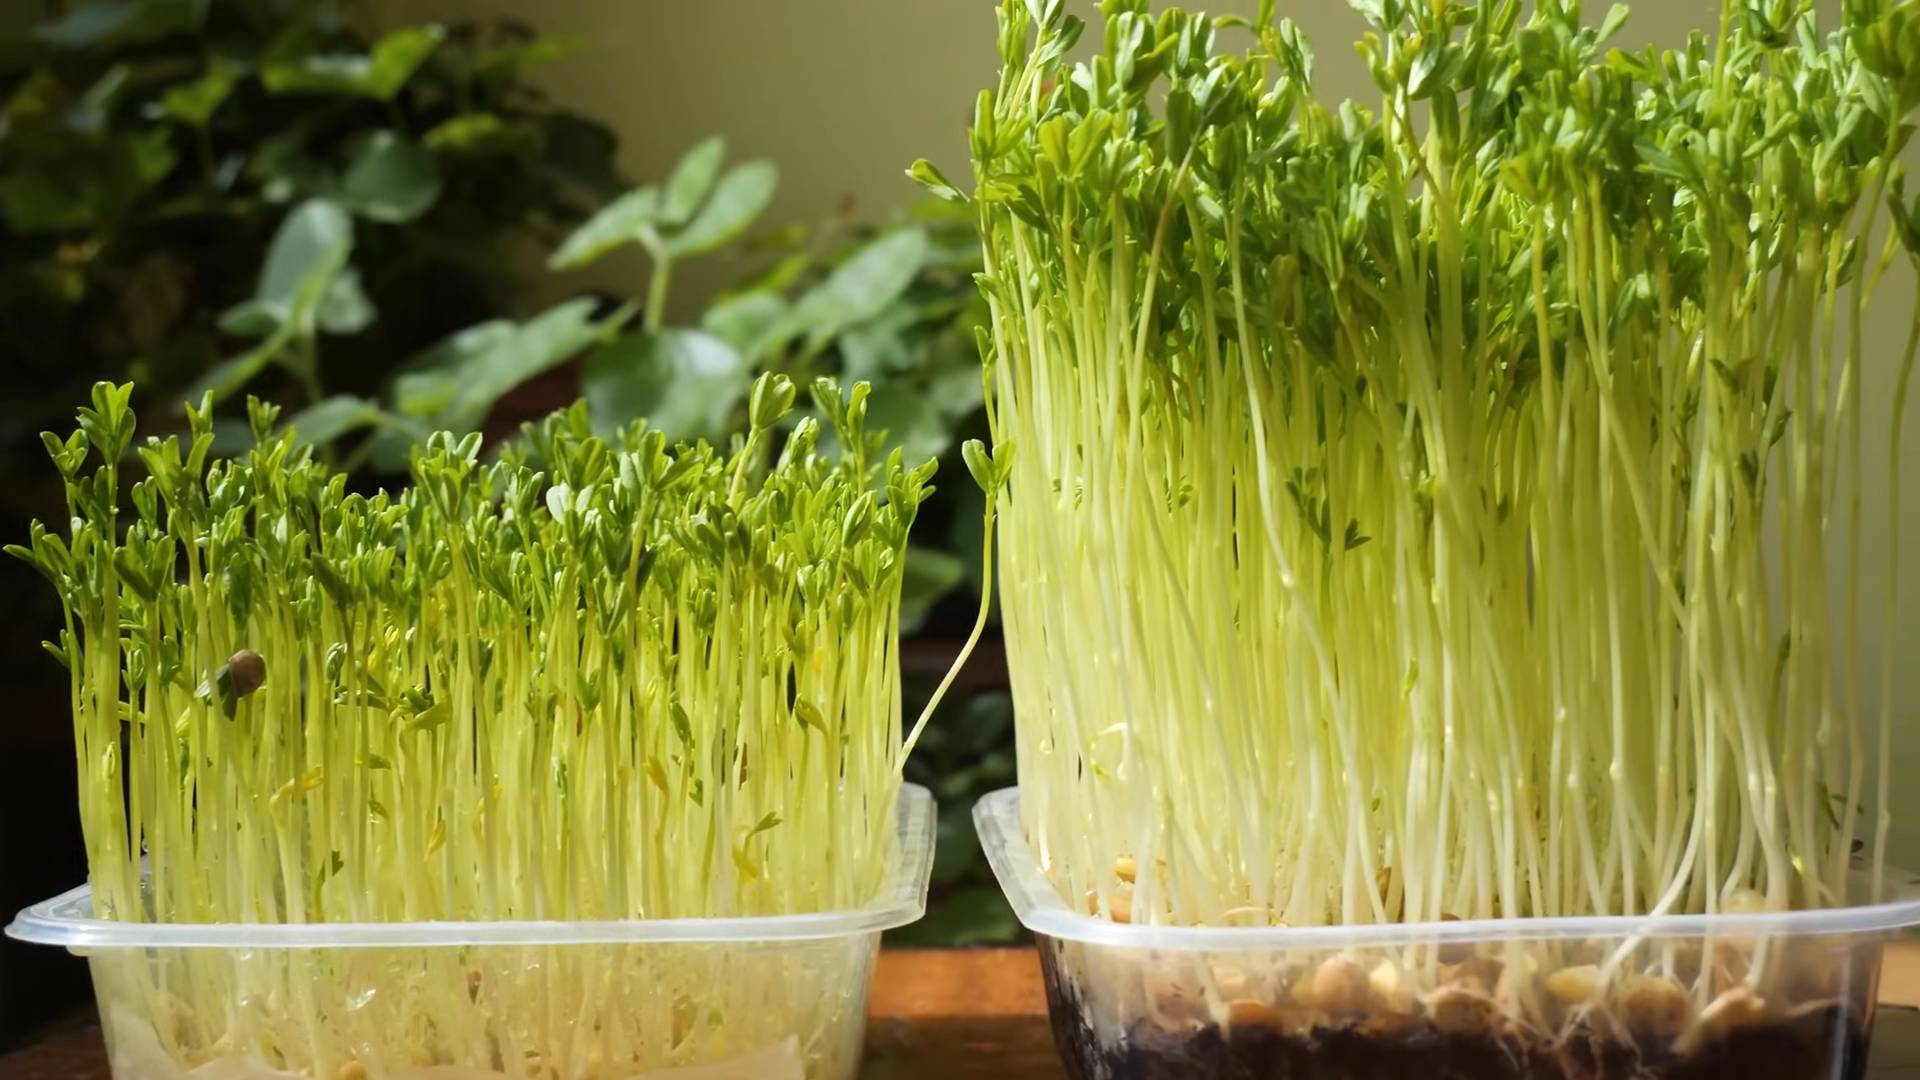
6. Observe and Enjoy: Watch your microgreens grow! You’ll see them start to develop their first true leaves (the second set of leaves that appear after the cotyledons, or seed leaves).
Phase 4: Harvesting and Enjoying Your Microgreens
1. Harvest Time: Your microgreens are ready to harvest when they have developed their first true leaves and are about 1-3 inches tall. This typically takes 7-14 days, depending on the type of seed.
2. Harvesting Technique: Use sharp scissors or a knife to cut the microgreens just above the growing medium.
3. Washing (Optional): Gently wash the microgreens in cool water to remove any remaining growing medium.
4. Drying: Pat the microgreens dry with a paper towel or spin them in a salad spinner.
5. Storage: Store the harvested microgreens in a sealed container in the refrigerator. They will typically last for about a week.
6. Enjoy! Add your fresh, homegrown microgreens to salads, sandwiches, soups, smoothies, or use them as a garnish. Get creative and experiment with different flavors!
Troubleshooting Tips
* Mold: If you see mold growing on your microgreens, it’s usually a sign of overwatering or poor ventilation. Remove the affected areas and improve air circulation by removing the humidity dome or adding a small fan. You can also try spraying the
Conclusion
So, there you have it! Growing microgreens indoors is not only incredibly simple and rewarding, but it’s also a fantastic way to boost your nutrient intake and add a burst of fresh flavor to your meals, all year round. Forget those expensive, pre-packaged containers from the grocery store. With just a few basic supplies and a little bit of patience, you can cultivate your own vibrant, delicious microgreens right in the comfort of your home.
We’ve walked you through the entire process, from selecting the right seeds and containers to providing the optimal growing conditions and harvesting your bounty. The beauty of this DIY project lies in its adaptability. Feel free to experiment with different seed varieties to discover your favorite flavor combinations. Try a spicy radish microgreen mix for a zesty kick, or a mild broccoli microgreen blend for a subtle, earthy taste. You can even tailor your microgreen garden to complement specific dishes or cuisines.
Consider using different types of growing mediums, too. While soil is a classic choice, you can also explore soilless options like coconut coir or hemp mats. Each medium offers its own unique benefits and can influence the growth rate and flavor of your microgreens.
Don’t be afraid to get creative with your containers! While we recommended shallow trays, you can repurpose plastic takeout containers, yogurt cups, or even egg cartons. Just make sure they have drainage holes to prevent waterlogging.
The key takeaway is that growing microgreens indoors is accessible to everyone, regardless of their gardening experience or living space. It’s a sustainable, cost-effective, and incredibly satisfying way to enjoy fresh, healthy greens.
We truly believe that once you experience the joy of harvesting your own homegrown microgreens, you’ll be hooked. The vibrant colors, the intense flavors, and the satisfaction of knowing you grew them yourself are simply unmatched.
So, what are you waiting for? Gather your supplies, choose your seeds, and embark on your microgreen growing adventure today! We’re confident that you’ll be amazed by the results.
And most importantly, we want to hear about your experience! Share your photos, tips, and questions in the comments below. Let’s create a community of microgreen enthusiasts and inspire others to discover the joys of indoor gardening. Tell us what varieties you tried, what challenges you faced, and what successes you celebrated. Your feedback will not only help us improve this guide but also empower other aspiring microgreen growers. Let’s all learn and grow together!
Frequently Asked Questions (FAQ)
What exactly are microgreens, and why should I grow them?
Microgreens are young vegetable greens that are harvested just after the cotyledon leaves (the first leaves to emerge from the seed) have developed, and sometimes after the first true leaves have appeared. They are typically about 1-3 inches tall and are packed with nutrients, often containing higher concentrations of vitamins and minerals than their mature counterparts. Growing microgreens indoors allows you to have access to fresh, healthy greens year-round, regardless of the weather or your access to outdoor gardening space. They are also incredibly flavorful and can add a vibrant touch to salads, sandwiches, soups, and other dishes. Plus, it’s a fun and rewarding DIY project!
What are the best seeds to use for growing microgreens indoors?
The possibilities are endless! Some popular choices include:
* **Brassicas:** Broccoli, kale, radish, cabbage, mustard
* **Legumes:** Peas, lentils, chickpeas
* **Cereals:** Wheatgrass, barley, oats
* **Leafy Greens:** Arugula, spinach, lettuce
* **Herbs:** Basil, cilantro, dill
Experiment with different varieties to find your favorites. Look for seeds specifically labeled for microgreens or sprouting, as these are typically untreated and have a higher germination rate. Avoid using seeds that have been treated with fungicides or other chemicals.
What kind of container should I use?
Shallow trays with drainage holes are ideal. You can purchase dedicated microgreen trays or repurpose plastic takeout containers, yogurt cups, or even egg cartons. Just make sure the container is clean and has adequate drainage to prevent waterlogging. The depth of the container isn’t crucial, as microgreens don’t need a lot of soil. A depth of 1-2 inches is usually sufficient.
What kind of soil or growing medium should I use?
A good quality potting mix works well for growing microgreens indoors. You can also use soilless options like coconut coir, hemp mats, or even paper towels. Coconut coir is a sustainable and readily available option that provides good drainage and aeration. Hemp mats are another eco-friendly choice that provides a clean and consistent growing surface. If using paper towels, make sure to keep them consistently moist.
How much light do microgreens need?
Microgreens need plenty of light to thrive. A sunny windowsill that receives at least 4-6 hours of direct sunlight per day is a good starting point. However, if you don’t have access to a sunny windowsill, or if you live in a climate with limited sunlight, you can use grow lights. LED grow lights are energy-efficient and provide the full spectrum of light that microgreens need to grow. Position the grow lights a few inches above the microgreens and keep them on for 12-16 hours per day.
How often should I water my microgreens?
Keep the growing medium consistently moist, but not waterlogged. Water gently from the bottom by placing the tray in a shallow dish of water and allowing the medium to absorb the water. You can also use a spray bottle to mist the microgreens from above. Avoid overwatering, as this can lead to mold growth.
How long does it take for microgreens to grow?
The growth time varies depending on the seed variety, but most microgreens are ready to harvest in 7-14 days. You’ll know they’re ready when the cotyledon leaves are fully developed and the first true leaves have emerged.
How do I harvest microgreens?
Use sharp scissors or a knife to cut the microgreens just above the soil line. Harvest only what you need, and store the remaining microgreens in the refrigerator in a sealed container. They will typically last for up to a week.
What if my microgreens get moldy?
Mold growth is usually caused by overwatering or poor air circulation. If you notice mold, remove the affected areas immediately. Improve air circulation by placing a small fan near the microgreens. Avoid overwatering and ensure that the growing medium is well-draining. You can also try spraying the microgreens with a diluted solution of hydrogen peroxide (1 part hydrogen peroxide to 10 parts water).
Can I reuse the soil after harvesting microgreens?
It’s generally not recommended to reuse the soil after harvesting microgreens, as it may contain pathogens or depleted nutrients. It’s best to start with fresh soil for each batch of microgreens. You can compost the used soil to enrich your garden.


Leave a Comment