
Grow Ananas Melons at Home? Absolutely! Imagine biting into a juicy, fragrant Ananas melon, bursting with sweetness, knowing you nurtured it from seed to fruit, right in your own backyard. It’s not just a dream; it’s an achievable reality with a little know-how and some DIY spirit. For centuries, cultivating melons has been a cherished practice across various cultures, symbolizing abundance and prosperity. From ancient Egypt to the royal gardens of Europe, melons have held a special place in culinary history.
But why should you bother with the effort? Well, store-bought melons often lack the intense flavor and freshness of homegrown varieties. Plus, there’s immense satisfaction in creating something delicious with your own hands. This DIY guide will provide you with simple, effective tricks and hacks to successfully grow Ananas Melons at Home, even if you’re a beginner gardener. I’ll walk you through everything from seed selection and soil preparation to pest control and harvesting, ensuring you enjoy a bountiful harvest of these delectable melons. Get ready to transform your garden into a melon paradise!
Grow Your Own Pineapple Melon Paradise at Home!
Okay, melon lovers, gather ’round! I’m about to share my secrets for growing juicy, fragrant Pineapple Melons right in your own backyard (or even in containers!). It might sound intimidating, but trust me, with a little patience and these simple steps, you’ll be enjoying homegrown melon goodness in no time.
Choosing Your Seeds and Starting Indoors (Optional, but Recommended)
Starting your Pineapple Melon seeds indoors gives them a head start, especially if you live in a region with a shorter growing season. Here’s how I do it:
* Seed Selection is Key: Look for high-quality Pineapple Melon seeds from a reputable source. Read reviews and choose varieties known for their flavor and disease resistance. I personally love the ‘Honey Gold’ variety for its sweetness.
* Timing is Everything: Start your seeds indoors about 4-6 weeks before the last expected frost in your area. This gives the seedlings enough time to develop before transplanting them outdoors.
* Gather Your Supplies: You’ll need seed starting trays or small pots, seed starting mix (not regular potting soil!), a spray bottle, and a warm, sunny location or a grow light.
* Sowing the Seeds: Fill your seed starting trays or pots with the seed starting mix. Moisten the mix thoroughly with the spray bottle. Plant 2-3 seeds per cell or pot, about ½ inch deep. Gently cover the seeds with more mix.
* Creating a Greenhouse Effect: Cover the trays or pots with a clear plastic dome or plastic wrap to create a humid environment. This helps the seeds germinate.
* Warmth and Light: Place the trays or pots in a warm location (around 70-80°F) and provide plenty of light. If you don’t have a sunny window, use a grow light.
* Keep it Moist: Keep the seed starting mix consistently moist, but not soggy. Use the spray bottle to mist the soil as needed.
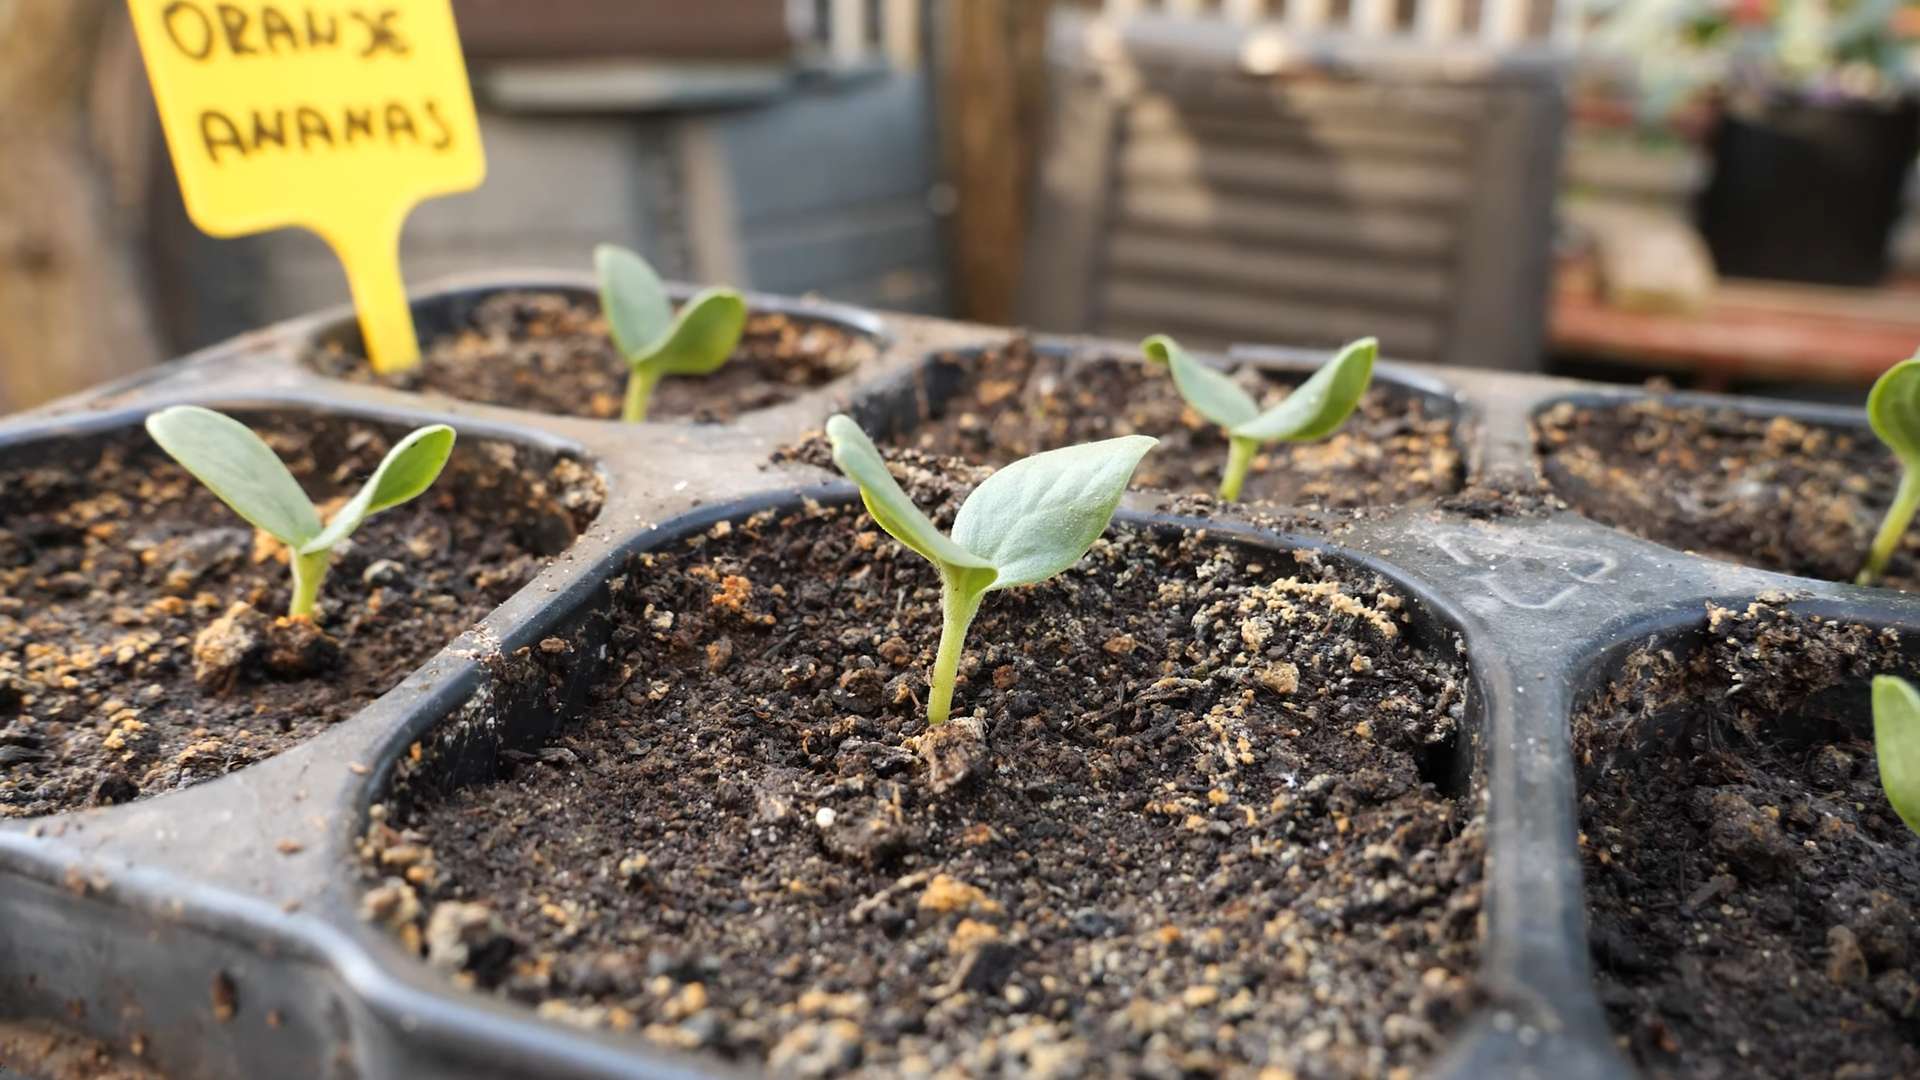
* Germination Time: Pineapple Melon seeds typically germinate in 7-14 days. Once the seedlings emerge, remove the plastic dome or wrap.
* Thinning the Seedlings: Once the seedlings have their first true leaves (the second set of leaves), thin them to one seedling per cell or pot. Choose the strongest, healthiest-looking seedling.
Preparing Your Garden Bed
Pineapple Melons are hungry plants, so preparing your garden bed properly is crucial for a bountiful harvest.
* Sunlight is Non-Negotiable: Choose a location that receives at least 6-8 hours of direct sunlight per day. Melons thrive in sunshine!
* Soil Matters: Pineapple Melons prefer well-drained, fertile soil with a pH between 6.0 and 6.8.
* Amend the Soil: Amend your soil with plenty of organic matter, such as compost, well-rotted manure, or leaf mold. This will improve drainage, fertility, and water retention. I usually add a generous layer of compost, about 2-3 inches thick, and work it into the soil.
* Raised Beds (Optional): Consider growing your Pineapple Melons in raised beds. Raised beds provide excellent drainage and warm up faster in the spring.
* Spacing is Important: Give your Pineapple Melon plants plenty of room to spread out. Space them about 2-3 feet apart in rows that are 4-6 feet apart. This allows for good air circulation, which helps prevent diseases.
* Weed Control: Remove any weeds from the planting area. Weeds compete with your melon plants for nutrients and water.
Transplanting Your Seedlings (or Direct Sowing)
Whether you started your seeds indoors or are direct sowing, this step is where the magic really begins.
* Harden Off Seedlings: If you started your seeds indoors, you’ll need to harden them off before transplanting them outdoors. This means gradually exposing them to outdoor conditions over a period of 7-10 days. Start by placing them in a sheltered location for a few hours each day, gradually increasing the amount of time they spend outdoors.
* Timing is Key (Again!): Transplant your seedlings outdoors after the last expected frost and when the soil has warmed up to at least 60°F.
* Planting Time: Dig a hole that is slightly larger than the root ball of your seedling. Gently remove the seedling from its pot and place it in the hole. Backfill with soil and gently firm it around the base of the plant.
* Water Thoroughly: Water the newly transplanted seedlings thoroughly. This helps settle the soil and encourages root growth.
* Direct Sowing (Alternative): If you’re direct sowing, plant the seeds about 1 inch deep and 2-3 feet apart. Water thoroughly. You may need to thin the seedlings later to ensure proper spacing.
Caring for Your Pineapple Melon Plants
Now comes the ongoing care that will lead to those delicious melons.
* Watering Wisely: Water your Pineapple Melon plants deeply and regularly, especially during hot, dry weather. Aim for about 1-2 inches of water per week. Water at the base of the plants to avoid wetting the foliage, which can lead to diseases. Drip irrigation is a great option.
* Fertilizing for Success: Fertilize your Pineapple Melon plants every 2-3 weeks with a balanced fertilizer. I like to use a fertilizer that is high in phosphorus and potassium, which promotes fruit development. You can also use a liquid seaweed fertilizer.
* Mulching Magic: Apply a layer of mulch around your Pineapple Melon plants. Mulch helps retain moisture, suppress weeds, and regulate soil temperature. Straw, wood chips, or shredded leaves are all good options.
* Pest Patrol: Keep an eye out for pests, such as aphids, squash bugs, and cucumber beetles. Handpick pests off the plants or use insecticidal soap or neem oil to control them.
* Disease Prevention: Pineapple Melons can be susceptible to diseases, such as powdery mildew and fusarium wilt. To prevent diseases, provide good air circulation, avoid overhead watering, and choose disease-resistant varieties. If you notice any signs of disease, treat the plants with a fungicide.
* Pruning (Optional): Some gardeners prune their Pineapple Melon plants to encourage fruit production. You can prune off any suckers (side shoots) that grow from the base of the plant. You can also prune off some of the leaves to improve air circulation.
* Supporting the Vines (Optional): If you’re growing your Pineapple Melons in a small space, you can train the vines to grow up a trellis or fence. This will save space and improve air circulation.
Harvesting Your Bounty
This is the moment you’ve been waiting for!
* Timing is Everything (Yet Again!): Pineapple Melons are typically ready to harvest about 80-90 days after planting.
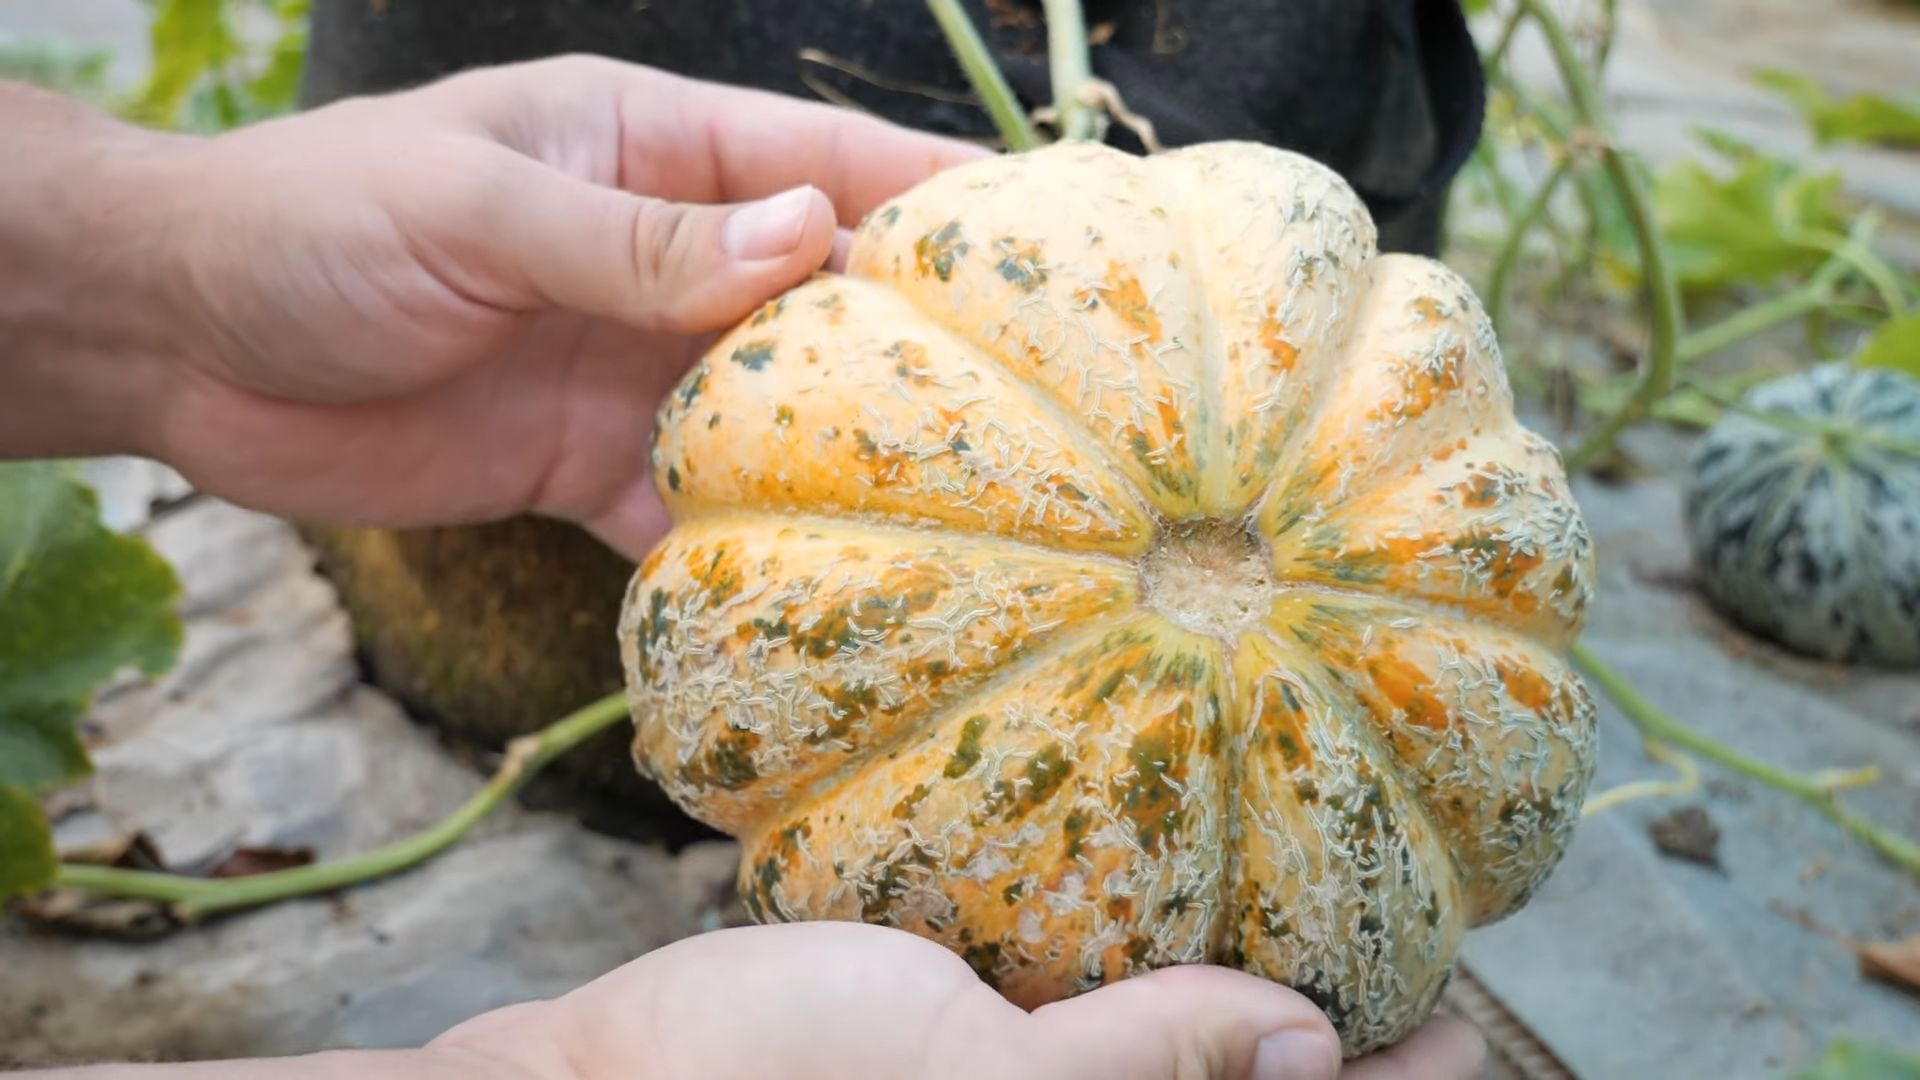
* Signs of Ripeness: Look for these signs of ripeness:
* The melon will have a fragrant aroma.
* The skin will turn from green to yellow or orange.
* The stem will start to dry out and crack near the point where it attaches to the melon.
* The melon will feel heavy for its size.
* The Gentle Tug Test: Gently tug on the melon. If it separates easily from the vine, it’s ripe.
* Cutting the Melon: If the melon doesn’t separate easily, use a sharp knife to cut it from the vine, leaving a short piece of stem attached.
* Enjoy Your Harvest: Store your Pineapple Melons in a cool, dry place. They will keep for several weeks. Enjoy them fresh, in salads, or in smoothies.
Troubleshooting Tips
Even with the best care, things can sometimes go wrong. Here are a few common problems and how to fix them:
* Poor Germination: Make sure your seeds are fresh and viable. Use a seed starting mix and keep the soil moist and warm.
* Yellowing Leaves: Yellowing leaves can be a sign of nutrient deficiency. Fertilize your plants with a balanced fertilizer.
* Lack of Fruit: Lack of fruit can be caused by poor pollination. Attract pollinators to your garden by planting flowers that attract bees and butterflies. You can also hand-pollinate the flowers.
* Pest Problems: Identify the pest and use appropriate control measures, such as handpicking, insecticidal soap, or neem oil.
* Disease Problems: Identify the disease and use appropriate control measures, such as fungicides.
Container Gardening with Pineapple Melons
Don’t have a garden? No problem! You can still grow Pineapple Melons in containers.
* Choose the Right Container: Select a large container that is at least 24 inches in diameter and 12 inches deep.
* Use a Good Potting Mix: Use a high-quality potting mix that drains well.
* Provide Support: Provide a trellis or other support
Conclusion
So, there you have it! Growing Ananas melons at home might seem like a tropical dream, but with a little patience, the right techniques, and this DIY trick, you can transform your garden into a personal melon paradise. We’ve walked you through the essentials, from selecting the perfect seeds to nurturing your seedlings and providing the ideal growing conditions. Remember, the key to success lies in consistent care, attention to detail, and a willingness to adapt to the unique needs of your plants.
This DIY approach isn’t just about saving money; it’s about connecting with nature, understanding the life cycle of your food, and experiencing the immense satisfaction of harvesting a delicious, homegrown Ananas melon. Imagine the sweet, aromatic flavor of a melon you nurtured from a tiny seed – a taste far superior to anything you can find in a grocery store.
But don’t stop there! Experiment with different varieties of Ananas melons. Try growing them in containers if you have limited space, or explore companion planting to enhance their growth and flavor. Consider using organic fertilizers and pest control methods to ensure a healthy and sustainable harvest. You could even try grafting your Ananas melon onto a more vigorous rootstock for increased disease resistance and yield.
The possibilities are endless!
We’re confident that with this guide, you’ll be well on your way to enjoying the sweet rewards of your own homegrown Ananas melons. Don’t be afraid to get your hands dirty, embrace the challenges, and celebrate the small victories along the way.
Now, it’s your turn! We encourage you to try this DIY trick for growing Ananas melons at home. Share your experiences, successes, and even your failures in the comments below. Let’s create a community of Ananas melon enthusiasts, sharing tips and tricks to help each other achieve the sweetest, most flavorful harvests possible. We can’t wait to hear your stories and see your beautiful Ananas melons! Happy gardening!
Frequently Asked Questions (FAQ)
Q: What exactly is an Ananas melon, and why should I grow it?
A: Ananas melons, also known as pineapple melons, are a unique variety of cantaloupe prized for their exceptionally sweet and aromatic flavor, reminiscent of pineapple. They are a delightful treat, perfect for eating fresh, adding to fruit salads, or even grilling. Growing them yourself allows you to enjoy a flavor and freshness that is simply unmatched by store-bought melons. Plus, it’s a rewarding gardening experience!
Q: What are the ideal growing conditions for Ananas melons?
A: Ananas melons thrive in warm, sunny locations with well-drained soil. They need at least 6-8 hours of direct sunlight per day. The soil should be rich in organic matter and have a pH between 6.0 and 6.8. Consistent watering is crucial, especially during fruit development, but avoid overwatering, which can lead to root rot. The ideal temperature range for growing Ananas melons is between 70°F and 90°F (21°C and 32°C).
Q: How long does it take to grow Ananas melons from seed?
A: From seed to harvest, Ananas melons typically take between 75 and 90 days. This timeframe can vary depending on the specific variety, growing conditions, and climate. Starting seeds indoors 4-6 weeks before the last expected frost can give you a head start.
Q: What are some common pests and diseases that affect Ananas melons, and how can I prevent them?
A: Common pests include aphids, squash bugs, cucumber beetles, and vine borers. Diseases include powdery mildew, fusarium wilt, and anthracnose. To prevent these problems, practice good garden hygiene, such as removing plant debris and weeds. Use row covers to protect young plants from pests. Choose disease-resistant varieties whenever possible. Consider using organic pest control methods like insecticidal soap or neem oil. Ensure proper air circulation to prevent fungal diseases.
Q: Can I grow Ananas melons in containers?
A: Yes, you can grow Ananas melons in containers, but you’ll need a large container (at least 20 gallons) with good drainage. Choose a dwarf or bush variety of Ananas melon that is better suited for container growing. Provide a trellis or support for the vines to climb. Water regularly and fertilize with a balanced fertilizer every 2-3 weeks.
Q: How do I know when my Ananas melon is ripe?
A: Several indicators suggest an Ananas melon is ripe. The skin will change color from green to a yellowish-tan. The stem will begin to crack or slip easily from the vine. The melon will also emit a sweet, fragrant aroma. Gently press on the blossom end of the melon; it should feel slightly soft.
Q: What are some good companion plants for Ananas melons?
A: Good companion plants for Ananas melons include marigolds (to deter pests), nasturtiums (to attract beneficial insects), basil (to repel insects), and oregano (to improve flavor). Avoid planting Ananas melons near potatoes or other members of the cucurbit family (like cucumbers and squash), as they can compete for nutrients and attract similar pests.
Q: Can I save seeds from my Ananas melons to plant next year?
A: Yes, you can save seeds from your Ananas melons, but keep in mind that if the melon was cross-pollinated with another variety, the seeds may not produce true-to-type plants. To save seeds, scoop them out of a ripe melon, rinse them thoroughly, and spread them out on a paper towel to dry completely. Store the dried seeds in an airtight container in a cool, dark place.
Q: What kind of fertilizer should I use for Ananas melons?
A: Use a balanced fertilizer (e.g., 10-10-10) when planting Ananas melons. Once the plants start to flower, switch to a fertilizer with a higher phosphorus content (e.g., 5-10-5) to promote fruit development. You can also supplement with compost or other organic fertilizers. Avoid over-fertilizing, as this can lead to excessive vine growth and reduced fruit production.
Q: My Ananas melon vines are growing, but I’m not getting any fruit. What could be the problem?
A: Several factors can contribute to a lack of fruit production. Insufficient pollination is a common issue. Ensure there are plenty of bees and other pollinators in your garden. You can also hand-pollinate the flowers if necessary. Other potential problems include inadequate sunlight, poor soil fertility, overwatering, or pest infestations. Check your plants regularly and address any issues promptly.
Q: How can I improve the flavor of my Ananas melons?
A: To improve the flavor of your Ananas melons, ensure they receive adequate sunlight and water. Avoid overwatering, as this can dilute the flavor. Provide a balanced fertilizer to promote healthy growth and fruit development. Consider adding compost or other organic matter to the soil to improve its fertility and drainage. Finally, harvest the melons at the peak of ripeness for the best flavor.
Leave a Comment