
Growing Red Cabbage might seem intimidating, but trust me, it’s a rewarding experience that brings vibrant color and delicious flavor right to your backyard! Have you ever dreamt of harvesting your own jewel-toned heads of cabbage, ready to be transformed into tangy slaws or hearty braised dishes? This isn’t just about gardening; it’s about connecting with a tradition that stretches back centuries. Cabbage, in its various forms, has been a staple in diets across the globe, from ancient Rome to modern-day kitchens.
But why bother with growing red cabbage yourself when you can just buy it at the store? Well, for starters, the taste of homegrown produce is simply unmatched. Plus, you have complete control over what goes into your garden, ensuring you’re enjoying healthy, organic vegetables. More importantly, in today’s world, knowing how to cultivate your own food provides a sense of self-sufficiency and resilience. This DIY guide will equip you with simple, effective tricks and hacks to successfully grow red cabbage, even if you’re a beginner. We’ll cover everything from seed starting to pest control, ensuring you have a thriving red cabbage patch in no time. Get ready to roll up your sleeves and discover the joy of homegrown goodness!
Growing Vibrant Red Cabbage: A DIY Guide for the Home Gardener
Hey there, fellow gardening enthusiasts! I’m so excited to share my tried-and-true method for growing gorgeous, deep-red cabbages right in your own backyard. It’s easier than you might think, and the reward of harvesting your own homegrown veggies is simply unbeatable. Let’s dive in!
Choosing the Right Red Cabbage Variety
Before we get our hands dirty, it’s important to pick the right variety of red cabbage for your climate and growing conditions. Here are a few of my favorites:
* ‘Red Acre’: This is a classic, reliable variety that produces medium-sized, round heads with a beautiful deep red color. It’s known for its good storage capabilities.
* ‘Ruby Perfection’: As the name suggests, this variety is prized for its perfect, round shape and vibrant ruby-red hue. It’s also relatively early maturing.
* ‘Red Express’: If you’re looking for a faster harvest, ‘Red Express’ is a great choice. It matures quickly and produces smaller, slightly flattened heads.
* ‘Langedijker Dauer’: For long-term storage, this Dutch heirloom is a winner. It forms very dense, solid heads that can last for months in a cool, dry place.
Consider your local climate, the length of your growing season, and your storage needs when making your selection.
Preparing the Soil: The Foundation for Success
Red cabbages, like all brassicas, are heavy feeders. That means they need nutrient-rich soil to thrive. Here’s how I prepare my soil for planting:
* Soil Testing: Before anything else, I highly recommend getting your soil tested. This will tell you the pH level and nutrient content, allowing you to amend it accordingly. Red cabbages prefer a slightly acidic soil with a pH between 6.0 and 7.0.
* Adding Organic Matter: I always incorporate plenty of organic matter into my soil. This improves drainage, aeration, and water retention, while also providing essential nutrients. Compost, well-rotted manure, and leaf mold are all excellent choices. I usually add a generous layer (2-4 inches) and work it into the top 6-8 inches of soil.
* Fertilizing: Based on my soil test results, I’ll add a balanced fertilizer to provide the necessary nutrients. A fertilizer with a ratio of 10-10-10 or 14-14-14 works well. Follow the instructions on the fertilizer package for application rates.
* Ensuring Good Drainage: Red cabbages don’t like soggy soil. Make sure your planting area has good drainage to prevent root rot. If your soil is heavy clay, consider adding sand or perlite to improve drainage.
Starting Seeds Indoors (Optional but Recommended)
While you can direct sow red cabbage seeds, I prefer to start them indoors for a few reasons: it gives them a head start, protects them from pests, and allows me to control the growing environment.
1. Timing: Start your seeds about 4-6 weeks before the last expected frost in your area.
2. Seed Starting Mix: Use a high-quality seed starting mix that is light and well-draining.
3. Planting: Sow the seeds about ¼ inch deep in small pots or seed trays.
4. Watering: Keep the soil consistently moist but not waterlogged.
5. Light: Provide plenty of light. A sunny windowsill might work, but I prefer to use grow lights for consistent results.
6. Hardening Off: Before transplanting your seedlings outdoors, you’ll need to harden them off. This means gradually exposing them to outdoor conditions over a period of 7-10 days. Start by placing them in a sheltered spot for a few hours each day, gradually increasing the amount of time they spend outside.
Transplanting Seedlings Outdoors
Once your seedlings have developed a few sets of true leaves and the danger of frost has passed, it’s time to transplant them into your garden.
1. Spacing: Space your red cabbage plants about 18-24 inches apart in rows that are 24-36 inches apart. This gives them enough room to grow and mature.
2. Planting Depth: Plant the seedlings at the same depth they were growing in their pots.
3. Watering: Water the transplants thoroughly after planting.
4. Mulching: Apply a layer of mulch around the plants to help retain moisture, suppress weeds, and regulate soil temperature. Straw, wood chips, or shredded leaves are all good options.
Caring for Your Red Cabbage Plants
Now that your red cabbage plants are in the ground, it’s time to provide them with the care they need to thrive.
* Watering: Red cabbages need consistent moisture, especially during hot, dry weather. Water deeply and regularly, aiming to keep the soil consistently moist but not waterlogged.
* Fertilizing: Side-dress your plants with a nitrogen-rich fertilizer about 3-4 weeks after transplanting. This will help promote leafy growth. You can use a liquid fertilizer or a granular fertilizer. Follow the instructions on the fertilizer package for application rates.
* Weeding: Keep your garden free of weeds, as they can compete with your red cabbage plants for nutrients and water. Hand-pull weeds regularly or use a hoe to cultivate the soil.
* Pest Control: Red cabbages are susceptible to a few common pests, including cabbage worms, aphids, and flea beetles. I like to use organic pest control methods whenever possible.
* Cabbage Worms: These green caterpillars can quickly devour your cabbage leaves. I handpick them off the plants whenever I see them. You can also use Bacillus thuringiensis (Bt), a natural bacteria that is effective against cabbage worms.
* Aphids: These tiny insects suck the sap from plants, causing them to weaken and distort. I spray them off with a strong stream of water. You can also use insecticidal soap or neem oil.
* Flea Beetles: These small, jumping beetles can create tiny holes in the leaves of your cabbage plants. I use row covers to protect my plants from flea beetles. You can also use diatomaceous earth.
* Disease Prevention: Red cabbages can also be susceptible to a few diseases, including black rot and clubroot.
* Black Rot: This bacterial disease causes yellowing and browning of the leaves. To prevent black rot, plant disease-resistant varieties and avoid overhead watering.
* Clubroot: This fungal disease causes swollen, distorted roots. To prevent clubroot, maintain a soil pH of 7.0 or higher and practice crop rotation.
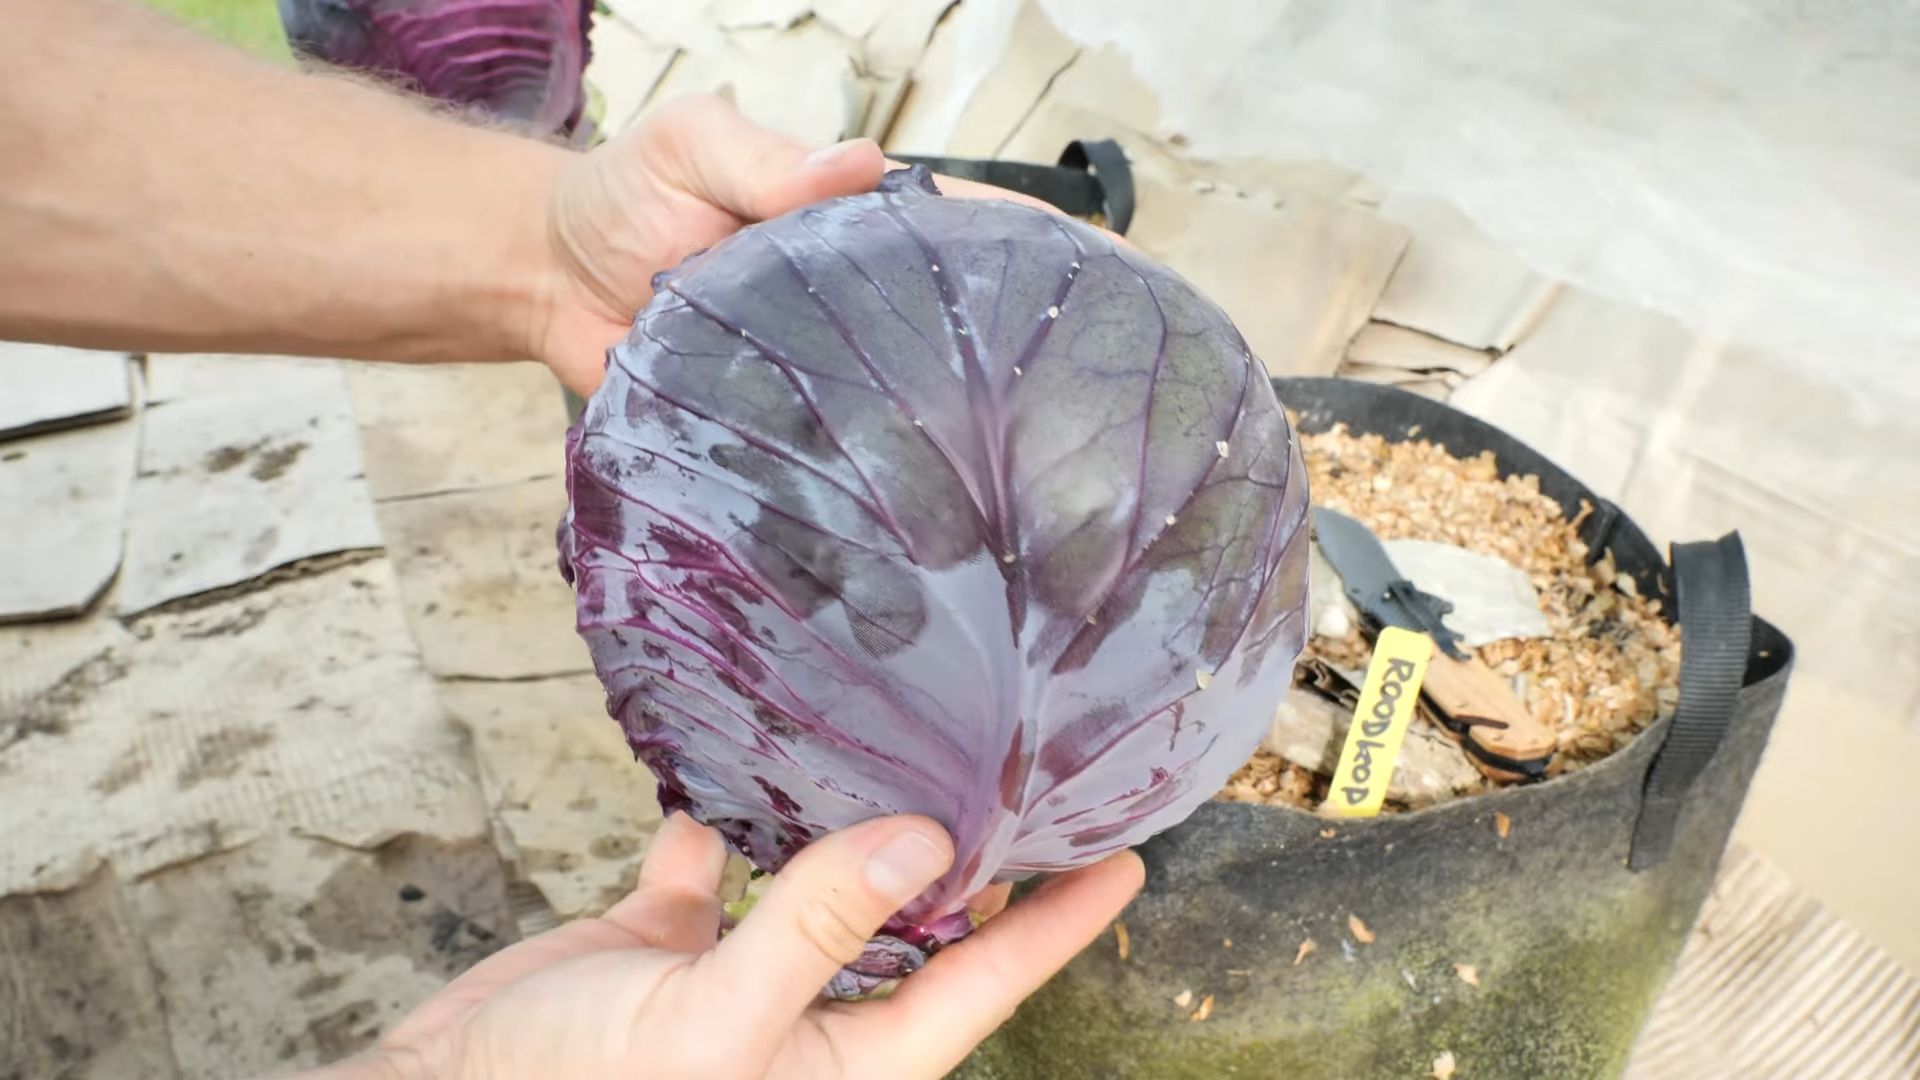
Harvesting Your Red Cabbage
The moment you’ve been waiting for! Red cabbages are typically ready to harvest about 70-100 days after transplanting, depending on the variety.
1. Maturity: The heads should be firm and solid to the touch.
2. Harvesting Technique: Use a sharp knife to cut the head from the stem, leaving a few outer leaves attached.
3. Storage: Red cabbages can be stored in a cool, dry place for several weeks. I usually wrap them in newspaper or plastic wrap to help prevent them from drying out.
Troubleshooting Common Red Cabbage Problems
Even with the best care, you might encounter a few problems while growing red cabbages. Here are some common issues and how to address them:
* Heads Not Forming: This can be caused by a lack of nutrients, insufficient watering, or extreme temperatures. Make sure you’re providing your plants with adequate nutrients and water, and protect them from extreme heat or cold.
* Splitting Heads: This can happen when the heads grow too quickly after a period of drought. Water your plants consistently to prevent splitting.
* Pest Infestations: As mentioned earlier, red cabbages are susceptible to a few common pests. Monitor your plants regularly and take action as soon as you notice any signs of infestation.
* Diseases: Prevent diseases by planting disease-resistant varieties, practicing crop rotation, and maintaining good soil health.
Enjoying Your Homegrown Red Cabbage
Congratulations! You’ve successfully grown your own vibrant red cabbages. Now it’s time to enjoy the fruits (or rather, vegetables) of your labor. Red cabbage is incredibly versatile and can be used in a variety of dishes. Here are a few of my favorites:
* Salads: Shredded red cabbage adds a beautiful color and crunchy texture to salads.
* Slaws: Red cabbage is a key ingredient in many slaws.
* Pickles: Pickled red cabbage is a delicious and tangy condiment.
Hey there, fellow gardening enthusiasts! I’m so excited to share my tried-and-true method for growing gorgeous, deep-red cabbages right in your own backyard. It’s easier than you might think, and the reward of harvesting your own homegrown veggies is simply unbeatable. Let’s dive in!
Choosing the Right Red Cabbage Variety
Before we get our hands dirty, it’s important to pick the right variety of red cabbage for your climate and growing conditions. Here are a few of my favorites:
* ‘Red Acre’: This is a classic, reliable variety that produces medium-sized, round heads with a beautiful deep red color. It’s known for its good storage capabilities.
* ‘Ruby Perfection’: As the name suggests, this variety is prized for its perfect, round shape and vibrant ruby-red hue. It’s also relatively early maturing.
* ‘Red Express’: If you’re looking for a faster harvest, ‘Red Express’ is a great choice. It matures quickly and produces smaller, slightly flattened heads.
* ‘Langedijker Dauer’: For long-term storage, this Dutch heirloom is a winner. It forms very dense, solid heads that can last for months in a cool, dry place.
Consider your local climate, the length of your growing season, and your storage needs when making your selection.
Preparing the Soil: The Foundation for Success
Red cabbages, like all brassicas, are heavy feeders. That means they need nutrient-rich soil to thrive. Here’s how I prepare my soil for planting:
* Soil Testing: Before anything else, I highly recommend getting your soil tested. This will tell you the pH level and nutrient content, allowing you to amend it accordingly. Red cabbages prefer a slightly acidic soil with a pH between 6.0 and 7.0.
* Adding Organic Matter: I always incorporate plenty of organic matter into my soil. This improves drainage, aeration, and water retention, while also providing essential nutrients. Compost, well-rotted manure, and leaf mold are all excellent choices. I usually add a generous layer (2-4 inches) and work it into the top 6-8 inches of soil.
* Fertilizing: Based on my soil test results, I’ll add a balanced fertilizer to provide the necessary nutrients. A fertilizer with a ratio of 10-10-10 or 14-14-14 works well. Follow the instructions on the fertilizer package for application rates.
* Ensuring Good Drainage: Red cabbages don’t like soggy soil. Make sure your planting area has good drainage to prevent root rot. If your soil is heavy clay, consider adding sand or perlite to improve drainage.
Starting Seeds Indoors (Optional but Recommended)
While you can direct sow red cabbage seeds, I prefer to start them indoors for a few reasons: it gives them a head start, protects them from pests, and allows me to control the growing environment.
1. Timing: Start your seeds about 4-6 weeks before the last expected frost in your area.
2. Seed Starting Mix: Use a high-quality seed starting mix that is light and well-draining.
3. Planting: Sow the seeds about ¼ inch deep in small pots or seed trays.
4. Watering: Keep the soil consistently moist but not waterlogged.
5. Light: Provide plenty of light. A sunny windowsill might work, but I prefer to use grow lights for consistent results.
6. Hardening Off: Before transplanting your seedlings outdoors, you’ll need to harden them off. This means gradually exposing them to outdoor conditions over a period of 7-10 days. Start by placing them in a sheltered spot for a few hours each day, gradually increasing the amount of time they spend outside.
Transplanting Seedlings Outdoors
Once your seedlings have developed a few sets of true leaves and the danger of frost has passed, it’s time to transplant them into your garden.
1. Spacing: Space your red cabbage plants about 18-24 inches apart in rows that are 24-36 inches apart. This gives them enough room to grow and mature.
2. Planting Depth: Plant the seedlings at the same depth they were growing in their pots.
3. Watering: Water the transplants thoroughly after planting.
4. Mulching: Apply a layer of mulch around the plants to help retain moisture, suppress weeds, and regulate soil temperature. Straw, wood chips, or shredded leaves are all good options.
Caring for Your Red Cabbage Plants
Now that your red cabbage plants are in the ground, it’s time to provide them with the care they need to thrive.
* Watering: Red cabbages need consistent moisture, especially during hot, dry weather. Water deeply and regularly, aiming to keep the soil consistently moist but not waterlogged.
* Fertilizing: Side-dress your plants with a nitrogen-rich fertilizer about 3-4 weeks after transplanting. This will help promote leafy growth. You can use a liquid fertilizer or a granular fertilizer. Follow the instructions on the fertilizer package for application rates.
* Weeding: Keep your garden free of weeds, as they can compete with your red cabbage plants for nutrients and water. Hand-pull weeds regularly or use a hoe to cultivate the soil.
* Pest Control: Red cabbages are susceptible to a few common pests, including cabbage worms, aphids, and flea beetles. I like to use organic pest control methods whenever possible.
* Cabbage Worms: These green caterpillars can quickly devour your cabbage leaves. I handpick them off the plants whenever I see them. You can also use Bacillus thuringiensis (Bt), a natural bacteria that is effective against cabbage worms.
* Aphids: These tiny insects suck the sap from plants, causing them to weaken and distort. I spray them off with a strong stream of water. You can also use insecticidal soap or neem oil.
* Flea Beetles: These small, jumping beetles can create tiny holes in the leaves of your cabbage plants. I use row covers to protect my plants from flea beetles. You can also use diatomaceous earth.
* Disease Prevention: Red cabbages can also be susceptible to a few diseases, including black rot and clubroot.
* Black Rot: This bacterial disease causes yellowing and browning of the leaves. To prevent black rot, plant disease-resistant varieties and avoid overhead watering.
* Clubroot: This fungal disease causes swollen, distorted roots. To prevent clubroot, maintain a soil pH of 7.0 or higher and practice crop rotation.
Harvesting Your Red Cabbage
The moment you’ve been waiting for! Red cabbages are typically ready to harvest about 70-100 days after transplanting, depending on the variety.
1. Maturity: The heads should be firm and solid to the touch.
2. Harvesting Technique: Use a sharp knife to cut the head from the stem, leaving a few outer leaves attached.
3. Storage: Red cabbages can be stored in a cool, dry place for several weeks. I usually wrap them in newspaper or plastic wrap to help prevent them from drying out.
Troubleshooting Common Red Cabbage Problems
Even with the best care, you might encounter a few problems while growing red cabbages. Here are some common issues and how to address them:
* Heads Not Forming: This can be caused by a lack of nutrients, insufficient watering, or extreme temperatures. Make sure you’re providing your plants with adequate nutrients and water, and protect them from extreme heat or cold.
* Splitting Heads: This can happen when the heads grow too quickly after a period of drought. Water your plants consistently to prevent splitting.
* Pest Infestations: As mentioned earlier, red cabbages are susceptible to a few common pests. Monitor your plants regularly and take action as soon as you notice any signs of infestation.
* Diseases: Prevent diseases by planting disease-resistant varieties, practicing crop rotation, and maintaining good soil health.
Enjoying Your Homegrown Red Cabbage
Congratulations! You’ve successfully grown your own vibrant red cabbages. Now it’s time to enjoy the fruits (or rather, vegetables) of your labor. Red cabbage is incredibly versatile and can be used in a variety of dishes. Here are a few of my favorites:
* Salads: Shredded red cabbage adds a beautiful color and crunchy texture to salads.
* Slaws: Red cabbage is a key ingredient in many slaws.
* Pickles: Pickled red cabbage is a delicious and tangy condiment.
* Braised Dishes: Red cabbage can be braised with apples, onions, and spices for a flavorful side dish.
* Soups

Conclusion
So, there you have it! Growing red cabbage at home isn’t just a gardening project; it’s an investment in vibrant flavor, stunning color, and a healthier lifestyle. Forget those lackluster, pre-packaged heads from the grocery store. With a little patience and these simple steps, you can cultivate ruby-red beauties bursting with freshness right in your own backyard.
Why is this DIY trick a must-try? Because the difference between store-bought and homegrown red cabbage is night and day. The flavor is more intense, the texture is crisper, and the satisfaction of harvesting something you nurtured from seed is unparalleled. Plus, you control exactly what goes into your cabbage – no pesticides, no hidden chemicals, just pure, natural goodness.
But the benefits don’t stop there. Growing your own red cabbage is also a fantastic way to reduce your carbon footprint, support sustainable practices, and connect with nature. It’s a rewarding hobby that can bring joy and nourishment to your life.
Ready to take your red cabbage game to the next level? Consider these variations:
* **Pickling Power:** Once you’ve harvested your bounty, try pickling some of your red cabbage. The tangy, vibrant flavor is a perfect complement to sandwiches, salads, and charcuterie boards. Experiment with different spices like caraway seeds, juniper berries, or chili flakes to create your signature pickle.
* **Slaw Sensations:** Red cabbage slaw is a classic for a reason. But don’t be afraid to get creative with your slaw recipes. Add shredded carrots, apples, or cranberries for a touch of sweetness. Toss in some toasted nuts or seeds for added crunch. And experiment with different dressings, from creamy mayonnaise-based dressings to tangy vinaigrettes.
* **Roasting Rhapsody:** Roasting red cabbage brings out its natural sweetness and creates a wonderfully caramelized flavor. Simply toss wedges of red cabbage with olive oil, salt, pepper, and your favorite herbs, then roast until tender and slightly charred.
* Companion Planting Pro: Experiment with companion planting. Marigolds can deter pests, while chamomile can improve the overall health of your red cabbage plants.
* Soil Amendments: Different soil types can affect the color and flavor of your red cabbage. Experiment with adding lime to your soil to increase alkalinity, which can result in more vibrant red hues.
Don’t be intimidated if you’re a beginner gardener. Growing red cabbage is surprisingly easy, and the rewards are well worth the effort. So, grab some seeds, get your hands dirty, and prepare to be amazed by the beauty and flavor of homegrown red cabbage.
We’re confident that you’ll love the experience of growing your own red cabbage. Now it’s your turn! We encourage you to try this DIY trick and share your experiences with us. Let us know what worked for you, what challenges you faced, and any tips or tricks you discovered along the way. Share your photos and stories on social media using #HomegrownRedCabbage and let’s inspire others to embrace the joy of gardening. Happy growing!
Frequently Asked Questions (FAQ)
What is the best time of year to plant red cabbage?
The best time to plant red cabbage depends on your climate. In general, red cabbage is a cool-season crop, meaning it thrives in temperatures between 60°F and 70°F (15°C and 21°C). For spring crops, start seeds indoors 6-8 weeks before the last expected frost. Transplant seedlings outdoors 2-3 weeks before the last frost. For fall crops, start seeds indoors in mid-summer and transplant seedlings outdoors 6-8 weeks before the first expected frost. Consider your local climate and growing season when determining the optimal planting time.
How much sunlight does red cabbage need?
Red cabbage requires at least 6 hours of direct sunlight per day to thrive. Choose a planting location that receives full sun for optimal growth and head development. If you live in a particularly hot climate, some afternoon shade may be beneficial to prevent the leaves from scorching.
What type of soil is best for growing red cabbage?
Red cabbage prefers well-drained, fertile soil that is rich in organic matter. The ideal soil pH is between 6.0 and 7.0. Before planting, amend the soil with compost, aged manure, or other organic matter to improve drainage, fertility, and water retention. A soil test can help you determine the pH and nutrient levels of your soil and guide you on any necessary amendments.
How often should I water red cabbage?
Red cabbage needs consistent moisture to grow properly. Water deeply and regularly, especially during dry periods. Aim to keep the soil consistently moist but not waterlogged. Mulching around the plants can help retain moisture and suppress weeds. Check the soil moisture regularly by sticking your finger into the soil. If the top inch feels dry, it’s time to water.
What are some common pests and diseases that affect red cabbage?
Red cabbage can be susceptible to various pests and diseases, including cabbage worms, aphids, flea beetles, clubroot, and black rot. Regularly inspect your plants for signs of infestation or disease. Use organic pest control methods, such as handpicking pests, using insecticidal soap, or applying Bacillus thuringiensis (Bt) for cabbage worms. To prevent diseases, practice crop rotation, ensure good drainage, and avoid overhead watering.
How do I harvest red cabbage?
Red cabbage is typically ready to harvest when the heads are firm and have reached their mature size, usually about 6-8 inches in diameter. To harvest, use a sharp knife to cut the head from the stem, leaving a few outer leaves attached. Harvest before the heads begin to split or crack.
How do I store red cabbage?
Red cabbage can be stored in the refrigerator for several weeks. Wrap the head tightly in plastic wrap or store it in a plastic bag to prevent it from drying out. You can also store red cabbage in a cool, dark, and humid place, such as a root cellar, for several months.
Can I grow red cabbage in containers?
Yes, you can grow red cabbage in containers, but you’ll need to choose a large container that is at least 12 inches in diameter and depth. Use a well-draining potting mix and provide regular watering and fertilization. Container-grown red cabbage may require more frequent watering than plants grown in the ground.
Why is my red cabbage not turning red?
The color of red cabbage is influenced by soil pH. Acidic soils (pH below 7.0) tend to produce more vibrant red hues, while alkaline soils (pH above 7.0) can result in more purple or bluish tones. If your red cabbage is not as red as you’d like, try adding sulfur to the soil to lower the pH. You can also add acidic organic matter, such as pine needles or coffee grounds.
Is red cabbage more nutritious than green cabbage?
Red cabbage is generally considered to be more nutritious than green cabbage. It contains higher levels of antioxidants, particularly anthocyanins, which give it its vibrant red color. Anthocyanins have been linked to various health benefits, including reducing the risk of heart disease, cancer, and cognitive decline. Red cabbage is also a good source of vitamin C, vitamin K, and fiber.
Leave a Comment