
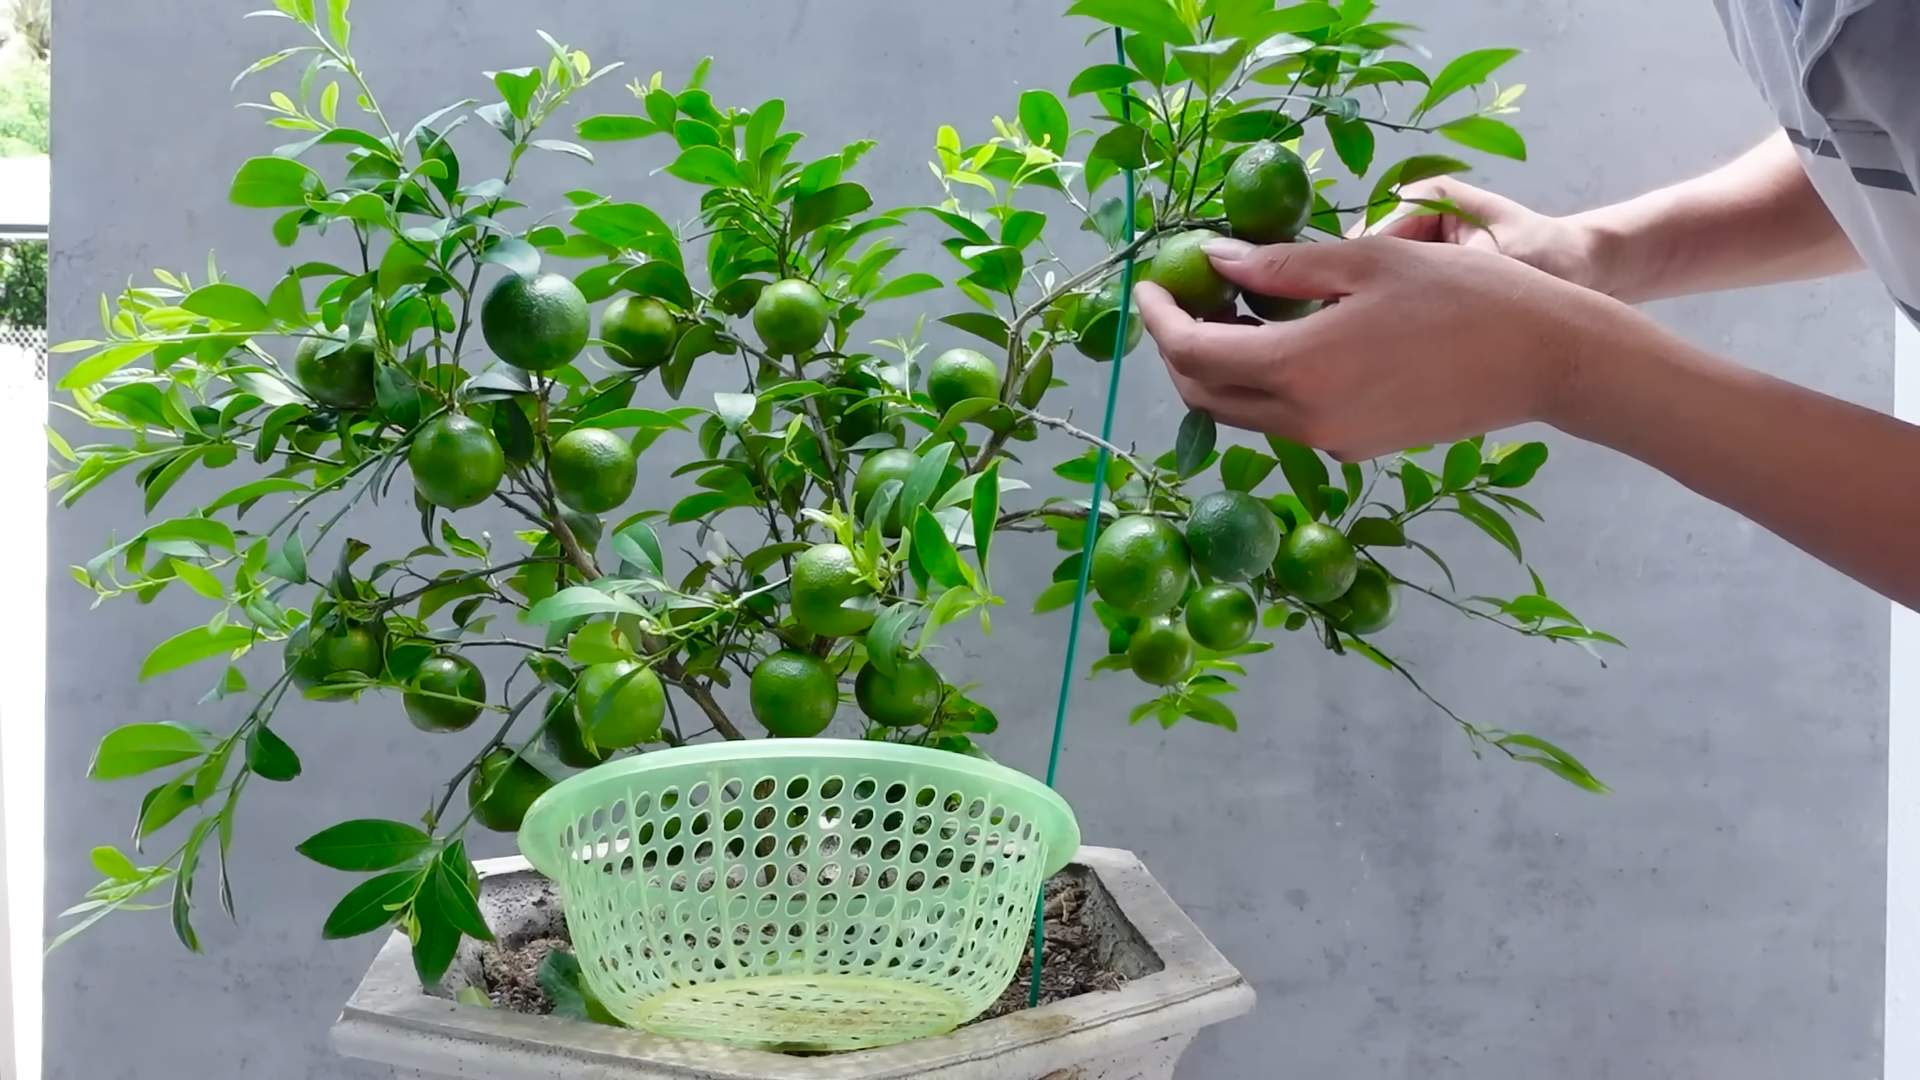
Kalamansi Potting Daily Routine: Ever dreamt of having a thriving calamansi tree bursting with fragrant blossoms and juicy fruits, right in your own backyard or even on your sunny balcony? I know I have! But let’s be honest, sometimes the journey from tiny seedling to bountiful harvest can feel a little daunting. That’s where a solid daily routine comes in, and I’m here to share my tried-and-true secrets to help you cultivate a calamansi tree that’s the envy of all your neighbors.
The calamansi, also known as the Philippine lime, holds a special place in many cultures, particularly in Southeast Asia. It’s not just a fruit; it’s a symbol of home cooking, refreshing drinks, and even traditional medicine. For generations, families have passed down their knowledge of growing and caring for these precious trees. But in today’s busy world, who has time for complicated gardening techniques? That’s why I’ve distilled the essence of calamansi care into a simple, manageable kalamansi potting daily routine that anyone can follow.
Why is this DIY trick so essential? Because a consistent daily routine is the key to unlocking your calamansi tree’s full potential. Neglecting even small aspects of its care can lead to stunted growth, yellowing leaves, and a disappointing lack of fruit. I’ll guide you through watering, sunlight, pest control, and even a little bit of pruning, all in a way that fits seamlessly into your everyday life. Get ready to transform your calamansi tree from a struggling sapling into a flourishing source of citrusy goodness!
DIY Kalamansi Potting and Daily Care: From Seed to Citrus Bliss!
Hey there, fellow plant enthusiasts! I’m so excited to share my tried-and-true method for growing vibrant, healthy Kalamansi trees right at home. This isn’t just about planting a seed; it’s about creating a thriving little ecosystem that will reward you with fragrant blossoms and tangy, delicious fruit. Get ready to get your hands dirty!
Choosing Your Kalamansi Adventure: Seed or Seedling?
Before we dive into the potting process, let’s talk about where your Kalamansi journey begins. You have two main options: starting from seed or purchasing a young seedling.
* **Seeds:** Growing from seed is incredibly rewarding, but it requires patience. It can take several weeks for seeds to germinate, and a few years before you see your first fruits. However, it’s a fantastic way to connect with the plant’s entire life cycle.
* **Seedlings:** Buying a seedling gives you a head start. You’ll likely see fruit much sooner, and you can be sure you’re getting a healthy, established plant.
For this guide, I’ll focus on potting a seedling, but I’ll also sprinkle in some tips for those brave souls starting from seed!
Gathering Your Kalamansi Arsenal: Essential Supplies
Okay, let’s gather our supplies. Having everything ready before you start makes the whole process smoother and more enjoyable.
* **Kalamansi Seedling:** Choose a healthy seedling with vibrant green leaves and a sturdy stem. Inspect it for any signs of pests or diseases.
* **Pot:** Select a pot that’s at least 12 inches in diameter. Terracotta pots are great because they allow for good drainage and airflow, but plastic pots work too. Just make sure it has drainage holes!
* **Potting Mix:** This is crucial! Kalamansi trees need well-draining, slightly acidic soil. A mix specifically formulated for citrus trees is ideal. If you can’t find that, you can create your own by combining equal parts potting soil, perlite, and peat moss.
* **Gravel or Pebbles:** These go at the bottom of the pot to improve drainage.
* **Watering Can:** A gentle watering can is essential for watering your Kalamansi without disturbing the soil.
* **Gloves:** Protect your hands from the soil.
* **Trowel or Small Shovel:** For transferring soil.
* **Optional: Slow-Release Fertilizer:** This will provide your Kalamansi with a steady supply of nutrients.
* **Optional: pH Meter:** If you’re really serious about your soil, a pH meter can help you ensure it’s in the ideal range (around 6.0-6.5).
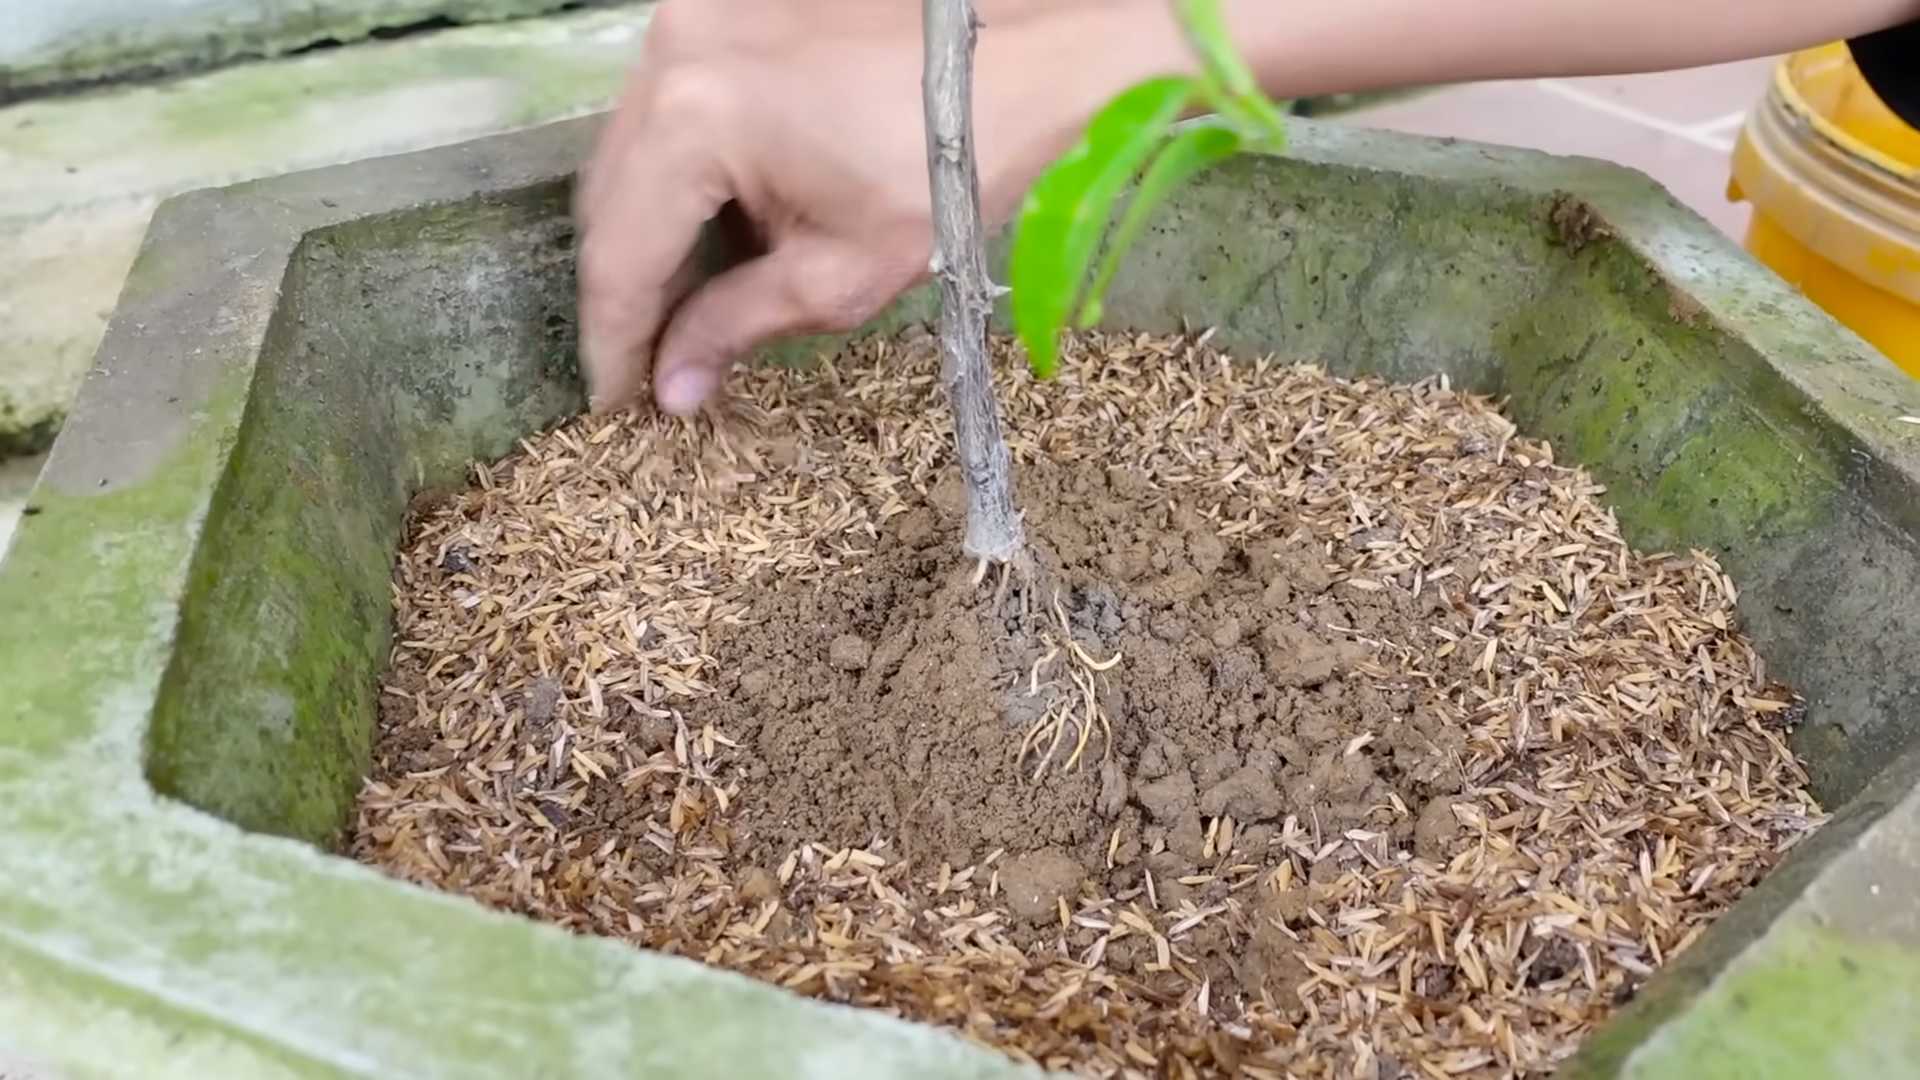
Potting Your Kalamansi Seedling: A Step-by-Step Guide
Alright, let’s get potting! This is where the magic happens.
1. **Prepare the Pot:** Place a layer of gravel or pebbles at the bottom of your pot. This will help prevent the drainage holes from getting clogged and ensure proper water flow.
2. **Add Potting Mix:** Fill the pot about one-third full with your chosen potting mix.
3. **Remove the Seedling from its Container:** Gently squeeze the sides of the seedling’s container to loosen the soil. Carefully tip the container upside down, supporting the base of the plant with your hand. If the plant is stuck, try tapping the bottom of the container.
4. **Loosen the Root Ball:** Once the seedling is out of the container, gently loosen the root ball with your fingers. This encourages the roots to spread out and establish themselves in the new pot. Don’t be afraid to gently tease the roots apart.
5. **Position the Seedling:** Place the seedling in the center of the pot, making sure the top of the root ball is level with the top of the pot.
6. **Fill with Potting Mix:** Carefully fill the pot with potting mix, leaving about an inch of space between the soil and the rim of the pot. Gently pat down the soil to remove any air pockets.
7. **Water Thoroughly:** Water the newly potted Kalamansi thoroughly until water drains out of the drainage holes. This helps settle the soil and hydrate the roots.
8. **Add Slow-Release Fertilizer (Optional):** If you’re using slow-release fertilizer, sprinkle it on top of the soil according to the package instructions.
9. **Find the Perfect Spot:** Place your newly potted Kalamansi in a location that receives at least 6-8 hours of direct sunlight per day. A south-facing window is ideal if you’re growing it indoors.
Kalamansi Care: Nurturing Your Citrus Companion
Now that your Kalamansi is happily potted, it’s time to learn how to keep it thriving. Here’s a breakdown of the essential care requirements:
* **Watering:** Kalamansi trees need consistent moisture, but they don’t like to be waterlogged. Water thoroughly when the top inch of soil feels dry to the touch. During the growing season (spring and summer), you may need to water more frequently. Reduce watering during the dormant season (fall and winter).
* **Sunlight:** As mentioned earlier, Kalamansi trees need plenty of sunlight. If you’re growing them indoors, supplement with a grow light if necessary.
* **Fertilizing:** Feed your Kalamansi tree regularly during the growing season with a citrus-specific fertilizer. Follow the instructions on the fertilizer package. Avoid fertilizing during the dormant season.
* **Pruning:** Prune your Kalamansi tree to maintain its shape and encourage fruit production. Remove any dead, damaged, or crossing branches. The best time to prune is in late winter or early spring, before new growth begins.
* **Temperature:** Kalamansi trees prefer temperatures between 65°F and 85°F (18°C and 29°C). Protect them from frost and extreme temperatures.
* **Humidity:** Kalamansi trees appreciate humidity. If you’re growing them indoors, you can increase humidity by placing a tray of water near the plant or using a humidifier.
* **Pest Control:** Keep an eye out for common citrus pests like aphids, spider mites, and scale. Treat infestations promptly with insecticidal soap or neem oil.
* **Repotting:** As your Kalamansi tree grows, it will eventually need to be repotted into a larger container. Repot every 1-2 years, or when the roots start to circle the bottom of the pot.
Troubleshooting Kalamansi Problems: Common Issues and Solutions
Even with the best care, you might encounter some challenges along the way. Here are some common Kalamansi problems and how to fix them:
* **Yellowing Leaves:** This can be caused by overwatering, underwatering, nutrient deficiencies, or pest infestations. Check the soil moisture, fertilize if necessary, and inspect for pests.
* **Leaf Drop:** Leaf drop can be caused by sudden changes in temperature, overwatering, underwatering, or stress. Try to maintain consistent conditions and avoid drastic changes.
* **Lack of Fruit:** Lack of fruit can be caused by insufficient sunlight, improper fertilization, or lack of pollination. Ensure your Kalamansi is getting enough sunlight, fertilize regularly, and consider hand-pollinating the flowers if you’re growing it indoors.
* **Pest Infestations:** As mentioned earlier, keep an eye out for pests and treat them promptly.
Daily Routine for a Happy Kalamansi
Okay, so you’ve got your Kalamansi potted and you know the basics of care. But what does a *daily* routine look like? Here’s what I do to keep my Kalamansi thriving:
1. **Morning Check-In:** Start your day by checking on your Kalamansi. Look at the leaves – are they perky and green? Feel the soil – is it dry to the touch? This quick check will give you a good sense of what your plant needs that day.
2. **Sunlight Assessment:** Make sure your Kalamansi is getting enough sunlight. If it’s a cloudy day, consider moving it closer to a window or turning on a grow light.
3. **Watering (If Needed):** If the top inch of soil feels dry, water your Kalamansi thoroughly. Remember to let the excess water drain out of the drainage holes.
4. **Leaf Cleaning (Occasionally):** Dust can accumulate on the leaves, blocking sunlight and hindering photosynthesis. Every few weeks, gently wipe the leaves with a damp cloth.
5. **Pest Patrol:** Take a quick look for any signs of pests. The earlier you catch them, the easier they are to control.
6. **Positive Affirmations (Optional, but Fun!):** Okay, this might sound silly, but I like to talk to my plants! I tell them how beautiful they are and how much I appreciate them. It’s a fun way to connect with nature and boost your own mood.
Starting from Seed: A Quick Guide
For those of you who are starting from seed, here are a few extra tips:
1. **Seed Preparation:** Soak the Kalamansi seeds in water for 24 hours before planting. This helps soften the seed
Conclusion
So, there you have it! Mastering the art of the Kalamansi Potting Daily Routine isn’t just about following steps; it’s about cultivating a thriving, fragrant, and fruitful citrus experience right in your own home. We’ve explored a simple yet effective method to ensure your Kalamansi plant receives the care it deserves, leading to healthier growth, abundant blossoms, and a bountiful harvest of those precious little citrus gems.
Why is this DIY trick a must-try? Because it empowers you to take control of your plant’s well-being. Instead of relying solely on pre-packaged solutions or guesswork, you’re actively participating in its growth cycle. This routine fosters a deeper connection with your plant, allowing you to observe its needs and respond accordingly. The result? A Kalamansi plant that’s not just surviving, but truly thriving. Plus, the satisfaction of knowing you’ve nurtured it from seedling to fruit-bearing beauty is incredibly rewarding.
But don’t think this is a rigid, one-size-fits-all approach. Feel free to experiment and adapt the routine to suit your specific environment and plant’s needs. For instance, if you live in a particularly humid climate, you might need to adjust the watering frequency to prevent overwatering. Conversely, in drier climates, you might need to mist the leaves more often to maintain adequate humidity.
Consider these variations to personalize your Kalamansi Potting Daily Routine:
* **Nutrient Boost:** Incorporate a diluted citrus fertilizer into your watering routine every other week during the growing season (spring and summer). This will provide your plant with the essential nutrients it needs to produce abundant fruit.
* **Leaf Inspection:** Take a few extra moments during your daily inspection to carefully examine the leaves for any signs of pests or diseases. Early detection is key to preventing infestations from taking hold.
* **Soil Aeration:** Gently loosen the topsoil around the base of the plant with a small gardening fork or chopstick every few weeks. This will improve aeration and drainage, promoting healthy root growth.
* Seasonal Adjustments: Reduce watering frequency during the dormant season (fall and winter) and avoid fertilizing. The plant’s growth slows down during this time, so it requires less water and nutrients.
* Companion Planting: Consider planting herbs like basil or rosemary near your Kalamansi plant. These herbs can help repel pests and attract beneficial insects.
Ultimately, the best Kalamansi Potting Daily Routine is one that works for you and your plant. The key is to be observant, responsive, and consistent.
We wholeheartedly encourage you to try this DIY trick and witness the difference it makes in the health and productivity of your Kalamansi plant. Don’t be afraid to experiment and find what works best for you. And most importantly, share your experiences with us! We’d love to hear about your successes, challenges, and any variations you’ve discovered. Post your photos and stories on social media using #KalamansiCare or leave a comment below. Let’s create a community of Kalamansi enthusiasts who are passionate about nurturing these delightful citrus trees. Happy growing!
Frequently Asked Questions (FAQ)
What type of potting mix is best for Kalamansi?
The ideal potting mix for Kalamansi plants is a well-draining, slightly acidic mix. A combination of peat moss, perlite, and vermiculite works well. You can also use a commercially available citrus potting mix. Avoid using garden soil, as it can be too heavy and retain too much water, leading to root rot. Good drainage is crucial for Kalamansi plants, as they are susceptible to root problems if the soil remains soggy. Look for mixes specifically formulated for citrus trees, as these often contain the necessary nutrients and pH balance for optimal growth.
How often should I water my Kalamansi plant?
Watering frequency depends on several factors, including the size of the pot, the type of potting mix, the climate, and the season. As a general rule, water your Kalamansi plant when the top inch of soil feels dry to the touch. During the growing season (spring and summer), you may need to water more frequently, perhaps every 2-3 days. In the dormant season (fall and winter), reduce watering to once a week or even less. Always check the soil moisture before watering to avoid overwatering. Overwatering is a more common problem than underwatering, and it can lead to root rot and other issues. Ensure the pot has drainage holes to allow excess water to escape.
How much sunlight does a Kalamansi plant need?
Kalamansi plants thrive in bright, indirect sunlight. They need at least 6-8 hours of sunlight per day to produce abundant fruit. If you’re growing your Kalamansi plant indoors, place it near a sunny window, preferably a south-facing or east-facing window. If you don’t have access to enough natural light, you can supplement with artificial grow lights. Rotate the plant regularly to ensure that all sides receive equal exposure to sunlight. Insufficient sunlight can lead to leggy growth, reduced flowering, and poor fruit production.
What are the signs of overwatering or underwatering?
Overwatering and underwatering can manifest in similar ways, but there are some key differences to look for. Overwatered plants may have yellowing leaves, especially at the bottom of the plant. The leaves may also feel soft and mushy. The soil will be constantly wet, and you may notice a foul odor coming from the pot. Underwatered plants, on the other hand, may have wilting leaves that are dry and crispy to the touch. The soil will be dry and cracked. The leaves may also start to drop off. To determine whether your plant is overwatered or underwatered, check the soil moisture. If the soil is soggy, it’s likely overwatered. If the soil is bone dry, it’s likely underwatered.
How do I fertilize my Kalamansi plant?
Kalamansi plants benefit from regular fertilization during the growing season (spring and summer). Use a citrus fertilizer that is specifically formulated for citrus trees. Follow the instructions on the fertilizer package for application rates. Fertilize every 2-4 weeks during the growing season. Avoid fertilizing during the dormant season (fall and winter), as the plant’s growth slows down during this time. Over-fertilizing can damage the plant, so it’s always better to err on the side of caution. You can also use organic fertilizers, such as compost tea or fish emulsion.
How do I prune my Kalamansi plant?
Pruning is important for maintaining the shape and health of your Kalamansi plant. Prune in late winter or early spring, before new growth begins. Remove any dead, damaged, or diseased branches. Also, prune any branches that are crossing or rubbing against each other. This will improve air circulation and prevent the spread of disease. You can also prune to shape the plant and encourage bushier growth. Use clean, sharp pruning shears to make clean cuts. Avoid pruning too heavily, as this can stress the plant.
How do I protect my Kalamansi plant from pests and diseases?
Kalamansi plants can be susceptible to various pests and diseases, including aphids, spider mites, scale, and citrus canker. Regularly inspect your plant for signs of pests or diseases. If you notice any problems, take action immediately. You can treat pests with insecticidal soap or neem oil. Diseases can be treated with fungicides. Good air circulation and proper watering can help prevent many pest and disease problems. You can also introduce beneficial insects, such as ladybugs, to help control pests.
How do I overwinter my Kalamansi plant indoors?
If you live in a climate with cold winters, you’ll need to bring your Kalamansi plant indoors to protect it from frost. Before bringing it indoors, inspect the plant for pests and diseases. Place the plant in a bright, sunny location, such as near a south-facing window. Reduce watering and fertilization during the winter months. The plant’s growth will slow down during this time, so it requires less water and nutrients. You may also need to increase the humidity around the plant, as indoor air can be dry during the winter. You can do this by placing a humidifier near the plant or by placing the pot on a tray filled with water and pebbles.
Why is my Kalamansi plant not fruiting?
There are several reasons why your Kalamansi plant may not be fruiting. One common reason is insufficient sunlight. Kalamansi plants need at least 6-8 hours of sunlight per day to produce fruit. Another reason could be lack of pollination. If you’re growing your Kalamansi plant indoors, you may need to hand-pollinate the flowers. Use a small brush to transfer pollen from one flower to another. Lack of nutrients can also prevent fruiting. Make sure you’re fertilizing your plant regularly during the growing season. Finally, stress can also inhibit fruiting. Make sure your plant is getting enough water, sunlight, and nutrients, and protect it from pests and diseases.
Can I grow Kalamansi from seed?
Yes, you can grow Kalamansi from seed, but it’s important to note that plants grown from seed may not be true to type. This means that the fruit may not be exactly the same as the parent plant. To grow Kalamansi from seed, extract the seeds from a ripe fruit. Wash the seeds and allow them to dry for a few days. Then, sow the seeds in a well-draining potting mix

Leave a Comment