
Grow Juicy Melons Easily, you say? Absolutely! Imagine biting into a perfectly ripe, incredibly sweet melon, bursting with flavor, all thanks to your own green thumb. That’s the promise of this DIY guide, and trust me, it’s easier than you think! For centuries, melons have been cultivated across the globe, from the sun-drenched fields of ancient Egypt to the vibrant gardens of Asia. They’ve been symbols of abundance and sweetness, gracing royal tables and nourishing communities.
But let’s be honest, sometimes growing these delicious fruits can feel a little daunting. We’ve all seen those sad, pale melons at the grocery store and thought, “There has to be a better way!” Well, there is! This article is packed with simple, effective tricks and hacks that will empower you to grow juicy melons easily, even if you’re a complete beginner.
Why do you need these DIY tricks? Because store-bought melons often lack the intense flavor and sweetness of homegrown varieties. Plus, knowing you nurtured that fruit from seed to table is incredibly rewarding. We’ll cover everything from choosing the right varieties for your climate to optimizing soil conditions and warding off pests. Get ready to impress your friends and family with the most delicious melons they’ve ever tasted!
Grow Juicy Melons Easily: My Foolproof DIY Guide
Hey there, fellow gardening enthusiasts! I’m so excited to share my tried-and-true method for growing incredibly juicy and delicious melons right in your own backyard. Forget those bland, store-bought melons – with a little know-how and some simple techniques, you can be enjoying homegrown sweetness all summer long. This guide is packed with everything I’ve learned over the years, so get ready to roll up your sleeves and get your hands dirty!
Choosing the Right Melon Variety
Before we even think about planting, it’s crucial to pick the right melon variety for your climate and growing conditions. Not all melons are created equal!
* Consider your climate: Watermelons generally need a long, hot growing season (70-90 days), while cantaloupes and honeydews can tolerate slightly shorter seasons (65-80 days). If you live in a cooler climate, opt for early-maturing varieties.
* Think about space: Watermelons, in particular, can be quite sprawling. If you have limited space, look for bush or compact varieties. Cantaloupes and honeydews are generally more manageable.
* Personal preference: Do you prefer the crisp sweetness of a watermelon, the musky aroma of a cantaloupe, or the delicate flavor of a honeydew? Choose varieties that you and your family will enjoy.
* Disease resistance: Look for varieties that are resistant to common melon diseases like powdery mildew and fusarium wilt. This will save you a lot of headaches down the road.
Some of my personal favorites include:
* Watermelon: ‘Sugar Baby’ (early maturing, compact), ‘Crimson Sweet’ (classic flavor), ‘Blacktail Mountain’ (cold-hardy)
* Cantaloupe: ‘Athena’ (disease resistant, sweet), ‘Hales Best Jumbo’ (classic cantaloupe flavor)
* Honeydew: ‘Honey Dew Green Flesh’ (reliable producer), ‘Temptation’ (early maturing)
Preparing the Soil: The Foundation for Success
Melons are heavy feeders, meaning they need nutrient-rich soil to thrive. Proper soil preparation is absolutely essential for a bountiful harvest.
* Sunlight is key: Melons need at least 6-8 hours of direct sunlight per day. Choose a location in your garden that gets plenty of sun.
* Well-draining soil: Melons hate soggy feet! Make sure your soil drains well. If you have heavy clay soil, amend it with plenty of organic matter like compost or well-rotted manure.
* Soil pH: Melons prefer a slightly acidic to neutral soil pH (6.0-7.0). You can test your soil pH with a home test kit or send a sample to your local extension office.
* Adding nutrients: Before planting, amend your soil with a generous amount of compost or well-rotted manure. You can also add a balanced fertilizer (e.g., 10-10-10) according to the package directions.
Starting Seeds Indoors (Optional but Recommended)
While you can direct sow melon seeds, starting them indoors gives them a head start, especially in cooler climates.
* Timing is everything: Start your seeds about 3-4 weeks before the last expected frost in your area.
* Use seed starting mix: Don’t use garden soil for starting seeds. It’s too heavy and can harbor diseases. Use a lightweight seed starting mix.
* Planting the seeds: Sow the seeds about 1/2 inch deep in small pots or seed trays.
* Keep them warm: Melons need warm temperatures to germinate (70-80°F). Use a heat mat if necessary.
* Provide light: Once the seeds germinate, provide them with plenty of light. A sunny windowsill or grow lights will work.
* Water carefully: Keep the soil moist but not soggy. Overwatering can lead to damping off, a fungal disease that can kill seedlings.
Transplanting Seedlings Outdoors
Once the danger of frost has passed and the soil has warmed up, it’s time to transplant your seedlings outdoors.
* Harden off the seedlings: Before transplanting, gradually acclimate the seedlings to outdoor conditions by exposing them to increasing amounts of sunlight and wind over a period of 7-10 days.
* Choose a cloudy day: Transplanting on a cloudy day will help reduce transplant shock.
* Dig the holes: Dig holes that are slightly larger than the root balls of the seedlings.
* Space them properly: Space watermelon plants 3-5 feet apart, cantaloupe and honeydew plants 2-3 feet apart.
* Water thoroughly: After transplanting, water the seedlings thoroughly.
* Mulch: Apply a layer of mulch around the plants to help retain moisture, suppress weeds, and regulate soil temperature. I like to use straw or black plastic mulch. Black plastic mulch is especially helpful for warming the soil quickly.
Direct Sowing Seeds (Alternative to Starting Indoors)
If you live in a warm climate with a long growing season, you can direct sow melon seeds directly into the garden.
* Wait for warm soil: Make sure the soil temperature is at least 70°F before planting.
* Planting depth: Sow the seeds about 1 inch deep.
* Spacing: Follow the same spacing recommendations as for transplanting seedlings.
* Water regularly: Keep the soil consistently moist until the seeds germinate.
* Thinning: Once the seedlings emerge, thin them to the strongest plant per hill.
Watering and Fertilizing: Keeping Your Melons Happy
Melons need consistent watering and fertilization to produce juicy, flavorful fruit.
* Water deeply and regularly: Water deeply and regularly, especially during hot, dry weather. Aim for about 1-2 inches of water per week.
* Avoid overhead watering: Overhead watering can lead to fungal diseases. Water at the base of the plants instead.
* Fertilize regularly: Fertilize every 2-3 weeks with a balanced fertilizer or a fertilizer specifically formulated for melons.
* Side-dressing: When the fruits start to develop, side-dress the plants with a fertilizer high in potassium. Potassium is essential for fruit development and sweetness.
Pruning and Training: Maximizing Fruit Production
Pruning and training can help improve air circulation, reduce disease, and increase fruit production.
* Pruning: Remove any suckers (small shoots that grow from the base of the plant) to encourage the plant to focus its energy on fruit production.
* Training: You can train melon vines to grow up a trellis or fence to save space and improve air circulation.
* Fruit support: For larger melons, you may need to provide support to prevent the fruits from breaking off the vine. You can use slings made from pantyhose or netting.
Pest and Disease Control: Protecting Your Crop
Melons are susceptible to a variety of pests and diseases. Here’s how to protect your crop:
* Common pests: Aphids, squash bugs, cucumber beetles, and vine borers are common melon pests.
* Control methods: Use insecticidal soap, neem oil, or handpick pests off the plants. You can also use row covers to protect young plants from pests.
* Common diseases: Powdery mildew, fusarium wilt, and anthracnose are common melon diseases.
* Prevention: Choose disease-resistant varieties, provide good air circulation, and avoid overhead watering.
* Treatment: Use a fungicide to treat fungal diseases.
Harvesting: The Sweet Reward
Knowing when to harvest your melons is crucial for getting the best flavor and texture.
* Watermelons: Look for a dull thud when you thump the melon. The tendril closest to the melon should be brown and dry. The underside of the melon (where it rests on the ground) should be yellow or cream-colored.
* Cantaloupes: The melon should slip easily from the vine with a gentle tug. The skin should be a golden color and have a fragrant aroma.
* Honeydews: The skin should be a creamy white color and have a slightly waxy feel. The blossom end should be slightly soft.
Enjoying Your Homegrown Melons
Congratulations! You’ve successfully grown your own juicy melons. Now it’s time to enjoy the fruits (or rather, melons) of your labor.
* Chill before serving: Chill your melons in the refrigerator for at least a few hours before serving.
* Cut and enjoy: Cut the melons into wedges or cubes and enjoy them as a refreshing snack or dessert.
* Get creative: Use your melons in salads, smoothies, or even grilled dishes.
* Share with friends and family: Share your bounty with friends and family. They’ll be amazed
Conclusion
So, there you have it! Growing juicy melons doesn’t have to be a gamble. By implementing this simple yet effective DIY trick, you’re significantly increasing your chances of harvesting sweet, flavorful melons that will be the envy of your neighbors. We’ve shown you how to create a microclimate that nurtures your melon plants, protects them from pests, and optimizes their growth potential.
This isn’t just about growing melons; it’s about taking control of your garden and experiencing the satisfaction of nurturing something from seed to table. Imagine biting into a perfectly ripe, homegrown melon, knowing you played a crucial role in its deliciousness. That’s the reward waiting for you.
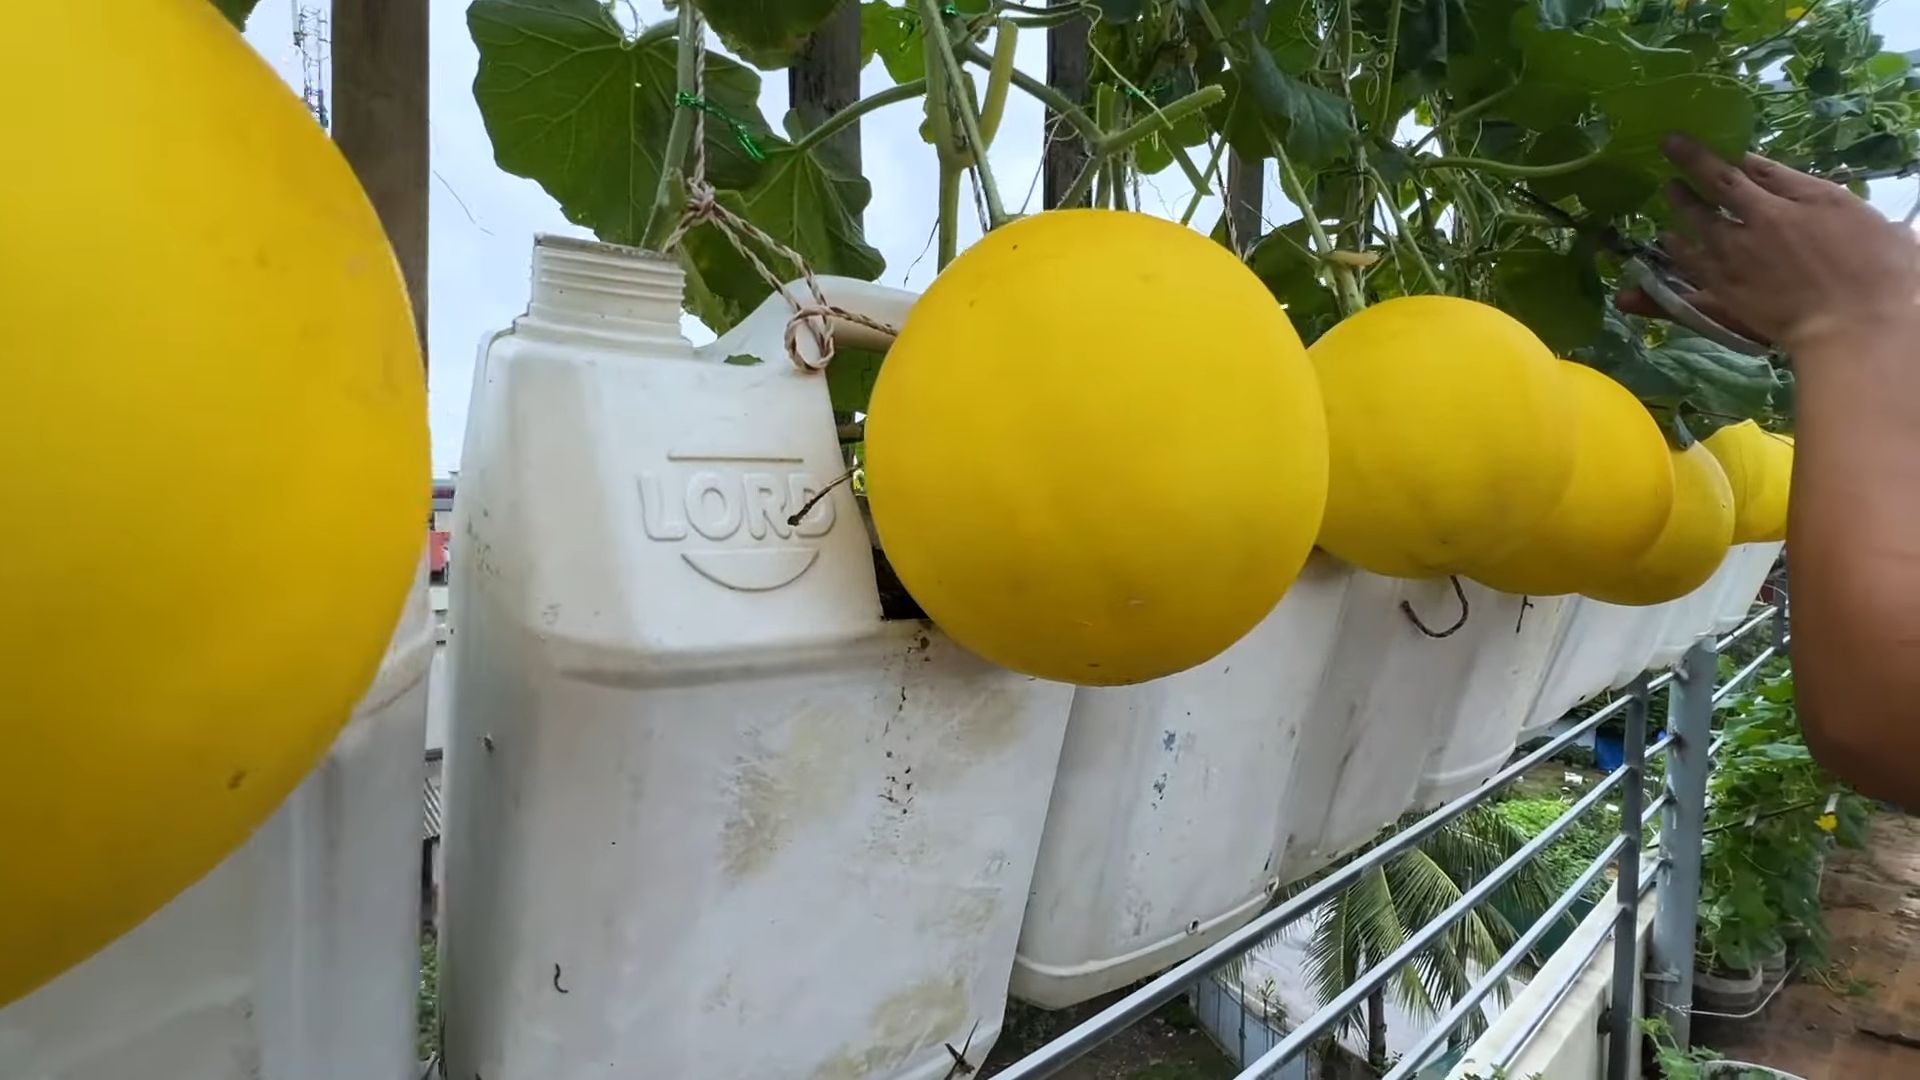
But don’t just take our word for it. The real magic happens when you try it yourself. Experiment with different materials for your DIY melon support system. Perhaps you’ll find that using recycled plastic containers works even better than the burlap sacks we suggested. Maybe you’ll discover that adding a layer of reflective material around the base of the plant further enhances sunlight exposure. The possibilities are endless!
Consider these variations to tailor the technique to your specific needs and environment:
* Vertical Gardening: If space is limited, adapt this method for vertical gardening. Train your melon vines to climb a trellis or fence, using the DIY support system to cradle the developing fruits. This is particularly effective for smaller melon varieties like cantaloupe.
* Climate Control: In cooler climates, consider using clear plastic sheeting instead of burlap to create a mini-greenhouse effect. This will trap heat and protect your plants from frost. Remember to ventilate the enclosure on warm days to prevent overheating.
* Pest Deterrent: Incorporate natural pest repellents into your DIY setup. For example, plant marigolds around the base of your melon plants to deter nematodes and other soil-borne pests. You can also sprinkle diatomaceous earth around the plants to control crawling insects.
* Nutrient Boost: Enhance the nutrient supply to your melon plants by adding compost tea or diluted liquid fertilizer to the watering schedule. This will provide them with the essential nutrients they need to produce large, juicy fruits.
We are confident that this DIY trick will revolutionize your melon-growing experience. It’s a cost-effective, eco-friendly, and incredibly rewarding way to ensure a bountiful harvest.
Now, it’s your turn! We encourage you to try this method in your own garden and share your results with us. Post pictures of your thriving melon plants and juicy harvests on social media, using the hashtag #DIYMelonMagic. Let’s create a community of melon enthusiasts who are passionate about growing their own delicious, homegrown fruit. We can’t wait to see what you create! Remember, the key to success is experimentation and adaptation. Don’t be afraid to tweak the method to suit your specific needs and environment. Happy gardening, and may your melons be sweet and juicy! This method is a game changer for anyone looking to grow juicy melons with ease.
Frequently Asked Questions (FAQ)
Q: What type of melons does this DIY trick work best for?
A: This DIY trick is versatile and can be used for a wide variety of melon types, including watermelon, cantaloupe, honeydew, and even smaller varieties like Galia melons. The key is to adjust the size and strength of the support system to accommodate the weight of the developing fruit. For larger watermelons, you’ll need a more robust support system than you would for smaller cantaloupes. The principles remain the same: providing support, protecting the fruit from ground contact, and optimizing sunlight exposure.
Q: How often should I water my melon plants when using this DIY trick?
A: Watering frequency depends on several factors, including your climate, soil type, and the stage of growth of your melon plants. As a general rule, water deeply and infrequently, allowing the soil to dry out slightly between waterings. During hot, dry weather, you may need to water more frequently. Check the soil moisture by sticking your finger about an inch into the soil. If it feels dry, it’s time to water. Avoid overwatering, as this can lead to root rot and other problems. When watering, focus on the base of the plant, avoiding wetting the foliage as much as possible to prevent fungal diseases.
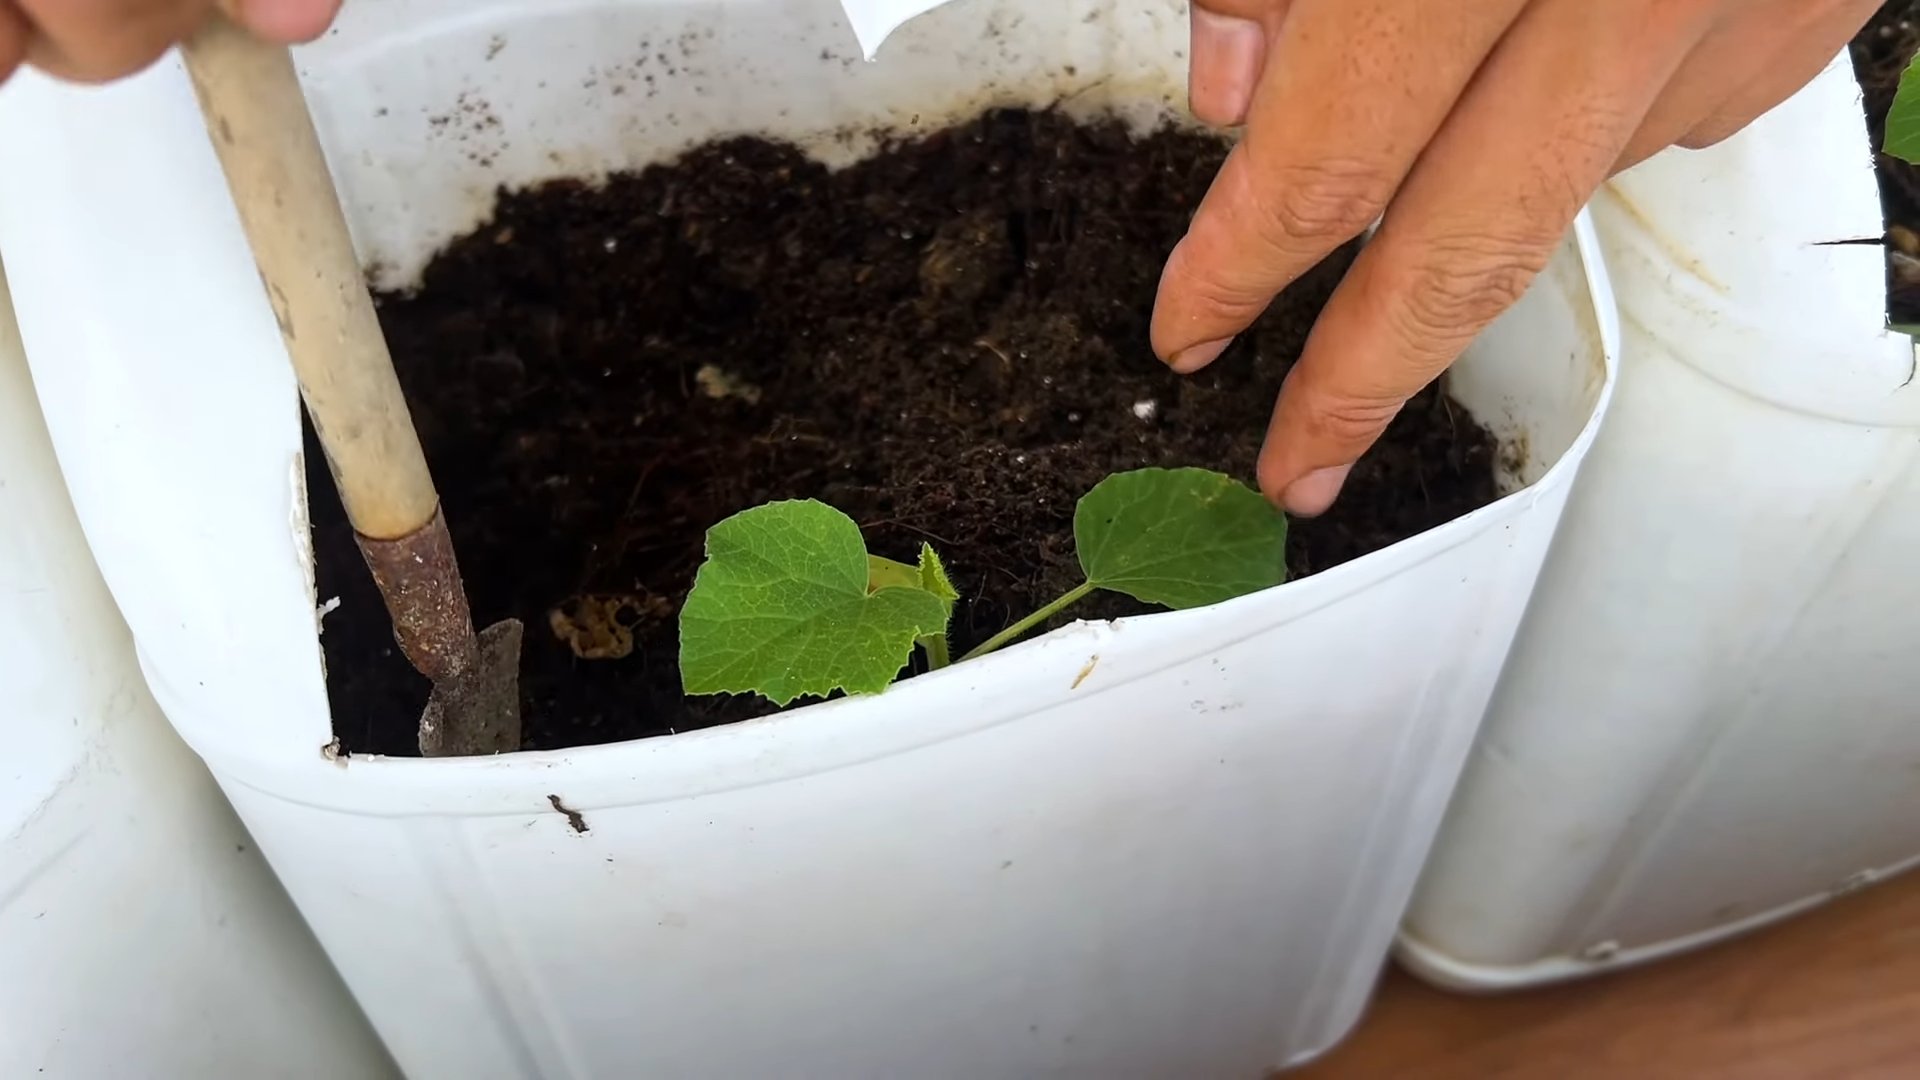
Q: Can I use this DIY trick in a container garden?
A: Absolutely! This DIY trick is easily adaptable for container gardening. Choose a large container with good drainage and use a high-quality potting mix. You may need to adjust the size and design of the support system to fit the container. For example, you could use a smaller burlap sack or even a piece of netting to cradle the developing fruit. Make sure the container is placed in a sunny location and water regularly. Container-grown melons may require more frequent watering and fertilization than those grown in the ground.
Q: What if I don’t have burlap sacks? What else can I use for the support system?
A: Burlap sacks are a great option because they are breathable and allow for good air circulation, but you can definitely use alternatives. Old t-shirts, pillowcases, or even strong netting can work well. The key is to choose a material that is strong enough to support the weight of the melon and that allows for good air circulation to prevent moisture buildup. You can also use recycled plastic containers, cutting them to size and creating a cradle for the fruit. Get creative and experiment with different materials to see what works best for you.
Q: How do I know when my melons are ripe and ready to harvest?
A: Determining ripeness varies slightly depending on the type of melon. Here are some general guidelines:
* Watermelon: Look for a dull, rather than shiny, rind. The underside of the melon (where it rests on the ground) should be a creamy yellow color. Thump the melon; a ripe watermelon will sound hollow.
* Cantaloupe: The melon should have a sweet aroma, and the stem should slip easily from the vine with a gentle tug. The rind should have a golden hue.
* Honeydew: The rind should be a creamy white color, and the blossom end should be slightly soft to the touch. The melon should have a slightly sweet aroma.
Remember that experience is the best teacher. As you grow more melons, you’ll become more adept at recognizing the signs of ripeness.
Q: My melon plants are attracting pests. What can I do?
A: Pests can be a challenge when growing melons, but there are several things you can do to protect your plants:
* Companion Planting: Plant marigolds, nasturtiums, or other pest-repelling plants around your melon plants.
* Neem Oil: Apply neem oil to your plants to control aphids, whiteflies, and other common pests.
* Insecticidal Soap: Use insecticidal soap to kill soft-bodied insects.
* Row Covers: Cover your plants with row covers to protect them from pests, especially during the early stages of growth.
* Handpicking: Regularly inspect your plants and handpick any pests you find.
* Diatomaceous Earth: Sprinkle diatomaceous earth around your plants to control crawling insects.
Q: Can I reuse the materials from the DIY support system for future melon crops?
A: Yes, absolutely! The materials you use for the DIY support system can be reused for future melon crops, provided they are still in good condition. Clean the materials thoroughly after each season to remove any dirt, debris, or potential pathogens. Store them in a dry place until you’re ready to use them again. This makes the DIY trick even more cost-effective and environmentally friendly.
Q: What kind of fertilizer is best for melon plants?
A: Melon plants are heavy feeders and benefit from regular fertilization. Use a balanced fertilizer with a slightly higher phosphorus content to promote fruit development. You can also supplement with compost tea or diluted liquid fertilizer. Avoid over-fertilizing, as this can lead to excessive foliage growth at the expense of fruit production. Follow the instructions on the fertilizer label carefully.
Q: How much sunlight do melon plants need?
A: Melon plants need at least 6-8 hours of direct sunlight per day to thrive. Choose a sunny location in your garden for planting. If you live in a particularly hot climate, you may need to provide some afternoon shade to prevent the plants from overheating.
We hope these FAQs have answered your questions about growing juicy melons using this DIY trick. Remember to experiment, adapt, and have fun! Happy gardening!
Leave a Comment