
Soil-Free Potato Growing: Imagine harvesting a bounty of delicious potatoes without ever getting your hands dirty! Sounds like a dream, right? Well, it’s not! This DIY guide will unlock the secrets to growing potatoes in a completely soil-free environment, a method that’s surprisingly simple and incredibly rewarding.
While traditional potato farming has fed civilizations for centuries, with roots tracing back to the Andes mountains, modern innovations are constantly pushing the boundaries of what’s possible. This soil-free method isn’t just a trendy experiment; it’s a practical solution for urban gardeners, those with limited space, or anyone looking for a cleaner, more controlled growing experience. Think of it as a modern twist on ancient agricultural practices!
Why should you ditch the dirt and embrace soil-free potato growing? Because it offers a multitude of benefits! You’ll minimize pests and diseases, eliminate the need for constant weeding, and enjoy a potentially higher yield in a smaller space. Plus, it’s a fantastic way to recycle materials and reduce your environmental footprint. I’m excited to share these easy-to-follow steps that will have you harvesting your own homegrown potatoes in no time. Let’s get started!
Growing Potatoes Without Soil: A Fun and Easy DIY Project!
Hey there, fellow gardening enthusiasts! Ever thought about growing potatoes without getting your hands dirty in soil? It sounds crazy, right? But trust me, it’s totally doable and a super fun experiment. I’m going to walk you through how to grow potatoes in a container using just water and some simple supplies. Get ready to be amazed!
What You’ll Need
Before we dive in, let’s gather everything we need. This will make the whole process smoother and more enjoyable.
* Seed Potatoes: These are potatoes specifically grown for planting. You can find them at your local garden center or online. Look for varieties that are known to do well in containers. I personally love using Yukon Gold or Red Pontiac.
* A Large Container: We’re talking big! A 5-gallon bucket or a large storage tote will work perfectly. Make sure it’s opaque to prevent algae growth.
* Water: Tap water is fine, but if your water is heavily chlorinated, let it sit out for 24 hours before using it.
* Nutrient Solution: This is crucial for feeding your potatoes since they won’t be getting nutrients from soil. I recommend a hydroponic nutrient solution specifically formulated for vegetables. You can find these at hydroponics stores or online.
* Air Pump and Air Stone: These are essential for oxygenating the water, which is vital for healthy root growth. A small aquarium air pump and air stone will do the trick.
* Net Pots or Small Plastic Containers: These will hold your seed potatoes and allow the roots to grow down into the water.
* Clay Pebbles or Hydroton: These provide support for the seed potatoes in the net pots and allow for good drainage.
* Dark Cloth or Opaque Cover: To wrap around the container to prevent light from reaching the water and encouraging algae growth.
* pH Meter (Optional but Recommended): To monitor the pH of the water. Potatoes prefer a slightly acidic pH of around 5.5 to 6.5.
* pH Up and pH Down Solutions (Optional): To adjust the pH of the water if needed.
Preparing Your Seed Potatoes
Okay, now that we have our supplies, let’s get those seed potatoes ready for their soil-free adventure!
* Chitting (Sprouting): This step is optional but highly recommended. It gives your potatoes a head start. Place your seed potatoes in a cool, bright location for a few weeks until they develop small, green sprouts (eyes). You can put them in an egg carton or a tray.
* Cutting (If Necessary): If your seed potatoes are large, you can cut them into smaller pieces, making sure each piece has at least one or two “eyes” or sprouts. Let the cut surfaces dry for a day or two to prevent rotting.
Setting Up Your Hydroponic Potato Container
This is where the magic happens! We’re going to create the perfect environment for our potatoes to thrive.
1. Prepare the Container: Clean your container thoroughly with soap and water to remove any dirt or debris.
2. Drill Holes (If Needed): If your container doesn’t have drainage holes, drill a few small holes near the bottom. This is important for preventing waterlogging.
3. Place Net Pots: Position the net pots or small plastic containers on top of the container. You can use a lid with holes cut out to hold them in place, or simply rest them on the rim of the container. Make sure the bottom of the net pots will be submerged in the water.
4. Add Clay Pebbles: Fill the net pots with clay pebbles or hydroton. This will provide support for the seed potatoes and allow for good drainage.
5. Position Seed Potatoes: Place your sprouted seed potatoes in the net pots, with the sprouts pointing upwards. Gently nestle them into the clay pebbles.
6. Set Up Air Pump and Air Stone: Place the air stone at the bottom of the container and connect it to the air pump with the tubing. Plug in the air pump. You should see bubbles rising in the water. This is crucial for oxygenating the water and preventing root rot.
7. Prepare Nutrient Solution: Follow the instructions on your hydroponic nutrient solution to mix it with water. Start with a diluted solution and gradually increase the concentration as the plants grow.
8. Fill the Container: Carefully pour the nutrient solution into the container until it reaches just below the bottom of the net pots. You want the roots to be able to reach the water, but you don’t want the seed potatoes to be completely submerged.
9. Cover the Container: Wrap the container with a dark cloth or opaque cover to prevent light from reaching the water. This will help prevent algae growth.
Caring for Your Soil-Free Potato Plants
Now that everything is set up, it’s time to nurture your potato plants and watch them grow!
1. Monitor Water Level: Check the water level regularly and add more nutrient solution as needed. The water level should always be just below the bottom of the net pots.
2. Check pH (Optional but Recommended): Use your pH meter to check the pH of the water regularly. Aim for a pH of around 5.5 to 6.5. If the pH is too high, add a small amount of pH down solution. If the pH is too low, add a small amount of pH up solution.
3. Change Nutrient Solution: Change the nutrient solution every 2-3 weeks to prevent nutrient buildup and maintain optimal growing conditions.
4. Provide Light: Place your container in a location that receives at least 6-8 hours of sunlight per day. If you don’t have enough natural light, you can supplement with grow lights.
5. Monitor for Pests and Diseases: Keep an eye out for any signs of pests or diseases. If you notice any problems, take action immediately. You can use organic pest control methods or consult with your local garden center for advice.
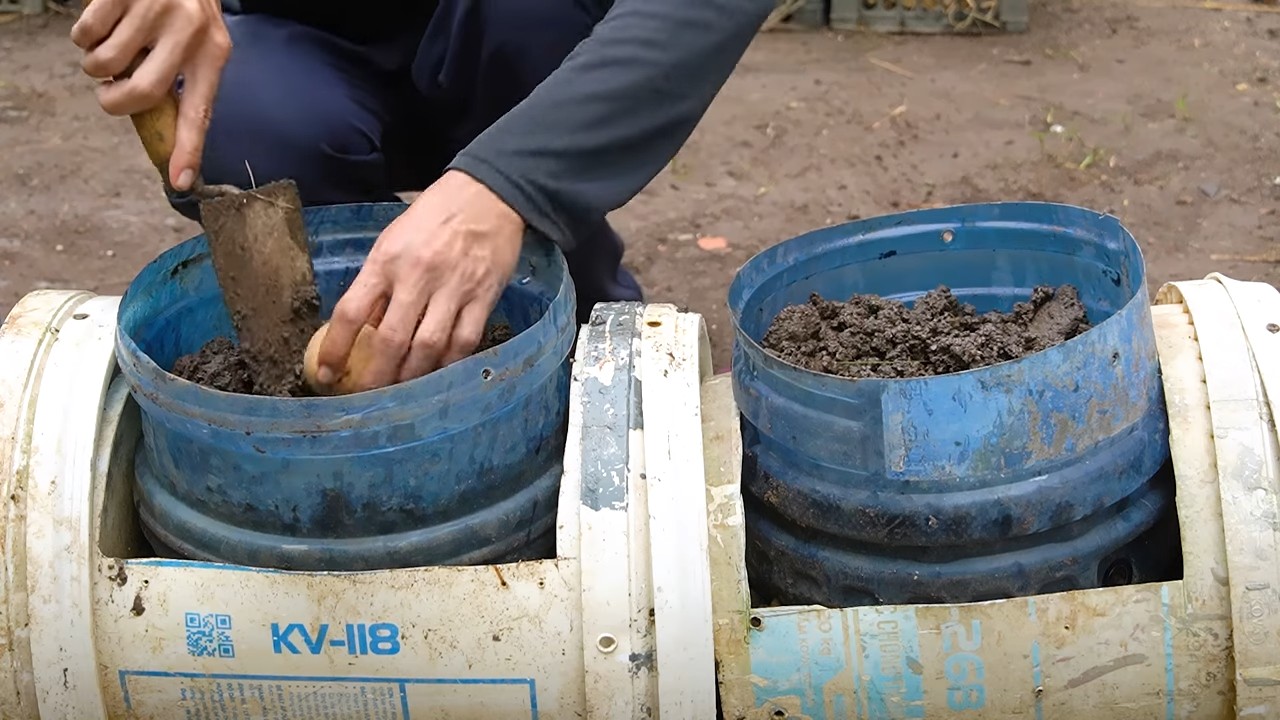
6. Hilling (Simulated): As the potato plants grow taller, you can simulate “hilling” by adding more clay pebbles to the net pots to support the stems and encourage more potato production. This is similar to how you would mound soil around the stems of potatoes grown in the ground.
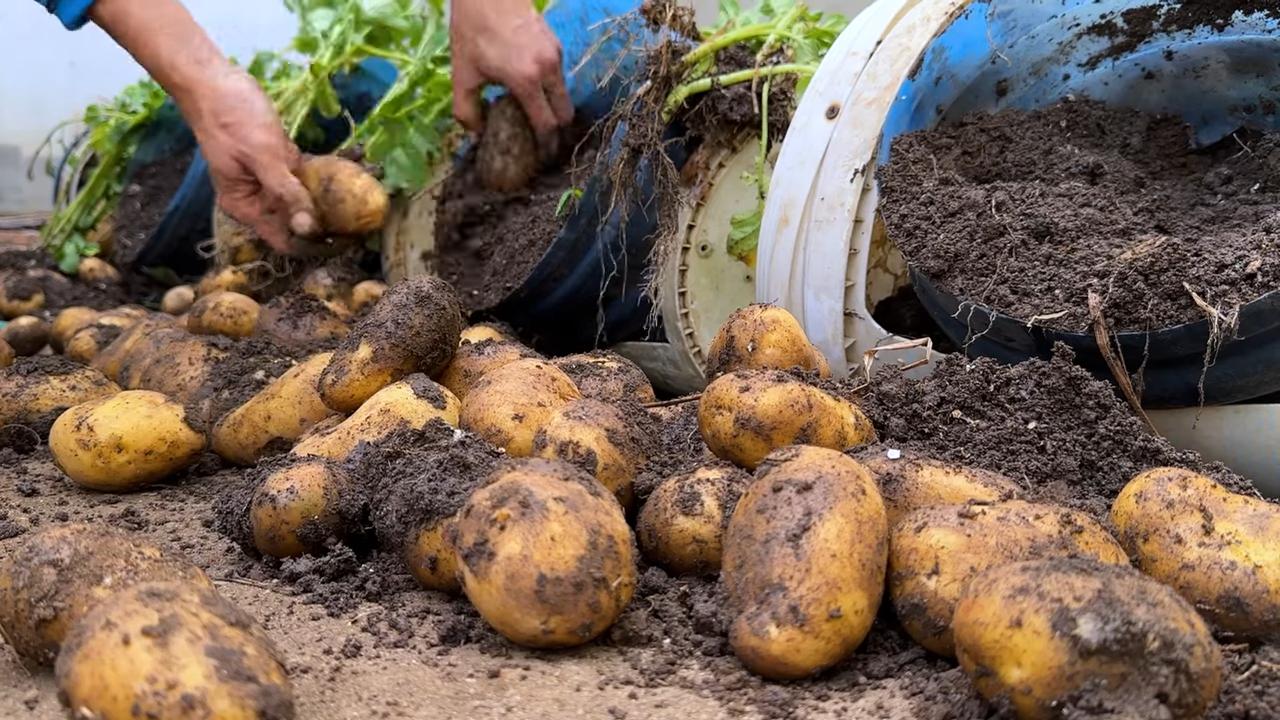
Harvesting Your Soil-Free Potatoes
The most exciting part! After a few months, your potato plants will be ready to harvest.
1. Signs of Maturity: The potato plants will start to flower, and the foliage will begin to yellow and die back. This is a sign that the potatoes are ready to harvest.
2. Harvesting: Carefully remove the potato plants from the container. You should find potatoes growing along the roots in the water. Gently pull the potatoes off the roots.
3. Curing: After harvesting, cure your potatoes by placing them in a cool, dark, and well-ventilated location for a week or two. This will help them develop a thicker skin and improve their storage life.
Troubleshooting Tips
Even with the best planning, sometimes things can go wrong. Here are a few common issues you might encounter and how to fix them:
* Algae Growth: If you notice algae growing in the water, it means light is getting in. Make sure your container is completely covered with a dark cloth or opaque cover. You can also add a small amount of hydrogen peroxide to the water to kill the algae.
* Root Rot: Root rot is caused by a lack of oxygen in the water. Make sure your air pump and air stone are working properly and providing adequate aeration. You can also add a small amount of hydrogen peroxide to the water to kill the bacteria that cause root rot.
* Nutrient Deficiencies: If your potato plants are showing signs of nutrient deficiencies, such as yellowing leaves or stunted growth, it means they’re not getting enough nutrients. Make sure you’re using a hydroponic nutrient solution specifically formulated for vegetables and that you’re following the instructions on the label. You may also need to adjust the pH of the water.
* Pests and Diseases: Keep a close eye on your potato plants for any signs of pests or diseases. If you notice any problems, take action immediately. You can use organic pest control methods or consult with your local garden center for advice.
Why Grow Potatoes Without Soil?
You might be wondering, why go through all this trouble to grow potatoes without soil? Well, there are several advantages:
* No Weeding: You don’t have to worry about weeding!
* Less Mess: It’s a cleaner and less messy way to grow potatoes.
* Space-Saving: You can grow potatoes in a small space, even on a balcony or patio.
* Fun and Educational: It’s a fun and educational project for kids and adults alike.
* Control Over Nutrients: You have complete control over the nutrients your potatoes receive, which can result in higher yields and better-tasting potatoes.
So,
Conclusion
So, there you have it! Soil-free potato growing – a revolutionary method that unlocks a world of possibilities for gardeners of all levels. From space-saving solutions for urban dwellers to a cleaner, more controlled environment for seasoned cultivators, this technique offers a compelling alternative to traditional in-ground planting. We’ve explored the simplicity and efficiency of growing potatoes without soil, highlighting the benefits of reduced pest pressure, easier harvesting, and the sheer joy of witnessing vibrant growth in a soilless medium.
This isn’t just a gardening fad; it’s a practical and sustainable approach that can significantly enhance your potato-growing experience. Imagine harvesting a bountiful crop of perfectly clean potatoes, free from the dirt and grime often associated with traditional methods. Think of the convenience of monitoring and adjusting nutrient levels with precision, ensuring optimal growth and minimizing waste. And consider the satisfaction of knowing you’re employing a method that’s both environmentally friendly and incredibly rewarding.
But the beauty of soil-free potato growing lies not only in its practicality but also in its adaptability. Feel free to experiment with different growing mediums. While perlite and vermiculite are excellent choices, you could also explore coco coir, rice hulls, or even a combination of these materials. Each medium offers unique properties that can influence drainage, aeration, and nutrient retention, allowing you to tailor your growing environment to your specific needs and preferences.
Furthermore, don’t be afraid to get creative with your container choices. While buckets and bins are popular options, you could also repurpose old tires, plastic crates, or even build your own custom containers. The key is to ensure adequate drainage and sufficient space for the potato plants to develop a healthy root system.
Consider also the variety of potatoes you choose to grow. While some varieties may be better suited to soil-free growing than others, most potatoes will thrive in this environment with proper care and attention. Experiment with different types to discover your favorites and optimize your yields. From classic russets to colorful fingerlings, the possibilities are endless.
We strongly encourage you to embrace this innovative approach and embark on your own soil-free potato growing adventure. It’s a surprisingly simple and incredibly rewarding experience that will transform the way you think about potato cultivation.
And now, we want to hear from you! Have you tried growing potatoes without soil? What were your experiences? What challenges did you face, and what successes did you achieve? Share your tips, tricks, and insights in the comments below. Let’s build a community of soil-free potato enthusiasts and learn from each other’s experiences. Your feedback is invaluable and will help us refine and improve this guide for future gardeners. So, get your hands dirty (or rather, not dirty!), and let’s grow some amazing potatoes together!
Frequently Asked Questions (FAQ)
What exactly is soil-free potato growing, and why should I consider it?
Soil-free potato growing, also known as hydroponic or soilless potato cultivation, is a method of growing potatoes without using traditional soil. Instead, the plants are grown in a nutrient-rich solution or a soilless medium like perlite, vermiculite, or coco coir. This method offers several advantages, including reduced pest and disease pressure, easier harvesting, better control over nutrient levels, and the ability to grow potatoes in limited spaces, such as balconies or patios. It’s a great option for urban gardeners, those with poor soil quality, or anyone looking for a cleaner and more efficient way to grow potatoes.
What kind of container should I use for soil-free potato growing?
The ideal container for soil-free potato growing should be large enough to accommodate the developing tubers and have adequate drainage. A 5-gallon bucket is a good starting point, but larger containers, such as bins or grow bags, may be necessary for certain potato varieties or if you plan to grow multiple plants in the same container. Ensure the container has drainage holes to prevent waterlogging, which can lead to root rot. You can also repurpose items like old tires or plastic crates, as long as they are clean and provide sufficient drainage and space.
What growing medium is best for soil-free potato growing?
Several growing mediums are suitable for soil-free potato growing. Perlite and vermiculite are popular choices due to their excellent drainage and aeration properties. Coco coir is another good option, as it retains moisture well and provides a good balance of aeration and water retention. You can also use a mix of these mediums to create a custom blend that suits your specific needs. Experiment with different mediums to see which one works best for you and your growing environment.
How often should I water and fertilize my soil-free potato plants?
Watering and fertilization are crucial for successful soil-free potato growing. The frequency of watering will depend on the growing medium, the size of the container, and the environmental conditions. Generally, you should water when the top inch of the growing medium feels dry to the touch. Avoid overwatering, as this can lead to root rot. Use a balanced, water-soluble fertilizer specifically formulated for potatoes or vegetables. Follow the manufacturer’s instructions for dosage and frequency. Monitor your plants closely and adjust the fertilizer levels as needed based on their growth and appearance.
What kind of light do soil-free potato plants need?
Potato plants need plenty of sunlight to thrive. Aim for at least 6-8 hours of direct sunlight per day. If you are growing your potatoes indoors, you may need to supplement with artificial grow lights. LED grow lights are a good option, as they are energy-efficient and provide the full spectrum of light that plants need for photosynthesis. Position the grow lights close enough to the plants to provide adequate light intensity, but not so close that they burn the leaves.
How do I “hill” potatoes when growing them without soil?
“Hilling” in traditional potato growing involves covering the developing stems with soil to encourage more tuber formation. In soil-free growing, you can achieve a similar effect by gradually adding more growing medium to the container as the plants grow taller. This will encourage the formation of more tubers along the buried stems. Be careful not to bury the leaves, as this can inhibit photosynthesis.
How do I know when my soil-free potatoes are ready to harvest?
The time it takes for potatoes to mature will vary depending on the variety and growing conditions. Generally, potatoes are ready to harvest when the foliage begins to turn yellow and die back. You can also gently dig around the base of the plant to check the size and maturity of the tubers. If the potatoes are the size you desire and the skins are firm, they are ready to harvest.
What are some common problems I might encounter when growing potatoes without soil, and how can I prevent them?
Some common problems you might encounter include nutrient deficiencies, pest infestations, and root rot. To prevent nutrient deficiencies, use a balanced fertilizer and monitor your plants closely for signs of yellowing leaves or stunted growth. To prevent pest infestations, inspect your plants regularly for pests and take appropriate action, such as using insecticidal soap or neem oil. To prevent root rot, ensure adequate drainage and avoid overwatering.
Can I grow different varieties of potatoes using the soil-free method?
Yes, you can grow different varieties of potatoes using the soil-free method. Experiment with different types to discover your favorites and optimize your yields. From classic russets to colorful fingerlings, the possibilities are endless. Keep in mind that some varieties may be better suited to soil-free growing than others, so do some research before you start.
Is soil-free potato growing more sustainable than traditional methods?
Soil-free potato growing can be more sustainable than traditional methods in several ways. It reduces the need for pesticides and herbicides, as the plants are grown in a more controlled environment. It also conserves water, as the nutrient solution can be recycled. Additionally, it reduces soil erosion and degradation, as the plants are not grown in soil. However, the sustainability of soil-free growing depends on the energy used to produce the growing medium and the fertilizer.
Leave a Comment